Simplex Yard Shunter

A place for discussing battery-electric locomotives, whether they're diesel, steam or even electric outline
User avatar
Old Man Aaron
Trainee Driver
Trainee Driver
Posts: 808
Joined: Wed Oct 19, 2016 11:08 am
Location: Sunshine Coast QLD, Australia

Simplex Yard Shunter

Post by Old Man Aaron » Tue Nov 28, 2023 6:25 am

An unexpected spare week with nothing to do for the first time in years - and bored out of my mind - had me pulling out anything to fill in the time.
Worked on five different projects (starting three of them) over less than a week. Didn't finish anything, I usually work in bursts.

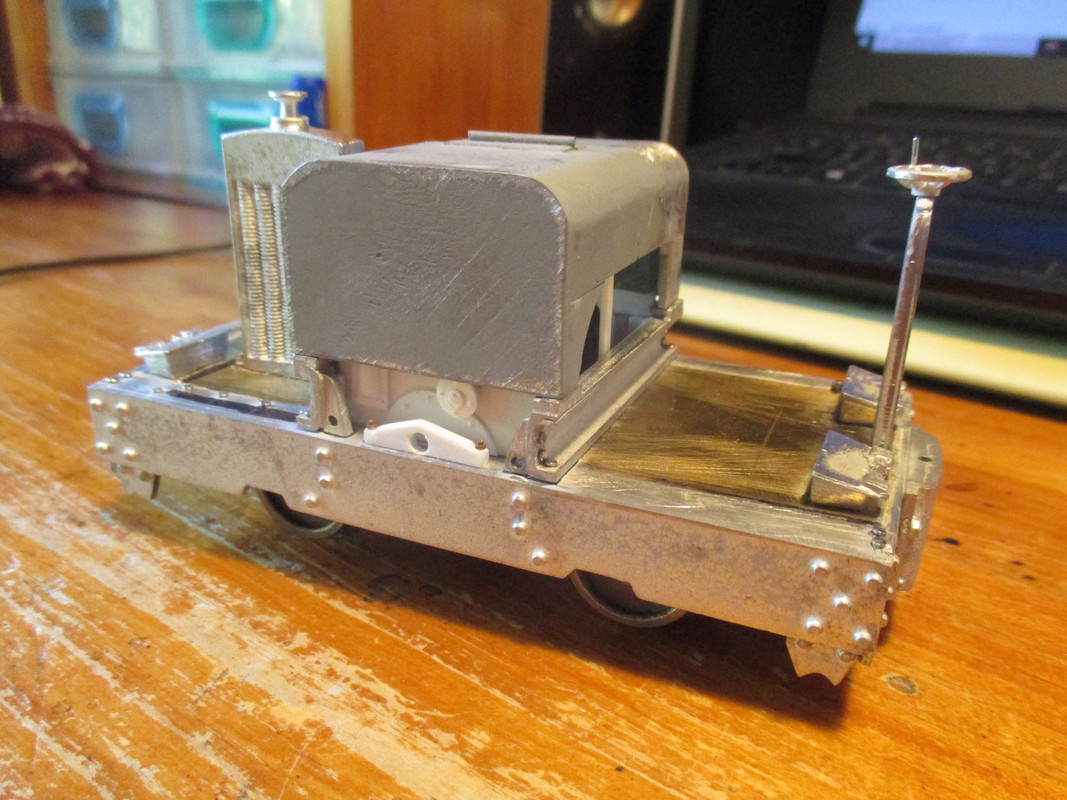
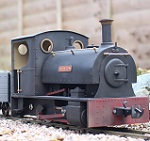
An IP Eng. Simplex kit was one of them. In time, this will be one of two shunters for my mill yard.
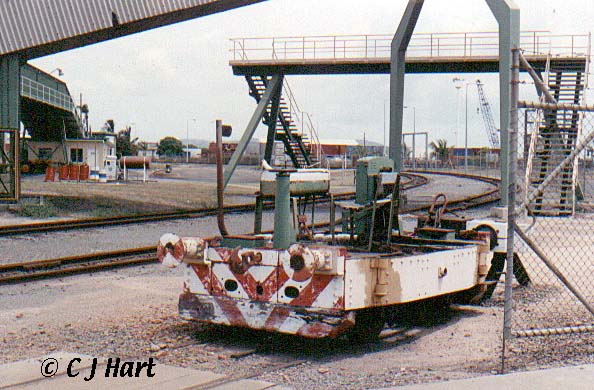
They were also used on navvy duties, a few having previously spent time on the Western Front. Here's a former (either) protected or armoured turtle, in use as a brake wagon in 1990! I don't know what became of it.

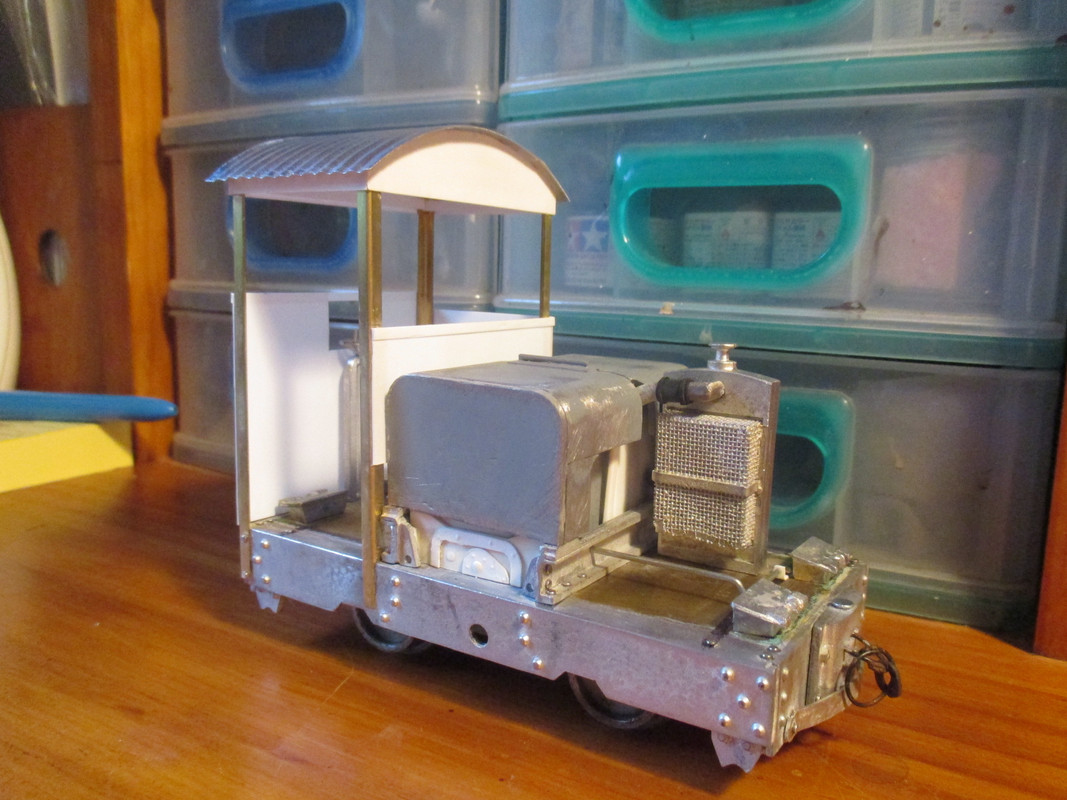
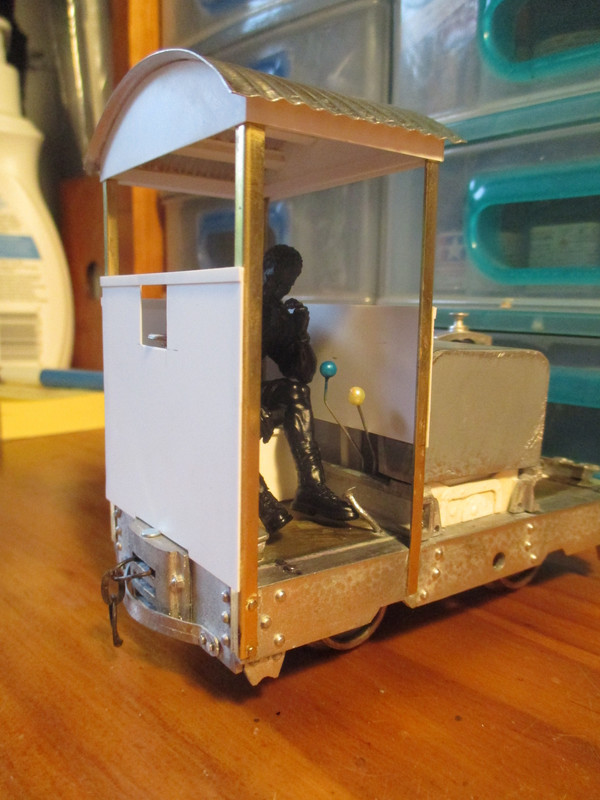
In any case, this 16mm kit will get a home-brew cab with headlights fore and aft, befitting a loco expected to work almost 24/7, rain or shine for the 6 month crushing season.

24/11/23
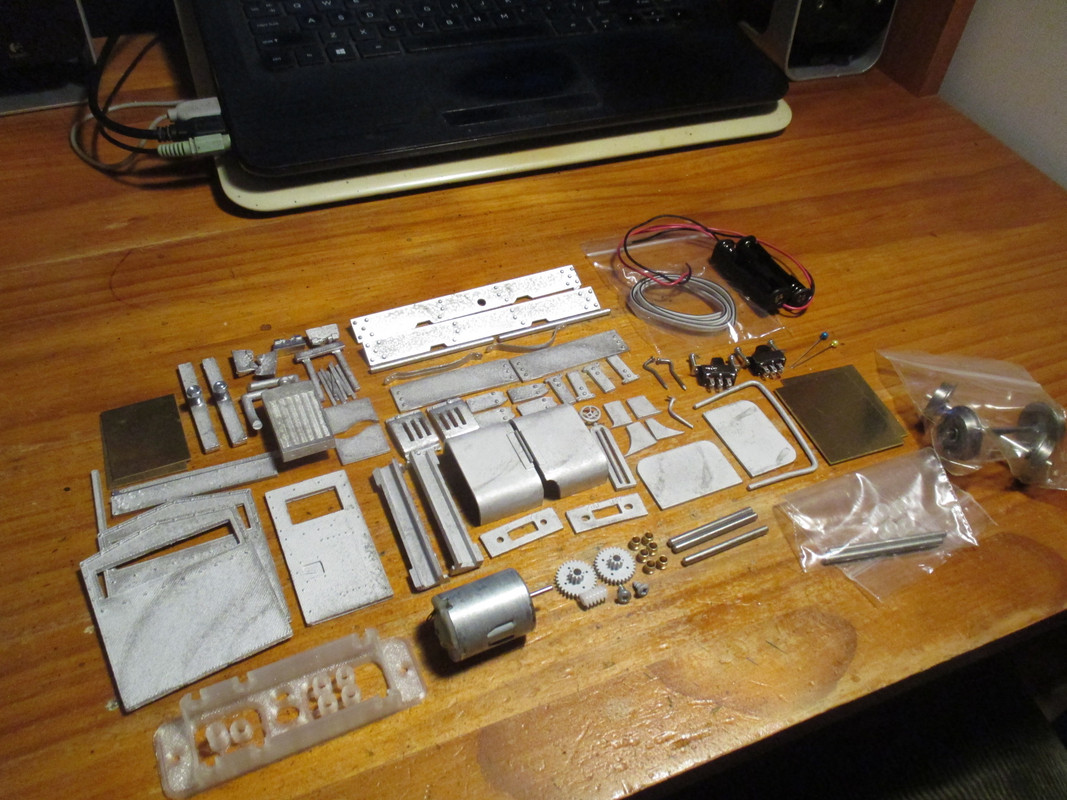
Starting with the customary "kit contents" image.
I was going to try soldering this kit together, even going so far as to have bought two different low-melt solders, a variable-temperature iron and a dedicated tip for said solder. I realised however that I had bought a 48W iron, and probably needed something much stronger for a 16mm whitemetal kit. So glue, it is.
Image


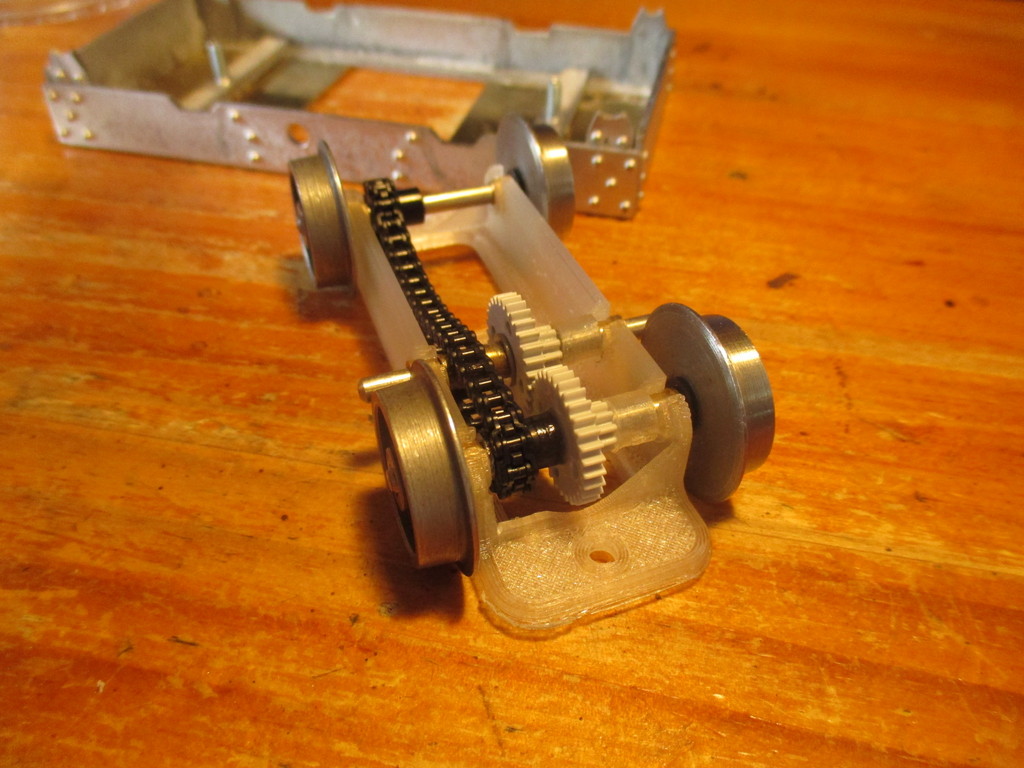
The chassis for these locos are 3D-printed nowadays, rather than the U-shaped steel chassis of the past. I think it's a good use of the technology.
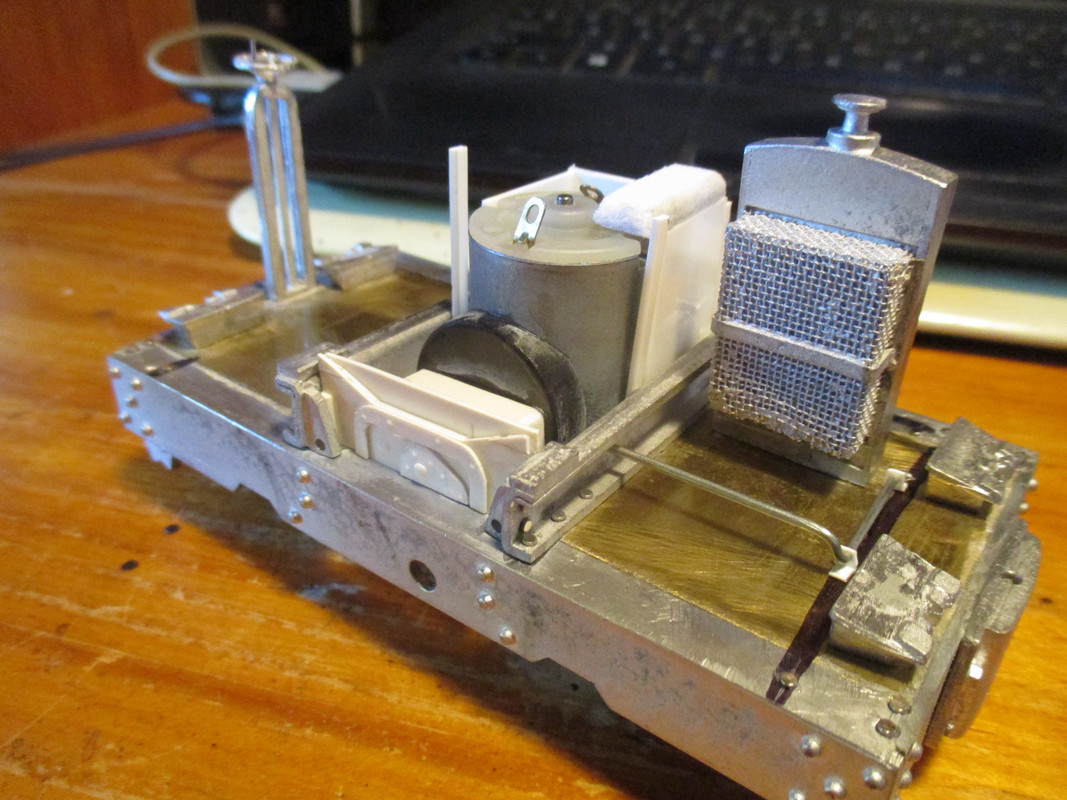
They take more work to convert to 4WD. The printed gussets at front and rear needed trimming to clear the added delrin sprockets.
And the printed jackshaft spacer was replaced with a thinner-walled brass tube to clear the chain running past. Not a complaint, just "wot I done".
Image


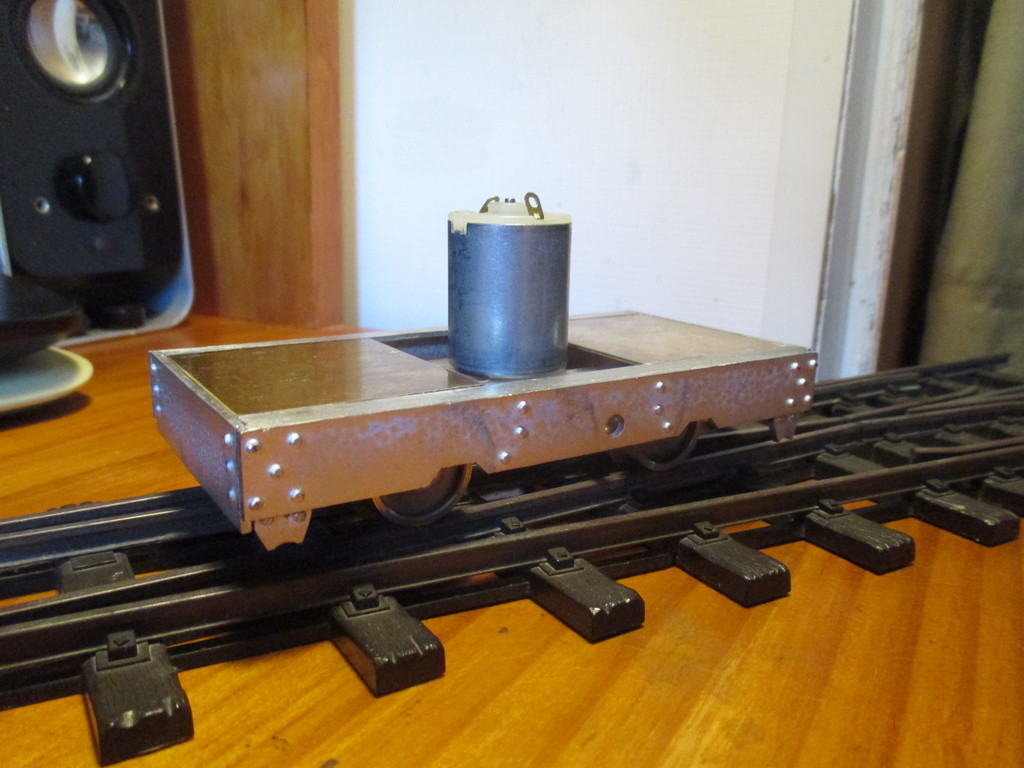
The frame castings needed minimal cleanup, mainly along the top edge of the frame plates where the mould halves were mis-aligned. Epoxy, tacked with superglue was used. Extra reinforcing with cheap 4mm ABS angle was later fitted over the joints.
With a little plastic-compatible grease on the gears and a touch of oil in the bushings, the chassis runs smoothly and reasonably quiet.
Image
Regards,
Aaron - Scum Class Works

User avatar
Peter Butler
Driver
Driver
Posts: 5245
Joined: Sun Sep 09, 2012 10:33 pm
Location: West Wales

Re: Simplex Yard Shunter

Post by Peter Butler » Tue Nov 28, 2023 10:42 am

Looks like a nice kit Aaron, I'll be watching with interest.
The best things in life are free.... so why am I doing this?

User avatar
Tropic Blunder
Trainee Fireman
Trainee Fireman
Posts: 189
Joined: Sun Dec 06, 2015 4:02 am
Location: Australia
Contact:

Re: Simplex Yard Shunter

Post by Tropic Blunder » Wed Nov 29, 2023 8:33 am

Will be watching this closely I've got the Phil Sharples kit to do a similar thing but the IP kit looks like a far better start. Does the Chassies feel like it'll have much grunt or will it be only good for a few trucks at a time?
Jake

Image

User avatar
Old Man Aaron
Trainee Driver
Trainee Driver
Posts: 808
Joined: Wed Oct 19, 2016 11:08 am
Location: Sunshine Coast QLD, Australia

Re: Simplex Yard Shunter

Post by Old Man Aaron » Thu Nov 30, 2023 10:35 am

You definitely need to add 4WD, otherwise it's "stationary rice puddings" and all that.

My Malcolm Moore uses a very similar IP chassis. (same wheelsets, bearings, motor and gearing, besides the extra 1:1 jackshaft of the Simplex)
It will comfortably move what the prototype might be expected to drag - in my case, I'd say its limit is 15-20 cane trucks or 3-5 bogey wagons of around 12" length.

All the weight in this whitemetal kit, I'd expect it could pull more still - though I'm not one to push things to their breaking point.

I've seen some beautiful results with those Sharples Simplexes in the 16mm Assoc. farcebook group, they just take some extra detailing.
Cambrian sells a Simplex detailing pack and radiator.
Only one side of the radiator is moulded, so one would need to order a pair and glue them back-to-back.
Dean goods supplies a "Simplex script" coupling, too.
These would improve either of our kits - For whatever reason, I never bought these, and wish I had.
Regards,
Aaron - Scum Class Works

User avatar
Old Man Aaron
Trainee Driver
Trainee Driver
Posts: 808
Joined: Wed Oct 19, 2016 11:08 am
Location: Sunshine Coast QLD, Australia

Re: Simplex Yard Shunter

Post by Old Man Aaron » Fri Dec 29, 2023 10:24 am

29/12/23
A bit (very) slow in writing this up, but it is what it is.
The bonnet sections were glued together and reinforced with thin plastic strip from behind. A coat of etch primer was applied before slapping Squadron putty on it, followed by sanding. I've left a few divots and marks in the castings (along with some light taps with a tiny hammer) to give the impression of dents and ripples in the prototype's thin sheet steel bonnet. We'll see how it looks once painted..

The sandboxes, handbrake and radiator were cleaned up, filled as needed and fitted. My usual pins provide extra rivet detail, if a little coarsely.
Image


Disguising the 3V motor proved a challenge. I didn't want to fill the spaces in the bonnet with mesh or black panels.
Poring over Simplex images online, I was eventually able to make filler panels and detailing from styrene and a bottle lid.
Power & headlight switches will be fitted either beneath the chassis, or in the cab. Not yet sure..
A linkage to the front sandboxes is has yet to be glued in place.

The styrene box around the motor crudely represents the two-cylinder diesel engine of the prototype, and is glued directly to the 3V motor. It will come away with the chassis if/when it is removed from the body for repair.
I will run the wiring for the motor and receiver through this box as well, the receiver to be fitted under the bonnet.
Image


Choosing a driver next, then will make his seat to suit. I can then design a home-built cab around that.
Regards,
Aaron - Scum Class Works

User avatar
Peter Butler
Driver
Driver
Posts: 5245
Joined: Sun Sep 09, 2012 10:33 pm
Location: West Wales

Re: Simplex Yard Shunter

Post by Peter Butler » Fri Dec 29, 2023 2:28 pm

Looking good Aaron, that will be a chunky beast.
The best things in life are free.... so why am I doing this?

User avatar
ge_rik
Administrator
Administrator
Posts: 6580
Joined: Sun Oct 25, 2009 10:20 pm
Location: Cheshire
Contact:

Re: Simplex Yard Shunter

Post by ge_rik » Fri Dec 29, 2023 3:07 pm

Looking good, Aaron.
You might need to extend the aerial out from under the bonnet otherwise its signal might get masked by the metal.

Rik
------------------------
Peckforton Light Railway - Blog Facebook Youtube

User avatar
dudeface
Fireman
Fireman
Posts: 295
Joined: Tue Nov 14, 2023 3:35 am
Location: Dodge Co. WI
Contact:

Re: Simplex Yard Shunter

Post by dudeface » Fri Dec 29, 2023 5:36 pm

Nice. :thumbup:
https://m.youtube.com/@Dudeface167
Miles-- Trains are fun. With the exception of track power. Argh!

User avatar
Old Man Aaron
Trainee Driver
Trainee Driver
Posts: 808
Joined: Wed Oct 19, 2016 11:08 am
Location: Sunshine Coast QLD, Australia

Re: Simplex Yard Shunter

Post by Old Man Aaron » Mon Jan 29, 2024 9:28 am

28/01/24
Over the past few weeks, a mostly-welded mill workshop cab has slowly come together. Still deciding on adding sliding windows..
Radiator hoses were added to the whitemetal pipe castings by way of heat shrink. Tiny slivers of the stuff were then cut with a razor blade, and shrunk in place to represent hose clamps. The lower pipe actually goes on the other side of the radiator.

The buffer bars across the couplings were rather painful to reshape and fit. Their cast-in mounting bolt detail was removed, and the bars drilled and pinned once glued onto the headstocks.
Image


A suitable driver had to be chosen before designing the cab around him. This well-detailed resin figure is having a ciggy.
I should have worked out where the clutch pedal had to go, and drilled the footplate before building the cab in place. But the pin vice got there in the end.
I quite like the supplied ball-ended sewing pins for use as gear and direction sticks.

For ease of use, I've replaced the usual coupling hooks with permanently-fitted chains. This will save me having to grab chains from the other end of a rake when shunting; Either end of the loco can just be hooked to whatever it's moving.

No nicely-made hump to clear the handbrake here, like you'd find on a Welsh loco - just a hole.
But it's tidy, and not hacked out with an oxy-acetylene. You can't ask a sugar mill for better than that. :lol:
Image
Last edited by Old Man Aaron on Thu Apr 11, 2024 6:02 am, edited 1 time in total.
Regards,
Aaron - Scum Class Works

User avatar
-steves-
Administrator
Administrator
Posts: 2444
Joined: Thu Jul 28, 2011 1:50 pm
Location: Cambridge & Peterborough

Re: Simplex Yard Shunter

Post by -steves- » Mon Jan 29, 2024 10:32 am

Other than some material, you wouldn't know where the kit ends and your additions start, a great job :thumbup:
The buck stops here .......

Ditton Meadow Light Railway (DMLR)
Member of Peterborough and District Association
http://peterborough.16mm.org.uk/

User avatar
Peter Butler
Driver
Driver
Posts: 5245
Joined: Sun Sep 09, 2012 10:33 pm
Location: West Wales

Re: Simplex Yard Shunter

Post by Peter Butler » Mon Jan 29, 2024 10:35 am

Another wonderfully adapted kit from Scum Class Works. You always go the extra mile, and it shows in the detailing.
The best things in life are free.... so why am I doing this?

User avatar
dudeface
Fireman
Fireman
Posts: 295
Joined: Tue Nov 14, 2023 3:35 am
Location: Dodge Co. WI
Contact:

Re: Simplex Yard Shunter

Post by dudeface » Mon Jan 29, 2024 5:22 pm

Looks terrific. :thumbright: The pins look great as levers, I'll remember that!
https://m.youtube.com/@Dudeface167
Miles-- Trains are fun. With the exception of track power. Argh!

User avatar
GAP
Trainee Driver
Trainee Driver
Posts: 690
Joined: Sun Dec 23, 2012 10:34 pm
Location: Bundaberg QLD Australia
Contact:

Re: Simplex Yard Shunter

Post by GAP » Mon Jan 29, 2024 9:46 pm

Some pictures of one made by F C Hibberd in 1959 that's in Bundaberg as a loco shunter that may help with painting ideas.
Planet.jpg
Planet.jpg (361.04 KiB) Viewed 2397 times
Planet 3.jpg
Planet 3.jpg (4.23 MiB) Viewed 2397 times
Planet 2.jpg
Planet 2.jpg (3.58 MiB) Viewed 2397 times
Planet 1.jpg
Planet 1.jpg (359.17 KiB) Viewed 2397 times
Graeme
From the home of the Ringbalin Light Railway
https://ringbalin-light-railway.blogspo ... -page.html

User avatar
Old Man Aaron
Trainee Driver
Trainee Driver
Posts: 808
Joined: Wed Oct 19, 2016 11:08 am
Location: Sunshine Coast QLD, Australia

Re: Simplex Yard Shunter

Post by Old Man Aaron » Tue Jan 30, 2024 5:43 am

Cheers gents!
GAP wrote: Mon Jan 29, 2024 9:46 pm Some pictures of one made by F C Hibberd in 1959 that's in Bundaberg as a loco shunter that may help with painting ideas.
Funny that, just about the livery I was planning on. 8)
Speaking of Bundaberg, I'm up to Maryborough in September, and plan on visiting ASCR while I'm around. Will be in touch..
Regards,
Aaron - Scum Class Works

User avatar
ge_rik
Administrator
Administrator
Posts: 6580
Joined: Sun Oct 25, 2009 10:20 pm
Location: Cheshire
Contact:

Re: Simplex Yard Shunter

Post by ge_rik » Tue Jan 30, 2024 9:35 am

That's interesting. Has it been fitted with a smaller engine and moved the radiator to under the bonnet?

Rik
------------------------
Peckforton Light Railway - Blog Facebook Youtube

User avatar
-steves-
Administrator
Administrator
Posts: 2444
Joined: Thu Jul 28, 2011 1:50 pm
Location: Cambridge & Peterborough

Re: Simplex Yard Shunter

Post by -steves- » Tue Jan 30, 2024 10:36 am

I am going to put a 12v car battery in the 3D files section, quite useful for projects like this. I just hope most people have some sort of access to a printer.

https://gardenrails.org/forum/viewtopic ... 55&t=14674
The buck stops here .......

Ditton Meadow Light Railway (DMLR)
Member of Peterborough and District Association
http://peterborough.16mm.org.uk/

User avatar
GAP
Trainee Driver
Trainee Driver
Posts: 690
Joined: Sun Dec 23, 2012 10:34 pm
Location: Bundaberg QLD Australia
Contact:

Re: Simplex Yard Shunter

Post by GAP » Tue Jan 30, 2024 7:49 pm

This is a 3D printed one I have been looking at.
https://www.thingiverse.com/thing:4844519
and one in On30
https://www.thingiverse.com/thing:4866417/files
Along with these I am thinking of making a scene for my extension in the shed of a small ore train running to a coal loader using an existing tunnel from the old HO layout as a mine entrance. I left the base running to it and as it was HO I'm leaning toward On30.
G scale
https://www.printables.com/en/model/244 ... son-u-skip
On 30
https://www.thingiverse.com/thing:4672778
Graeme
From the home of the Ringbalin Light Railway
https://ringbalin-light-railway.blogspo ... -page.html

User avatar
GAP
Trainee Driver
Trainee Driver
Posts: 690
Joined: Sun Dec 23, 2012 10:34 pm
Location: Bundaberg QLD Australia
Contact:

Re: Simplex Yard Shunter

Post by GAP » Tue Jan 30, 2024 7:54 pm

ge_rik wrote: Tue Jan 30, 2024 9:35 am That's interesting. Has it been fitted with a smaller engine and moved the radiator to under the bonnet?

Rik
It is powered by a small diesel engine which I think is air cooled, I've never noticed a radiator.
I'll check that out next Monday.
This is an old photo of it before restoration
Planet.jpg
Planet.jpg (518.29 KiB) Viewed 2264 times
Graeme
From the home of the Ringbalin Light Railway
https://ringbalin-light-railway.blogspo ... -page.html

User avatar
GAP
Trainee Driver
Trainee Driver
Posts: 690
Joined: Sun Dec 23, 2012 10:34 pm
Location: Bundaberg QLD Australia
Contact:

Re: Simplex Yard Shunter

Post by GAP » Mon Feb 05, 2024 1:34 am

As promised pictures of the motor, there is no radiator so presumably it is an air cooled diesel.

In mid picture is the decompression lever and down the bottom the crank handle slot.
Planet Engine Front.jpg
Planet Engine Front.jpg (2.89 MiB) Viewed 1995 times

The switch in lower part of picture is used once the engine is starting to fire.
Planet Engine Side.jpg
Planet Engine Side.jpg (2.21 MiB) Viewed 1995 times

Start sequence is;
Check kill lever is in run position it is being checked in top picture
Lift decompression lever
Crank 4-5 times or till engine sounds like it is starting to fire
Press switch and lower decompression lever.
The press switch is an electrical assist motor it can be used as a starter but is not really effective hence using the hand crank.
Graeme
From the home of the Ringbalin Light Railway
https://ringbalin-light-railway.blogspo ... -page.html

User avatar
dudeface
Fireman
Fireman
Posts: 295
Joined: Tue Nov 14, 2023 3:35 am
Location: Dodge Co. WI
Contact:

Re: Simplex Yard Shunter

Post by dudeface » Mon Feb 05, 2024 7:03 am

It's air cooled, the hollow thing with the fan in it is a cooling shroud.
https://m.youtube.com/@Dudeface167
Miles-- Trains are fun. With the exception of track power. Argh!

Post Reply

Who is online

Users browsing this forum: No registered users and 5 guests