Palmerston - Small England Loco as built

A place where discussions are about 3D printing.
Trevor Thompson
Trainee Driver
Trainee Driver
Posts: 978
Joined: Fri Oct 05, 2018 6:30 pm
Location: South West Wales

Re: Palmerston - Small England Loco as built

Post by Trevor Thompson » Fri Dec 08, 2023 1:13 pm

There have been a couple of updates to Anycubic's slicing software since I started building this locomotive - and I had another go at slicing the whole body as one piece - tanks, firebox and smokebox all in one part. This time it worked.

So I have placed the component on the bed at as much of an angle as I could. I tried to keep the "cab" sides as close to the bed as I could, and I used medium supports.

Well it worked! Here it is as it finishes printing:
IMG_3533.jpeg
IMG_3533.jpeg (2.4 MiB) Viewed 2692 times
That took 10 hours to print, and used quite a bit of resin. There are a couple of faults - but nothing that cant be repaired when it is fully cured. It has been washed - it only just fits into the tank, but it has yet to be cured properly. With the smaller printer I have got into the habit of curing things while they are still on the bed, but in this case it won't fit into the tank at all. So it was a rather messy business getting the whole thing free from the bed plate.

It is now drying before it is cured. I have noted that the resin is very flexible at this stage, and I have started to carefully remove some of the supports, the ones holding the detail in particular. As long as I can avoid breaking off the delicate bits it looks like a really good print. Apart from a slice missing from one side of the "cab" side, and a bit on the balance pipe which will need repairing:


IMG_3536.jpeg
IMG_3536.jpeg (1.44 MiB) Viewed 2692 times
IMG_3535.jpeg
IMG_3535.jpeg (1.75 MiB) Viewed 2692 times
Trevor

User avatar
-steves-
Administrator
Administrator
Posts: 2444
Joined: Thu Jul 28, 2011 1:50 pm
Location: Cambridge & Peterborough

Re: Palmerston - Small England Loco as built

Post by -steves- » Fri Dec 08, 2023 1:21 pm

Looking good so far :thumbup:
The buck stops here .......

Ditton Meadow Light Railway (DMLR)
Member of Peterborough and District Association
http://peterborough.16mm.org.uk/

User avatar
philipy
Moderator
Moderator
Posts: 5098
Joined: Sun Jan 30, 2011 3:00 pm
Location: South Northants

Re: Palmerston - Small England Loco as built

Post by philipy » Fri Dec 08, 2023 2:48 pm

That is looking really good.
I've found that secret to getting a big print off the bed is to use a magnetic flexible steel plate bed. Simply peel the plate from the magnetic sheet and flex it and it pops the print off.
Philip

Trevor Thompson
Trainee Driver
Trainee Driver
Posts: 978
Joined: Fri Oct 05, 2018 6:30 pm
Location: South West Wales

Re: Palmerston - Small England Loco as built

Post by Trevor Thompson » Fri Dec 08, 2023 7:52 pm

philipy wrote: Fri Dec 08, 2023 2:48 pm That is looking really good.
I've found that secret to getting a big print off the bed is to use a magnetic flexible steel plate bed. Simply peel the plate from the magnetic sheet and flex it and it pops the print off.
I will have to think about that - it would make life much easier.

Trevor

User avatar
philipy
Moderator
Moderator
Posts: 5098
Joined: Sun Jan 30, 2011 3:00 pm
Location: South Northants

Re: Palmerston - Small England Loco as built

Post by philipy » Fri Dec 08, 2023 9:35 pm

Trevor,
We did speak about this 12months ago :lol:
viewtopic.php?f=56&t=14146&p=171598&hil ... le#p171598

That was on my small Photon S, but when I got the big printer it was the first extra thing I bought and haven't regretted it for a second.
Philip

User avatar
SimonWood
Trainee Driver
Trainee Driver
Posts: 658
Joined: Tue Apr 07, 2015 9:46 pm
Location: West Wales
Contact:

Re: Palmerston - Small England Loco as built

Post by SimonWood » Sat Dec 09, 2023 8:32 am

I remember that! I considered getting a magnetic plate for mine. I didn't. Obviously a mistake! Although I have got better at prising the prints off since then - at the time I was having to use so much force they were snapping or flying off into forgotten corners of the shed...
Rheilffordd Moel Rhos: blog - photos - videos

User avatar
-steves-
Administrator
Administrator
Posts: 2444
Joined: Thu Jul 28, 2011 1:50 pm
Location: Cambridge & Peterborough

Re: Palmerston - Small England Loco as built

Post by -steves- » Sat Dec 09, 2023 9:01 am

I use one of these, works a treat every time.

https://www.amazon.co.uk/Blake-Bull-Scr ... 2b2ec0f142
scraper.png
scraper.png (289.45 KiB) Viewed 2635 times
The buck stops here .......

Ditton Meadow Light Railway (DMLR)
Member of Peterborough and District Association
http://peterborough.16mm.org.uk/

User avatar
philipy
Moderator
Moderator
Posts: 5098
Joined: Sun Jan 30, 2011 3:00 pm
Location: South Northants

Re: Palmerston - Small England Loco as built

Post by philipy » Sat Dec 09, 2023 10:06 am

Yes, I got one of those when you mentioned it before, Steve, and it is useful but I find I tend to scratch the ali bed with it.

I've just noticed on your two pics above that the surface of the print raft appears to have a dimpled top, not just from the support connections. Is there a particular reason and how do you do it, I haven't noticed it in Chitubox options/settings?
Philip

Trevor Thompson
Trainee Driver
Trainee Driver
Posts: 978
Joined: Fri Oct 05, 2018 6:30 pm
Location: South West Wales

Re: Palmerston - Small England Loco as built

Post by Trevor Thompson » Sat Dec 09, 2023 7:10 pm

philipy wrote: Sat Dec 09, 2023 10:06 am Yes, I got one of those when you mentioned it before, Steve, and it is useful but I find I tend to scratch the ali bed with it.

I've just noticed on your two pics above that the surface of the print raft appears to have a dimpled top, not just from the support connections. Is there a particular reason and how do you do it, I haven't noticed it in Chitubox options/settings?
The raft has a matrix of holes in it. It seems to be the standard raft in the latest version of Anycubic's slicing software. You can see it here:
Screenshot 2023-12-09 at 19.08.13.png
Screenshot 2023-12-09 at 19.08.13.png (86.73 KiB) Viewed 2587 times
It does help to get the raft off the bed - as well as saving a small amount of resin.

Trevor

Trevor Thompson
Trainee Driver
Trainee Driver
Posts: 978
Joined: Fri Oct 05, 2018 6:30 pm
Location: South West Wales

Re: Palmerston - Small England Loco as built

Post by Trevor Thompson » Sat Dec 09, 2023 7:26 pm

I have now got the body cleaned up and fully cured. I have also repaired the balance pipe under the front of the smokebox, and the handrail at the rear left hand side. I used resin for the repairs, cured it, and then added more resin. I added a small amount each time and built it up bit by bit. There is a bit more repairing and filing required but it seems to works a way of making good an otherwise usable print. When I drew this up I didn't leave enough of a gap between the body and the raised area of the footplate which the body fits over. That required lots of filing to get right. Still it is done - and the drawings modified in case I need to make another footplate (I am conscious that these parts are quite brittle and there is always the chance that I will break something). I have already had to replace a connecting rod. It wasn't too weak for the job - I just forgot it was hanging attached at one end when I picked it up. The body fitted to the footplate:
IMG_3540.jpeg
IMG_3540.jpeg (2.6 MiB) Viewed 2585 times
IMG_3539.jpeg
IMG_3539.jpeg (1.8 MiB) Viewed 2585 times
You can see that there is a slight step on the side of the water tank where the resin changes colour. It hasn't occurred anywhere else. I hope to hide it - but it might require a bit of judicious sanding. Half way through the print I added more resin, and it was a different make and colour. The body requires twice what the tank holds. I think the damage to the handrail and this step was caused by the resin running low. I knew I would have to refill it after 5 hours - and I almost forgot.


Trevor

Trevor Thompson
Trainee Driver
Trainee Driver
Posts: 978
Joined: Fri Oct 05, 2018 6:30 pm
Location: South West Wales

Re: Palmerston - Small England Loco as built

Post by Trevor Thompson » Sat Dec 09, 2023 7:33 pm

philipy wrote: Fri Dec 08, 2023 9:35 pm Trevor,
We did speak about this 12months ago :lol:
viewtopic.php?f=56&t=14146&p=171598&hil ... le#p171598

That was on my small Photon S, but when I got the big printer it was the first extra thing I bought and haven't regretted it for a second.
Somehow I had mentally linked this to the filament printer - although I can see you were describing a resin print. Will get one!

Trevor

User avatar
philipy
Moderator
Moderator
Posts: 5098
Joined: Sun Jan 30, 2011 3:00 pm
Location: South Northants

Re: Palmerston - Small England Loco as built

Post by philipy » Sat Dec 09, 2023 8:58 pm

At the risk of teaching granny, it is essential to get the build plate totally resin free before trying to attache the magnetic plate, which has 3M's adhesive on one side. I soaked mine in IPA overnight and then scrubbed it. Then dunked it in hot water to raise the temp to make sure the adhesive would soften slightly, and only once it was warm did I offer up the magnetic plate. Then I put it on a flat surface with a weight on top for 24 hours. It's given me no problems and has the added advantage that you can peel the mag plate off, complete with print, without needing to disturb the actual build plate mounting, so there's much less chance of disturbing the levelling or z-offset.

There is only thing you MIGHT need to be wary of and that depends on how your printer detects its Z height. Mine has a small black plastic projection that sticks down from the bottom of the head and goes down into a slot with a photo detector inside. The combined thickness of the flexible s/s plate plus the magnetic bed is greater than the amount of adjustment in the machine and it needs an inverted " h" shaped spacer that clips over the machine's own projection and just triggers the detector a couple of mm sooner. Takes 10 mins to print on the fdm m/c.
Philip

User avatar
dudeface
Fireman
Fireman
Posts: 295
Joined: Tue Nov 14, 2023 3:35 am
Location: Dodge Co. WI
Contact:

Re: Palmerston - Small England Loco as built

Post by dudeface » Sat Dec 09, 2023 11:43 pm

Looks nice. :thumbup:
https://m.youtube.com/@Dudeface167
Miles-- Trains are fun. With the exception of track power. Argh!

User avatar
philipy
Moderator
Moderator
Posts: 5098
Joined: Sun Jan 30, 2011 3:00 pm
Location: South Northants

Re: Palmerston - Small England Loco as built

Post by philipy » Sun Dec 10, 2023 7:20 am

Trevor Thompson wrote: Sat Dec 09, 2023 7:10 pm

The raft has a matrix of holes in it. It seems to be the standard raft in the latest version of Anycubic's slicing software. You can see it here:
Ahh, that probably explains it then, I use Chitubox not Anycubic, although I thought Steve also used Chitubox?
Philip

User avatar
-steves-
Administrator
Administrator
Posts: 2444
Joined: Thu Jul 28, 2011 1:50 pm
Location: Cambridge & Peterborough

Re: Palmerston - Small England Loco as built

Post by -steves- » Sun Dec 10, 2023 9:27 am

philipy wrote: Sun Dec 10, 2023 7:20 am
Trevor Thompson wrote: Sat Dec 09, 2023 7:10 pm

The raft has a matrix of holes in it. It seems to be the standard raft in the latest version of Anycubic's slicing software. You can see it here:
Ahh, that probably explains it then, I use Chitubox not Anycubic, although I thought Steve also used Chitubox?
I have and use Chitubox, NovaMaker and Anycubic depending on which machine and what I need from it at the time. I too have not noticed the holes in the Anycubic slicer, I will have to have a look. :thumbup:

EDIT:

Oh yeah, so it does. Cool :D
Anycubic.png
Anycubic.png (119.45 KiB) Viewed 2534 times
The buck stops here .......

Ditton Meadow Light Railway (DMLR)
Member of Peterborough and District Association
http://peterborough.16mm.org.uk/

Trevor Thompson
Trainee Driver
Trainee Driver
Posts: 978
Joined: Fri Oct 05, 2018 6:30 pm
Location: South West Wales

Re: Palmerston - Small England Loco as built

Post by Trevor Thompson » Tue Dec 12, 2023 6:33 pm

Building this locomotive has helped me to understand better how to achieve good results with this large resin printer. As part of this I have been altering the support settings in the slicing software, to see what gets the best results for the sort of model I want to print. So far I have settled on "Medium" supports, and adjusted the distance between the supports to 4mm, and the angle of the support ends to 45 degrees. I am currently using a 1mm diameter "ball" end with a 0.5mm "break point' 1mm from the model.

The latest component is the tender, as printed:
IMG_3544.jpeg
IMG_3544.jpeg (1.83 MiB) Viewed 2379 times
Note that the supports above seem more than 4mm apart - which is because the ends of the supports you can see branch out, and the 4mm is the distance between the branches. You can see that the support on the bottom corner has come free and that the end of the front buffer beam is distorted.

I manually added and deleted support "anchors" in certain places. All the supports which passed up at the side of the locomotive body and the tender were removed. They seem to get attached to the side of the model and are impossible to remove cleanly. Those supports are mainly attached to the ends of rivets - and it seems to work without them. Some of the supports attached to the handrail on top of the tanks on the loco body went down to the raft and some to the top of the tank. All of those going to the raft were removed for the same reason. Those to the top of the tank were left. The software treats short supports differently and I have tried different settings, settling on supports less than 2mm long being 3mm long and 60 % of the normal sizes, which seems to cover those supports.

The area of the model which seems to suffer distortion is the area closest to the bed - the first part to be printed. I have been manually adding lots of support around these areas. The front buffer beam on the tender and the footplate side screens, for example.

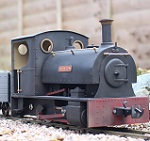
The tender with its supports removed and primed:
IMG_3545.jpeg
IMG_3545.jpeg (2 MiB) Viewed 2379 times
The print I made of the footplate has dome shaped depressions in it where the ends of the supports have been ripped out. Some filling and sanding required here. The bottom of the tender which has the balls and break points does not. In this case the remains of the ball are left in place with 1mm of the ball sticking out. Easily filed or sanded away. Much easier to deal with than a hole!

I am currently painting the body. The sidescreen repair seems to have been totally successful and I am working on the ridge on the tank sides. Whether I will be able to hide it remains to be seen. I have repaired and re-sliced the body in case I need to reprint it. I haven't decided how to treat the sidescreen rear stanchions which don't actually touch the footplate. I can decide how to treat that it the tank sides look OK.

In the background of the last photo you can see the first attempt at the tender. There were errors in the sketchup drawing which I only noticed after printing. The sides and front screens didn't actually meet the footplate in the drawing - so they printed hanging free . In selecting all of the components of the tender I omitted so select the rivet detailing component. I am now assembling all of the individual components into one component or group so that added bits cant be missed out.

Trevor

User avatar
ge_rik
Administrator
Administrator
Posts: 6580
Joined: Sun Oct 25, 2009 10:20 pm
Location: Cheshire
Contact:

Re: Palmerston - Small England Loco as built

Post by ge_rik » Wed Dec 13, 2023 9:35 am

That does indeed look excellent, Trevor.
I've always resisted printing whole objects in favour of breaking them down into component parts and gluing them together.
My main concern is that a complex object with a long print time gives more opportunity for something to go wrong. However, your example gives me some reassurance. However, I know you are a lot more assiduous in your modelling than me. I think my comparatively slap dash approach might not work as successfully. But I am willing to give it a try.

Rik
------------------------
Peckforton Light Railway - Blog Facebook Youtube

Trevor Thompson
Trainee Driver
Trainee Driver
Posts: 978
Joined: Fri Oct 05, 2018 6:30 pm
Location: South West Wales

Re: Palmerston - Small England Loco as built

Post by Trevor Thompson » Wed Dec 13, 2023 2:18 pm

ge_rik wrote: Wed Dec 13, 2023 9:35 am That does indeed look excellent, Trevor.
I've always resisted printing whole objects in favour of breaking them down into component parts and gluing them together.
My main concern is that a complex object with a long print time gives more opportunity for something to go wrong. However, your example gives me some reassurance. However, I know you are a lot more assiduous in your modelling than me. I think my comparatively slap dash approach might not work as successfully. But I am willing to give it a try.

Rik
Rik

I have always done the same - until now. What has made me think again is seeing how commercially offered models seem to me printed in one piece. I was also interested in avoiding having to glue resin printed components together. Although I now realise that I can glue things together with the resin and then just cure it.

Following on from the success with the tender, I have a wagon body printing at the moment to see how that works. I will share the results later.

Trevor

User avatar
-steves-
Administrator
Administrator
Posts: 2444
Joined: Thu Jul 28, 2011 1:50 pm
Location: Cambridge & Peterborough

Re: Palmerston - Small England Loco as built

Post by -steves- » Wed Dec 13, 2023 2:31 pm

I guess it depends if you want a finished article or whether you want to make it and build it as a kit. One piece is easier to do the CAD work for but not so good if just one small part fails, whereas in seperate parts, you just just print the single part again wasting less resin but the CAD work is more time consuming trying to get everything to fit. Horses for courses I guess. Personally I like to build it as a kit afterwards, but that's just one persons opinion.

I do have to admit that these particular parts do look exceedingly good and my hat goes off to you for even trying it. :thumbup:
The buck stops here .......

Ditton Meadow Light Railway (DMLR)
Member of Peterborough and District Association
http://peterborough.16mm.org.uk/

Trevor Thompson
Trainee Driver
Trainee Driver
Posts: 978
Joined: Fri Oct 05, 2018 6:30 pm
Location: South West Wales

Re: Palmerston - Small England Loco as built

Post by Trevor Thompson » Thu Dec 14, 2023 12:02 pm

-steves- wrote: Wed Dec 13, 2023 2:31 pm I guess it depends if you want a finished article or whether you want to make it and build it as a kit. One piece is easier to do the CAD work for but not so good if just one small part fails, whereas in seperate parts, you just just print the single part again wasting less resin but the CAD work is more time consuming trying to get everything to fit. Horses for courses I guess. Personally I like to build it as a kit afterwards, but that's just one persons opinion.

I do have to admit that these particular parts do look exceedingly good and my hat goes off to you for even trying it. :thumbup:
It is an interesting conversation - all of your comments are correct - and in some ways I am surprising myself at how well it all works. For me the finished product is still scratch built even if it comes out of a printer in one piece - so the kit making is something that I can leave behind.

I am finding that I have to be really careful to get the cad work correct - otherwise I am making failures. This is the first thing I have got right first time:
IMG_3549.jpeg
IMG_3549.jpeg (1.76 MiB) Viewed 2278 times
Festiniog railway sheep wagon based on a historic photo showing Little Wonder hauling an incredibly long test train.

Trevor

Post Reply

Who is online

Users browsing this forum: No registered users and 3 guests