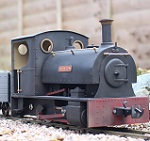
Palmerston - Small England Loco as built

-
-steves-
- Administrator

- Posts: 2444
- Joined: Thu Jul 28, 2011 1:50 pm
- Location: Cambridge & Peterborough
Re: Palmerston - Small England Loco as built
I have to confess the finish is amazing. It makes me think that I should try bigger stuff in my Whale 2 and see what happens, but to be fair, I don't have the faith in it that I have on my AnyCubic printers, which mine are smaller ones. 
The buck stops here .......
Ditton Meadow Light Railway (DMLR)
Member of Peterborough and District Association
http://peterborough.16mm.org.uk/
Ditton Meadow Light Railway (DMLR)
Member of Peterborough and District Association
http://peterborough.16mm.org.uk/

Re: Palmerston - Small England Loco as built
Oh dear. I should have bought an AnyCubic rather than a Whale 2? I really must get round to writing up my experiences with the printer so someone who knows something about it can tell me whether my problems are to do with me or the machine!
Re: Palmerston - Small England Loco as built
Funny that, I feel EXACTLY the same about my Phrozen Sonic Mighty 8K!
Philip
-
Trevor Thompson
- Trainee Driver

- Posts: 978
- Joined: Fri Oct 05, 2018 6:30 pm
- Location: South West Wales
Re: Palmerston - Small England Loco as built
Simon
I was going to put the sheep wagon into the files section so everyone can use the files. So if you were to try it with the support settings I set out in an earlier post, and at the same sort of angle I have used it will be interesting to see how it comes out. We can compare parameters in detail off the forum if it helps.
I am not convinced that the make of printer will be that critical - they should all be capable of doing the same things. The biggest issue is taking the risk, knowing that if it goes wrong it will cost in resin. I think I must have wasted about 1.5 litres on the locomotive. I had 4 goes at the body - and I think I will be printing it yet again (mainly because of the step in the side of the tank) - but I am going to make sure the stl file is perfect before ~I do that.
Incidentally I am using Sunlu ABS like resin which is about £35 for 2 litres from eBay. I am very pleased with it so I am going to try to stick with that specific resin to maintain consistency.
Trevor
-
-steves-
- Administrator
- Posts: 2444
- Joined: Thu Jul 28, 2011 1:50 pm
- Location: Cambridge & Peterborough
Re: Palmerston - Small England Loco as built
It's not the make of the printer per say, it's more like I hardly get any failures on the AnyCubic, but I get 50/50 on the Whale 2. Now, this could be the fact the bed size is bigger, it has more pulling force when it retracts, the bed isn't perfectly level or even the way the different slicing software puts the support in. The last bit I can now fix as Chitubox have just released a new version and it supports saving files in CWS format which is what the Whale 2 uses, though I have not tried it yet. I still think it takes a very brave person to print something that big and complicated in one hit.Trevor Thompson wrote: ↑Thu Dec 14, 2023 7:11 pm
I am not convinced that the make of printer will be that critical - they should all be capable of doing the same things. The biggest issue is taking the risk, knowing that if it goes wrong it will cost in resin. I think I must have wasted about 1.5 litres on the locomotive. I had 4 goes at the body - and I think I will be printing it yet again (mainly because of the step in the side of the tank) - but I am going to make sure the stl file is perfect before ~I do that.
Incidentally I am using Sunlu ABS like resin which is about £35 for 2 litres from eBay. I am very pleased with it so I am going to try to stick with that specific resin to maintain consistency.
Trevor
The buck stops here .......
Ditton Meadow Light Railway (DMLR)
Member of Peterborough and District Association
http://peterborough.16mm.org.uk/
Ditton Meadow Light Railway (DMLR)
Member of Peterborough and District Association
http://peterborough.16mm.org.uk/
Re: Palmerston - Small England Loco as built
Thanks Trevor I will do that. I know there are many other factors, but printing the same article and comparing notes will definitely be a helpful learning experience for me - with a clear benchmark to work to!Trevor Thompson wrote: ↑Thu Dec 14, 2023 7:11 pm I was going to put the sheep wagon into the files section so everyone can use the files. So if you were to try it with the support settings I set out in an earlier post, and at the same sort of angle I have used it will be interesting to see how it comes out. We can compare parameters in detail off the forum if it helps.
I did make quite a step forward with resin printing when I remembered how much filament I'd wasted in the early days of that printer - I printed out the same wagon side about five times at different angles for example (I really must post my pictures from that!) With the resin printer I then decided to write off the first few bottles as the cost of learning what I'm doing.I am not convinced that the make of printer will be that critical - they should all be capable of doing the same things. The biggest issue is taking the risk, knowing that if it goes wrong it will cost in resin. I think I must have wasted about 1.5 litres on the locomotive.
I will give that a go. I've tried one other resin apart from the Nova3D - an Elegoo ABS-like resin, for which the results were dreadful. But it's definitely worth experimenting, as the benefits of everything I learn now will affect all the models I print in the future!Incidentally I am using Sunlu ABS like resin which is about £35 for 2 litres from eBay. I am very pleased with it so I am going to try to stick with that specific resin to maintain consistency.
-
Trevor Thompson
- Trainee Driver
- Posts: 978
- Joined: Fri Oct 05, 2018 6:30 pm
- Location: South West Wales
Re: Palmerston - Small England Loco as built
Thanks Trevor I will do that. I know there are many other factors, but printing the same article and comparing notes will definitely be a helpful learning experience for me - with a clear benchmark to work to!
If I were to print it again I would delete all of the supports on the one end of the wagon where there are supports. Particularly the ones which support the plank edges - they are difficult to remove and I am not convinced they are necessary.
Trevor
If I were to print it again I would delete all of the supports on the one end of the wagon where there are supports. Particularly the ones which support the plank edges - they are difficult to remove and I am not convinced they are necessary.
Trevor
-
Trevor Thompson
- Trainee Driver
- Posts: 978
- Joined: Fri Oct 05, 2018 6:30 pm
- Location: South West Wales
Re: Palmerston - Small England Loco as built
Progress on t his has been slow - I am at the painting stage and the different layers need to dry properly.
I did reprint the body again, and this time I am satisfied with it. The one major change I made was to remove the handrails and make a hole through the handrail supports to take a 2mm diameter stainless shaft. The plastic handrails tend to distort readily - and metal handrails are much more robust. I expected that the brackets would be delicate but they have proven to be very robust. Printing a hole through them worked, but it did need "Reaming" to take the handrail. I did this by sharpening the end of the handrail and careful twisting it as I pushed it into place.
The tender is ready to take a sound card and speaker, in due course. There is more painting to be done, the nameplates, and then the lining.
The one thing that has not worked perfectly is that the footplate side screens have warped outwards slightly at their rear ends. They are held straight by the handrail at the top - but the bottom is still slightly warped outwards.
The bases of the stanchions cant be permanently fixed to the footplate as they are part of the body - which has to be removable. However I think some form of support to locate them would be feasible. Perhaps a rod inside the stanchion, going through a hole in the footplate.
The motion works correctly, and only one motor is required. I don't think 2 motors on a coupled wheel set is actually going to work - the motors seem to work against each other to some extent. I am currently connecting up the batteries and radio control.
Trevor
I did reprint the body again, and this time I am satisfied with it. The one major change I made was to remove the handrails and make a hole through the handrail supports to take a 2mm diameter stainless shaft. The plastic handrails tend to distort readily - and metal handrails are much more robust. I expected that the brackets would be delicate but they have proven to be very robust. Printing a hole through them worked, but it did need "Reaming" to take the handrail. I did this by sharpening the end of the handrail and careful twisting it as I pushed it into place.
- IMG_3644.jpeg (2.25 MiB) Viewed 1376 times
- IMG_3645.jpeg (2.81 MiB) Viewed 1376 times
The one thing that has not worked perfectly is that the footplate side screens have warped outwards slightly at their rear ends. They are held straight by the handrail at the top - but the bottom is still slightly warped outwards.
The bases of the stanchions cant be permanently fixed to the footplate as they are part of the body - which has to be removable. However I think some form of support to locate them would be feasible. Perhaps a rod inside the stanchion, going through a hole in the footplate.
The motion works correctly, and only one motor is required. I don't think 2 motors on a coupled wheel set is actually going to work - the motors seem to work against each other to some extent. I am currently connecting up the batteries and radio control.
Trevor

Re: Palmerston - Small England Loco as built
Really impressed with the handrail knobs and other finer details. I tend to avoid 3D printing these because of their fragility.
Rik
PS Is the whole thing resin printed?
Rik
PS Is the whole thing resin printed?
-
Trevor Thompson
- Trainee Driver
- Posts: 978
- Joined: Fri Oct 05, 2018 6:30 pm
- Location: South West Wales
Re: Palmerston - Small England Loco as built
This Sunlu resin is slightly flexible - perhaps resilient is a better word - and I am amazed at how much detail I have been able to print. The body is a one piece print - balance pipe, regulator, firebox details - all printed as one part.
When you think about drilling through the handrail knobs with an improvised long reach drill - I'm just amazed that they didn't break off - however gently and carefully I did the drilling.
Trevor
Re: Palmerston - Small England Loco as built
Trevor that loco looks brilliant, well done. I think you're right that a metal pin to hold the bottom of the side sheets would be a good idea.
Rik, I concur with Trevor on the Sunlu resin. As I've posted recently, the Sunlu Water Washable ABS-like is superb, that's what I used on the water tower and everybody commented favourably about the fine detail on that.
Rik, I concur with Trevor on the Sunlu resin. As I've posted recently, the Sunlu Water Washable ABS-like is superb, that's what I used on the water tower and everybody commented favourably about the fine detail on that.
Philip
Re: Palmerston - Small England Loco as built
I wonder if the water washable resin is less toxic than the other stuff?
Rik
Rik
Re: Palmerston - Small England Loco as built
No, I don't think it affects toxicity, but I think it is a bit less smelly.
Philip


Re: Palmerston - Small England Loco as built
Looking good Trevor 
https://m.youtube.com/@Dudeface167
Miles-- Trains are fun. With the exception of track power. Argh!
Miles-- Trains are fun. With the exception of track power. Argh!
-
Trevor Thompson
- Trainee Driver
- Posts: 978
- Joined: Fri Oct 05, 2018 6:30 pm
- Location: South West Wales
Re: Palmerston - Small England Loco as built
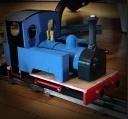
Progress on Palmerston has been delayed by a problem with the motor and the bevel gear drive. I have solved it and I thought it might be worth sharing the problem and my solution - in case anyone else has issues with these miniature geared motors (which I have been buying via eBay).
So the problem was that I mounted the bevel gear on the end of the shaft like this:
The gearbox fitted inside a rectangular depression in the footplate and the gear engaged with a similar gear on the front axle. I found that the play in the output shaft of the gearbox enabled the gear teeth to move sufficiently to disengage. So the locomotive stopped - and made a horrible noise.You can see that the gear is at the very end of the shaft - which was part of the problem.
The solution was to extend the output shaft and to make a bearing to support the shaft properly. The components:
The bearing is the same size overall as the gearbox so it slots into the space where the gearbox was mounted, and the 4mm diameter reamed hole in it engaged properly with the 4mm shaft extension. That extension has a 3mm hole in it for the motor shaft and the extended bit is reduced to 3mm diameter. The components:
Bear in mind that the motor shaft was actually a bit small to grip the 3mm hole in the gear properly, and that shaft fits easily into the hole in the extension.
Assembly required the bearing to be pressed onto the shaft extension first. I used a spare length of 3mm rod mounted in the lathe to hold the shaft extension while I pressed the gear on with the tailstock. Then the shaft extension and bearing were mounted onto the footplate with a couple of drops of superglue used to hold it in place. That also made sure that there was little end float allowing the extension shaft to rise or fall (to prevent the gears disengaging). The assembly before fitting:
The motor was connected to the shaft extension using bearing retainer to lock the shafts together. Of course the motor body was free to rotate at this point so a modified motor mount was printed, and superglued in place:
Having connected the motor to the receiver I can confirm that the chassis is running properly with no hint of gears disengaging. It is also quite powerful, easily pushing a long rake of goods wagons.
So back to finishing it off!
Trevor
So the problem was that I mounted the bevel gear on the end of the shaft like this:
- IMG_3686.jpeg (2.59 MiB) Viewed 863 times
The solution was to extend the output shaft and to make a bearing to support the shaft properly. The components:
- Screenshot 2024-02-09 at 09.33.19.png (70.5 KiB) Viewed 863 times
- Screenshot 2024-02-09 at 09.34.56.png (60.34 KiB) Viewed 863 times
- IMG_3684.jpeg (2.36 MiB) Viewed 863 times
Assembly required the bearing to be pressed onto the shaft extension first. I used a spare length of 3mm rod mounted in the lathe to hold the shaft extension while I pressed the gear on with the tailstock. Then the shaft extension and bearing were mounted onto the footplate with a couple of drops of superglue used to hold it in place. That also made sure that there was little end float allowing the extension shaft to rise or fall (to prevent the gears disengaging). The assembly before fitting:
- IMG_3685.jpeg (2.43 MiB) Viewed 863 times
- IMG_3687.jpeg (2.63 MiB) Viewed 863 times
So back to finishing it off!
Trevor
Re: Palmerston - Small England Loco as built
Wow, surprising you can get satisfactory performance out of such a small motor! I've got a handful of those little ones I ordered by mistake (forgot to check the dimensions) so I might have to take another look and see if I can use them after all. I certainly seem to have no shortage of little locos I'd like to motorize.
 Nolwyn Valley Tramway
Re: Palmerston - Small England Loco as built
I've got a couple of them and Greg uses them in some of his small loco's.
Philip
Re: Palmerston - Small England Loco as built
Looking back, I did try doing one as a belt drive, but without much success: viewtopic.php?t=14383&start=20#p174647
It certainly looks like the bevel gears would be a stronger and more reliable method to get the power to the wheels. I certainly wouldn't have thought of that ingenious drive shaft extension though!
It certainly looks like the bevel gears would be a stronger and more reliable method to get the power to the wheels. I certainly wouldn't have thought of that ingenious drive shaft extension though!
Re: Palmerston - Small England Loco as built
I'd forgotten that you posted that Drew. A more reliable drive would be to simply replace the pulleys and rubber band with Delrin sprockets and chains.drewzero1 wrote: ↑Sun Feb 11, 2024 3:11 am Looking back, I did try doing one as a belt drive, but without much success: viewtopic.php?t=14383&start=20#p174647
It certainly looks like the bevel gears would be a stronger and more reliable method to get the power to the wheels. I certainly wouldn't have thought of that ingenious drive shaft extension though!
Philip
Who is online
Users browsing this forum: No registered users and 6 guests