Building THORNAS - ADDING SOUND

A place where discussions are about 3D printing.
User avatar
philipy
Moderator
Moderator
Posts: 5098
Joined: Sun Jan 30, 2011 3:00 pm
Location: South Northants

Re: Building THORNAS

Post by philipy » Mon Oct 30, 2023 1:33 pm

OK, I've been working on the body today, putting the major bits in place and it's coming on well, I think. Just the roof to stick on in due course. I forgot to say previously, that in the interests of print quality and to allow a recess for glazing I removed the front and rear window frames from the cab front and rear panels and printed them separately, so I still have to add them on.

I have printed out 4 x 25mm disc wheels ready to fit, but pictures of Thomas the Tank Engine always show spoked wheels. Thinking about it this morning I remembered that a couple of years ago Simon Wood posted his OpenSCAD file to produce wheels of any type in any size. Fortunatly I managed to find Simon's post and downloaded his file and the OpenScad program. It's not something I've ever really played with before because the programming is waaaay beyond me but I did manage to deduce how to change the parameters in Simon's file and lo and behold, ended up with an stl file for a 10 spoke wheel. :D It probably would look better with more spokes but I doubt that the printer would cope. However, it also looked more like a wagon wheel than a loco wheels and then it dawned on me that balance weights would be needed. I can't see an option in Simon's file to incorporate them (?) so I imported the stl into SketchUp and added a nominal weight manually.

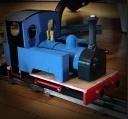
This picture shows the loco body so far, the roof, the backhead that I have mentioned before and 4 spoked wheels plus one disc for comparison.
IMG_0403.jpg
IMG_0403.jpg (424 KiB) Viewed 2953 times
Philip

User avatar
SimonWood
Trainee Driver
Trainee Driver
Posts: 658
Joined: Tue Apr 07, 2015 9:46 pm
Location: West Wales
Contact:

Re: Building THORNAS

Post by SimonWood » Mon Oct 30, 2023 4:46 pm

philipy wrote: Mon Oct 30, 2023 1:33 pm I can't see an option in Simon's file to incorporate them (?)
I'll put it on the 'to-do' list! Also 10 spokes - wow, I only tested it up to 8. Good to know that works.

Loving the build, by the way.
Rheilffordd Moel Rhos: blog - photos - videos

User avatar
philipy
Moderator
Moderator
Posts: 5098
Joined: Sun Jan 30, 2011 3:00 pm
Location: South Northants

Re: Building THORNAS

Post by philipy » Tue Oct 31, 2023 5:28 am

Thanks Simon.

Just another couple of related thoughts for your 'to do' list :roll: I'm not sure of the exact shapes, but I think most wheel spokes are slightly tapered from back to front and have a rounded or oval front face. Also they flair in to the centre boss and the wheel rim. Easy for me to say, I know but it might be a useful brain-stretch if it is possible?
Philip

User avatar
SimonWood
Trainee Driver
Trainee Driver
Posts: 658
Joined: Tue Apr 07, 2015 9:46 pm
Location: West Wales
Contact:

Re: Building THORNAS

Post by SimonWood » Tue Oct 31, 2023 8:52 am

I think the tapering, and certainly rounding, wouldn't be too hard. The flare I can't even begin to picture - a you link to any drawings or photographs that would give me an inkling? I haven't spent a lot of time looking at real wheels, I mostly just print from my drawings to fill the gaps between what is available in the Binnie range, and I can't see a noticeable taper on those.

Also I must admit once I've built a wagon and the wheels are fitted inside axle boxes I don't tend to notice even things like the number of spokes anymore!
Rheilffordd Moel Rhos: blog - photos - videos

User avatar
philipy
Moderator
Moderator
Posts: 5098
Joined: Sun Jan 30, 2011 3:00 pm
Location: South Northants

Re: Building THORNAS

Post by philipy » Tue Oct 31, 2023 9:42 am

I've done a quick look around and Walsall Model Industries do narrow gauge type castings to be machined up for live steamers.
These two links are for a Festiniog Princess in 7/8" scale, 8 spoke, and a "Narrow Gauge" 12 spoke driver ( presumably generic). To give you a clue, hopefully. I'm not really asking you to do it, it's just that when you said about looking at balance weights, it occurred to me that these upgrades would be nice to have. As you say, once on the model they don't really get noticed that much anyway, particularly with an outside frame loco.

https://www.walsallmodelindustries.co.u ... :::6403742
https://www.walsallmodelindustries.co.u ... :::5890776
Philip

User avatar
GTB
Driver
Driver
Posts: 1559
Joined: Sat Mar 05, 2011 2:46 pm
Location: Australia

Re: Building THORNAS

Post by GTB » Tue Oct 31, 2023 11:58 am

philipy wrote: Tue Oct 31, 2023 9:42 am I've done a quick look around and Walsall Model Industries do narrow gauge type castings to be machined up for live steamers.
I use Walsall castings on my live steamers, usually only on the inside frame locos. Outside plate frames usually hide spokes and it's cheaper to turn disc wheels out of solid bar. That said, I'd use spoked driving wheel castings on outside bar frame locos. to maintain the airy look of older US locos. below the boiler.

There are also suitable castings at the smaller end of the gauge 1 range that can be used on SM32/45 locos and rolling stock. I'd like to have spoked wheels on my rolling stock as well, but would go broke buying that many castings.

Walsall castings are more or less generic, but are good quality metal and machine up nicely. Anyway, I defy any rivet counter to count the spokes on a loco driver and work out the crankpin location while the loco is moving.... :roll:

If you want to see how much variation there was in steam era driving and rolling stock wheels, have a browse on Mark Wood's website. His wheels have specific prototypes he and casts them by the lost wax method.

http://www.markwoodwheels.co.uk/wheels/index.html

Graeme

User avatar
SimonWood
Trainee Driver
Trainee Driver
Posts: 658
Joined: Tue Apr 07, 2015 9:46 pm
Location: West Wales
Contact:

Re: Building THORNAS

Post by SimonWood » Tue Oct 31, 2023 4:04 pm

philipy wrote: Tue Oct 31, 2023 9:42 am I've done a quick look around and Walsall Model Industries do narrow gauge type castings to be machined up for live steamers.
These two links are for a Festiniog Princess in 7/8" scale, 8 spoke, and a "Narrow Gauge" 12 spoke driver ( presumably generic). To give you a clue, hopefully. I'm not really asking you to do it, it's just that when you said about looking at balance weights, it occurred to me that these upgrades would be nice to have. As you say, once on the model they don't really get noticed that much anyway, particularly with an outside frame loco.

https://www.walsallmodelindustries.co.u ... :::6403742
https://www.walsallmodelindustries.co.u ... :::5890776
I see what you mean! I can't even begin to think how to do the flare, so the effort/visibility ratio is quite low, and I might not bother. On the other hand, rounding the edges of the spokes should be quite easy, so I will aim to do that. There seem to be an an almost infinite variety of shapes for balance weights, so I might just include one as an option rather than trying to offer configurations to cover them all!
Rheilffordd Moel Rhos: blog - photos - videos

User avatar
philipy
Moderator
Moderator
Posts: 5098
Joined: Sun Jan 30, 2011 3:00 pm
Location: South Northants

Re: Building THORNAS

Post by philipy » Tue Oct 31, 2023 4:18 pm

SimonWood wrote: Tue Oct 31, 2023 4:04 pm There seem to be an an almost infinite variety of shapes for balance weights, so I might just include one as an option rather than trying to offer configurations to cover them all!
I took the easiest option when I did it manually and simply drew line across between two spokes and extruded the fill area that created. I think that should be good enough for all but the biggest rivet counters.
Wheels.jpg
Wheels.jpg (108.35 KiB) Viewed 2868 times
Philip

User avatar
ge_rik
Administrator
Administrator
Posts: 6580
Joined: Sun Oct 25, 2009 10:20 pm
Location: Cheshire
Contact:

Re: Building THORNAS

Post by ge_rik » Tue Oct 31, 2023 4:41 pm

philipy wrote: Tue Oct 31, 2023 4:18 pm I think that should be good enough for all but the biggest rivet counters.

Wheels.jpg
I can't see any rivets on there to count ...... :lol:

Rik
------------------------
Peckforton Light Railway - Blog Facebook Youtube

User avatar
philipy
Moderator
Moderator
Posts: 5098
Joined: Sun Jan 30, 2011 3:00 pm
Location: South Northants

Re: Building THORNAS

Post by philipy » Tue Oct 31, 2023 5:25 pm

ge_rik wrote: Tue Oct 31, 2023 4:41 pm
philipy wrote: Tue Oct 31, 2023 4:18 pm I think that should be good enough for all but the biggest rivet counters.

Wheels.jpg
I can't see any rivets on there to count ...... :lol:

Rik
:anhammer
Philip

User avatar
philipy
Moderator
Moderator
Posts: 5098
Joined: Sun Jan 30, 2011 3:00 pm
Location: South Northants

Re: Building THORNAS

Post by philipy » Wed Nov 01, 2023 2:43 pm

Drew, what did you use for crank pins? I can obviously just put a bolt and nut in but I wondered if you had some more sophisticated option?
Philip

User avatar
drewzero1
Administrator
Administrator
Posts: 486
Joined: Fri Apr 21, 2023 4:35 pm
Location: WI, US

Re: Building THORNAS

Post by drewzero1 » Wed Nov 01, 2023 3:46 pm

philipy wrote: Wed Nov 01, 2023 2:43 pm Drew, what did you use for crank pins? I can obviously just put a bolt and nut in but I wondered if you had some more sophisticated option?
I cut short sections of the same 1/8" round stock that I had used for the axles, and pressed them into place in the cranks. After fitting the connecting rod, I pressed the crank pin caps onto the end of the pins to keep the rods in place.

I'm sure there's a better way but it sure beats the snap-fit 3d printed crank pins I started out with.

User avatar
philipy
Moderator
Moderator
Posts: 5098
Joined: Sun Jan 30, 2011 3:00 pm
Location: South Northants

Re: Building THORNAS

Post by philipy » Wed Nov 01, 2023 3:56 pm

Ahh, ok that makes sense. Thanks
Philip

User avatar
drewzero1
Administrator
Administrator
Posts: 486
Joined: Fri Apr 21, 2023 4:35 pm
Location: WI, US

Re: Building THORNAS

Post by drewzero1 » Wed Nov 01, 2023 4:03 pm

Here's a pic with the pins in, before fitting the caps.
Screenshot_20231101-110057.jpg
Screenshot_20231101-110057.jpg (220.74 KiB) Viewed 2819 times

User avatar
ge_rik
Administrator
Administrator
Posts: 6580
Joined: Sun Oct 25, 2009 10:20 pm
Location: Cheshire
Contact:

Re: Building THORNAS

Post by ge_rik » Wed Nov 01, 2023 4:16 pm

I know we've discussed this before, but things have probably moved on since then.
How do people feel about using 3D printed wheels? I've tended to avoid them as I wonder about their efficacy.
Are folk generally happy with their performance?

Sorry about potential thread drift, I can start a new thread if preferred.

Rik
------------------------
Peckforton Light Railway - Blog Facebook Youtube

User avatar
philipy
Moderator
Moderator
Posts: 5098
Joined: Sun Jan 30, 2011 3:00 pm
Location: South Northants

Re: Building THORNAS

Post by philipy » Wed Nov 01, 2023 7:45 pm

I've got quite a few printed wheels and not had many issues, but then again I believe mine get far less heavy use than yours would.
The only real problem I have is actually getting them on the axles properly i.e parallel to each other and at right angles to the axle.
Philip

User avatar
drewzero1
Administrator
Administrator
Posts: 486
Joined: Fri Apr 21, 2023 4:35 pm
Location: WI, US

Re: Building THORNAS

Post by drewzero1 » Wed Nov 01, 2023 9:02 pm

I would agree with all of the above on 3d printed wheels. The ones in the picture are my first set of wheels printed in PETG instead of PLA, and I'm still getting the printer settings dialed in, hence the rough surface on the tread of the wheel. The bed adhesion has been more consistent so far than with PLA, so the backs of the wheels are not as rough as the wheels on my GVT coaches.

For what little running I do, they have worked well. I would expect to see more/faster wear than a commercially produced plastic wheel set under heavy use but these are easy enough to replace.

User avatar
philipy
Moderator
Moderator
Posts: 5098
Joined: Sun Jan 30, 2011 3:00 pm
Location: South Northants

Re: Building THORNAS

Post by philipy » Thu Nov 02, 2023 8:37 am

Drew, thanks for your wheel/crankpin info update.

I remember now that we had the discussion about your wheel backs some while ago. I've never tried PETG because Rik did quite a bit of work with it and was never really happy with the results so I didn't bother wasting time. I've never had any real issues with PLA overall apart from glitches now and again. Since Steve recommended PLA+ I tried that and have never changed back although I do have stocks of ordinary PLA to use up somhow. :)

This pic shows both sides of a plain disc wheel that I had originally printed for my Thornas build and one of the subsequent spoked ones.
IMG_0416.JPG
IMG_0416.JPG (464.54 KiB) Viewed 2776 times
For some reason that I don't really understand, the surface finish generally on the spoked ones isn't quite as good as the plain discs. Obviously the print nozzle does a lot more dodging about so you might expect the backs to show more layer lines, but I don't know why the surface finish on the wheel treads is much more blobby and bitty.
Philip

User avatar
drewzero1
Administrator
Administrator
Posts: 486
Joined: Fri Apr 21, 2023 4:35 pm
Location: WI, US

Re: Building THORNAS

Post by drewzero1 » Thu Nov 02, 2023 2:18 pm

Yes, my experience so far with PETG has been mixed... It's less brittle than PLA and seems to hold together better along layer lines, but I've been getting a lot of stringing and blobbing requiring more postprocessing to get a clean part. I have also heard it doesn't glue as readily as PLA. It seems like it will be useful for some applications but I think I'll try PLA+ for my next spool.

User avatar
philipy
Moderator
Moderator
Posts: 5098
Joined: Sun Jan 30, 2011 3:00 pm
Location: South Northants

Re: Building THORNAS

Post by philipy » Thu Nov 02, 2023 4:49 pm

Not too much progress today, just some fiddling about with bits and pieces.
However...
I slightly readjusted the shape of my 2 battery packs, one in each side tank. I've been puzzling about how to stop them dropping out/rattling about, but then whilst checking the fit and alighnment of the motor unit, I realised that the gearbox bracket sticks up about 1mm above the top of the frames and neatly traps the batteries - doncha love it when a plan comes together, especially by accident! :lol: Having sorted that, I then cut and fitted a piece of black plasticard to stop them sliding fore and aft and thus left a small empty compartment at the front of each tank.

I also mounted a small on/off slide switch on the floor in the front LH corner of the cab, to be hidden by something or other in due course.

Finally, or I should say, yesterday, I printed a driver ... I think he must have been living in the bunker to get this black :shock:
IMG_0423.png
IMG_0423.png (1.84 MiB) Viewed 2745 times
Philip

Post Reply

Who is online

Users browsing this forum: No registered users and 4 guests