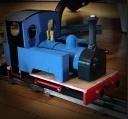
I finally looked up who I used for my driver, he's DSP3D's Driver 12. I chose him because his hunch and lean helped him fit better in the cramped cab. He rides on the cab step and leans out the window.
Building THORNAS - ADDING SOUND
Re: Building THORNAS
Looks good! He'll have to wash off in the water tank next. 
I finally looked up who I used for my driver, he's DSP3D's Driver 12. I chose him because his hunch and lean helped him fit better in the cramped cab. He rides on the cab step and leans out the window.
I finally looked up who I used for my driver, he's DSP3D's Driver 12. I chose him because his hunch and lean helped him fit better in the cramped cab. He rides on the cab step and leans out the window.
- Attachments
-
- Screenshot_20231102-121924.jpg (87.33 KiB) Viewed 3447 times
 Nolwyn Valley Tramway
-
-steves-
- Administrator

- Posts: 2444
- Joined: Thu Jul 28, 2011 1:50 pm
- Location: Cambridge & Peterborough
Re: Building THORNAS
Rikge_rik wrote: ↑Wed Nov 01, 2023 4:16 pm I know we've discussed this before, but things have probably moved on since then.
How do people feel about using 3D printed wheels? I've tended to avoid them as I wonder about their efficacy.
Are folk generally happy with their performance?
Sorry about potential thread drift, I can start a new thread if preferred.
Rik
I use 3D printed wheel all the time and have done for many kits. I find them reasonably low wearing and much better looking than a standard all metal disc type wheel. The major downsides are, as mentioned, drilling them perfectly parallel so you don't get wheel wobble, of course the larger the wheel the worse the effect. However it should be mentioned that not all metal and kit wheels are straight anyway. The other downside is how much they would wear under constant heavy loads. I rarely run a loco under any load or for days upon days, so I can not vouch for their longevity under those conditions. Their main benefit is how cheap they are and how readily you can make any shape, size or type. A big up for 3D printed wheels from me.
As for Thornas, it's coming along very nicely and I am looking forward to doing mine. I can see one or two changes that I would make, one of which is using bolts and brass bushes for the crank pins as to reduce any 3D printed wear and potential slop. I always use metal to metal here as I have seen plastic conrods quickly wear and create so much slop that the engine will only run one way, the other way they just lock up as the quartering is then too far out to work. Of course we all have our own preferences
The buck stops here .......
Ditton Meadow Light Railway (DMLR)
Member of Peterborough and District Association
http://peterborough.16mm.org.uk/
Ditton Meadow Light Railway (DMLR)
Member of Peterborough and District Association
http://peterborough.16mm.org.uk/

Re: Building THORNAS
Thanks Steve.
That's exactly what I am looking to do with mine. I think thats my next job after a bit of fiddling about with some bits and pieces that aren't vital at this stage but will have to be done eventually anyway.
Philip
Re: Building THORNAS
Well, over the weekend I've fixed the cab window frames and been filling, rubbing down, priming, etc, the body, although still a little bit left to do. For the time being the roof is left separate so that I can get in to paint and fix things( I 'm debating whether to glue it or screw it when the time comes). I have actually installed the on/off switch in the cab and wired it already, so that I can work around it without damaging anything later.
I also looked at both the original Thomas the Tank book pictures and the LBSCR E2 that he was based on. It struck me that Thomas seems to be shown with two whistles but no safety valve, a highly dangerous practice, although I guess you might get a split second warning from the whistle before the boiler blew up! Anyway, I had a look in my "Gash prints" box and dug out a spare spring safety valve, left over from another project, so that will go on top of the firebox in due course, and I think I'm going to mount the whistle on the cab front rather than the firebox.
Mechanism-wise I've reprinted the cranks with slightly a smaller hole in the small end, and tapped that M2.5. I had to order some M2.5 csk 8mm brass bolts for the crank pins, which arrived yesterday evening. Next job is to cut some small brass sleeves as bearing inserts for the rods. I also have on order some M2.5 domed nuts which I plan will sit on the end of the cranks pins and finish it all off nicely and allow me to get at things if, for instance, a rod breaks one day.
I've spent all this afternoon fighting the *@##%^ quartering and atm I CANNOT get it running smoothly enough for my satisfaction. It may help when I can nip the rod retaining nuts up tight, because at present they keep trying to unscrew. Once they are tight I'm hoping that the last tight spot will bed itself in. To be fair it isn't very noticeable now, it's just that I know its there!
I also looked at both the original Thomas the Tank book pictures and the LBSCR E2 that he was based on. It struck me that Thomas seems to be shown with two whistles but no safety valve, a highly dangerous practice, although I guess you might get a split second warning from the whistle before the boiler blew up!
Mechanism-wise I've reprinted the cranks with slightly a smaller hole in the small end, and tapped that M2.5. I had to order some M2.5 csk 8mm brass bolts for the crank pins, which arrived yesterday evening. Next job is to cut some small brass sleeves as bearing inserts for the rods. I also have on order some M2.5 domed nuts which I plan will sit on the end of the cranks pins and finish it all off nicely and allow me to get at things if, for instance, a rod breaks one day.
I've spent all this afternoon fighting the *@##%^ quartering and atm I CANNOT get it running smoothly enough for my satisfaction. It may help when I can nip the rod retaining nuts up tight, because at present they keep trying to unscrew. Once they are tight I'm hoping that the last tight spot will bed itself in. To be fair it isn't very noticeable now, it's just that I know its there!
- IMG_0424.png (854.5 KiB) Viewed 3310 times
Philip
Re: Building THORNAS
Looks much cleaner than mine, especially the running plate and smokebox door. You've also achieved a much smoother finish on the dome. I think the bolted coupling rods is the right way to go in the long run. 
Most of my experience with Thomas the Tank Engine comes from the model series TV show, though since starting this project my son has developed a huge interest in the books, and I've noticed details in the illustrations that were simplified or omitted in the TV series. None of the TV models show visible safety valves, but in some of the book illustrations a second trail of steam is shown above the firebox... so I can only assume the safety valve was swapped for a whistle to simplify the models. (Certainly Thomas would complain for a while before the pressure started reaching dangerous levels: "I'm going to burst! I'm going to burst!")
I have seen some nicely detailed Thomas-inspired models that more closely resemble the real thing, pipework, safety valves, and all, and I would have liked to have done that with Thornas if I had any idea what I was doing!
Most of my experience with Thomas the Tank Engine comes from the model series TV show, though since starting this project my son has developed a huge interest in the books, and I've noticed details in the illustrations that were simplified or omitted in the TV series. None of the TV models show visible safety valves, but in some of the book illustrations a second trail of steam is shown above the firebox... so I can only assume the safety valve was swapped for a whistle to simplify the models. (Certainly Thomas would complain for a while before the pressure started reaching dangerous levels: "I'm going to burst! I'm going to burst!")
- Screenshot_2023-11-06_10-28-59.png (110.38 KiB) Viewed 3300 times
Re: Building THORNAS
Yesterday morning, I attacked the sticky motion again with little success so I went back to basics. I took all the rods and cranks off and then just offered the rods up to the ends of the axles. The first one dropped straight on but the other side just didn't want to know. Checked with the vernier and discovered that the axle centres were 0.73mm different, one side to the other, and I also noticed a slight twist in the frames. I think that when I glued the frame that had been screw fixed originally, and then cut the slot in the other frame, things must have got a bit distorted. 
Anyway, I decided that there was no point in wasting more time trying to correct things and so I set the printer working again! However, before printing, I actually added a strengthening rib along the top of both frames and drew up a couple of longer frame spacers to assist with keeping it all square with no distortions. 6.5 hours later I had the components for a new chassis. Glued it all up and left it overnight to set.
This morning all was nice and solid so I transplanted the motor/gearbox from the old chassis and refitted the cranks and rods...lo and behold, it runs...in both directions!
In between things over the last day and a half, I've painted the body in the E&D standard loco green and I'm quite pleased with how it looks so far. There are still bits and pieces to add and the cab interior to do.
Anyway, I decided that there was no point in wasting more time trying to correct things and so I set the printer working again! However, before printing, I actually added a strengthening rib along the top of both frames and drew up a couple of longer frame spacers to assist with keeping it all square with no distortions. 6.5 hours later I had the components for a new chassis.
This morning all was nice and solid so I transplanted the motor/gearbox from the old chassis and refitted the cranks and rods...lo and behold, it runs...in both directions!
In between things over the last day and a half, I've painted the body in the E&D standard loco green and I'm quite pleased with how it looks so far. There are still bits and pieces to add and the cab interior to do.
- IMG_0434.png (896.46 KiB) Viewed 3111 times
Philip
-
Peter Butler

- Driver

- Posts: 5245
- Joined: Sun Sep 09, 2012 10:33 pm
- Location: West Wales
Re: Building THORNAS
That looks really good now, and a tidy paint job too!
The best things in life are free.... so why am I doing this?
-
-steves-
- Administrator
- Posts: 2444
- Joined: Thu Jul 28, 2011 1:50 pm
- Location: Cambridge & Peterborough
Re: Building THORNAS
Agree with Peter, looks very smart. Can't wait for some spare time to start mine. I will confess I am currently in the process of putting some paint on the NGG16, after over a week, I only have paint on the cab, boiler and smoke box, not even started the tenders and they are the hard bits. Well done for such a quick turnaround on this one, especially with a redesigned and rebuilt chassis!
The buck stops here .......
Ditton Meadow Light Railway (DMLR)
Member of Peterborough and District Association
http://peterborough.16mm.org.uk/
Ditton Meadow Light Railway (DMLR)
Member of Peterborough and District Association
http://peterborough.16mm.org.uk/

Re: Building THORNAS
That's what appeals to me and my approach to modelling - the ease with which 3D printing allows you to tweak and modify on the fly. Though I'm impressed with your use of a Vernier. I do have an electronic vernier but it rarely comes out of its box.philipy wrote: ↑Wed Nov 08, 2023 4:26 pm
Anyway, I decided that there was no point in wasting more time trying to correct things and so I set the printer working again! However, before printing, I actually added a strengthening rib along the top of both frames and drew up a couple of longer frame spacers to assist with keeping it all square with no distortions. 6.5 hours later I had the components for a new chassis.
Rik
Re: Building THORNAS
For years I made do with a ruler, then I bought a cheapo one that the battery kept falling out of or not making contact so I rarely used it. About a year ago I found a deal on an end of range, half decent one and I actually find it quite useful as a b-b gauge and checking the sizes of drills if I've not put them away properly and other odd jobs. In this case it proved it's worth because I would never have found the less than 1mm discrepancy using a ruler, whereas putting two lengths of axle rod through both sets of bearings and checking the o/a dims on both sides, the problem was instantly obvious.
Philip


Re: Building THORNAS
This has been a really interesting read. And the loco looks lovely. Really makes me appreciate the extraordinary scope of 3D design and print. Cutting up plasticard looking increasingly crude and clumsy!
-
Peter Butler
- Driver
- Posts: 5245
- Joined: Sun Sep 09, 2012 10:33 pm
- Location: West Wales
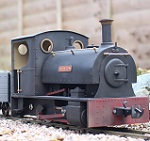
Re: Building THORNAS
Sorry Bertie but in the absence of a 3D printer I have to make do with good old-fashioned Plastikard, perhaps one day I'll get it right???
- 100_0603.JPG (289.11 KiB) Viewed 2983 times
The best things in life are free.... so why am I doing this?
Re: Building THORNAS
If I could make plasticard look 1/10th as good as some of you do, I'd trade in my printer for a cutting board. For now I'm just a kid with a computer.Peter Butler wrote: ↑Fri Nov 10, 2023 2:45 pmSorry Bertie but in the absence of a 3D printer I have to make do with good old-fashioned Plastikard, perhaps one day I'll get it right???
Re: Building THORNAS
I'm just as much in awe of Peter's abilities with plasticard as anyone, but IMO, the real skill/ability is his painting and weathering techniques, which magically transform a good model into a representation of the real thing. Cutting and gluing styrene sheet is something that can be learned but the painting is an innate artistic ability that 60-odd years of practice have never imbued me with.
Edited to add that I've spent quite a bit of time this morning trying to create a "tarnished brass" effect without much success, so if anyone can offer suggestions.....?
Edited to add that I've spent quite a bit of time this morning trying to create a "tarnished brass" effect without much success, so if anyone can offer suggestions.....?
Philip
-
-steves-
- Administrator
- Posts: 2444
- Joined: Thu Jul 28, 2011 1:50 pm
- Location: Cambridge & Peterborough
Re: Building THORNAS
I use Revell anthracite as a base coat and then Tamiya gold on top dry brushed and it seems to give a very good effect, most the time, I am no artist either.
The buck stops here .......
Ditton Meadow Light Railway (DMLR)
Member of Peterborough and District Association
http://peterborough.16mm.org.uk/
Ditton Meadow Light Railway (DMLR)
Member of Peterborough and District Association
http://peterborough.16mm.org.uk/
Re: Building THORNAS
Thanks Steve.
I've been using 'black' rather than anthracite, which I presume is actually a very dark grey? That might be better than pure black.
I have been playing with Valello 'Brass' but that comes out too 'flecky' for my taste. I saw somebody else on another forum had been using the Tamiya gold and he apparently had the same problem, the gold/brass was too particulate.
I rather suspect it is actually down to the exact technique, which brings me back to what I said about an innate ability.
Philip

Re: Building THORNAS
I find a tarnished brass finish is a lot easier to achieve when using metal blackener on a brass part...... 
On a plastic part I'd be inclined to spray the part with brass enamel, give it plenty of time to harden up (at least a week mimimum) then tarnish it with a wash of water based acrylic paint.
Humbrol used to have a brass paint in their metalizer range, but that seems to have disappeared. Their brass enamel is still around but I haven't bought a tin in many years. Revell have a brass enamel in their range which may perform better.
Revell anthracite is about the same shade as a mix of two parts black to one part dark grey, but depending on the light, it has a warmer red undertone, rather than the blue undertone you get with most black/grey mixtures. I use it on my steam locos for painting the smoke box and the cab roof, as a contrast to the weathered black on the rest of the loco.
Graeme
Re: Building THORNAS
Thanks Graeme.
This morning I think I found my personal secret recipe ( others may not like it! ).
I mixed approx 1part Vallejo Brass with 1part Citadel base Dryad Bark (a slightly reddish brown). Dry brushed on black and roughly brushed on green, both seem Ok so far.
This morning I think I found my personal secret recipe ( others may not like it!
I mixed approx 1part Vallejo Brass with 1part Citadel base Dryad Bark (a slightly reddish brown). Dry brushed on black and roughly brushed on green, both seem Ok so far.
Philip
Re: Building THORNAS
Bit of an update -
Over the past few days I've been fiddling about and making very little real progress, but.....
I've fixed the SV and whistle.
I've painted the backhead ready to go in the cab once I've painted it inside.
I've printed a generic type reversing lever.
I've got the driver half painted.
I've printed a couple of loco lamps ( not Drew's because I already had the stl for one which fits some 5mm LED's that I have in stock.). I'm currently trying to decide whether to put a 2nd lamp on the bunker, using the Rx65b's ability to automatically switch between them depending on direction.
I've painted the buffer beams.
I'm fitting magnetic couplings using the basic design from '3Minutes of Fame' a few months back, but modified with two magnets in each so that they are universal. I've also slightly modified them to double up as link and pin. I found some small brass tube and cut a short 10BA thread on one end, then soldered a pin into it with a 10BA nut at the join. The protruding pin was then bent into a standard type hook so that a chain can be hooked on if a vehicle hasn't been magnet fitted. The brass tube drops through the magnet head housing and acts as the pivot and a nut screws on the cut thread at the bottom to retain it.
The cab window frames and whistle are using my recipe for tarnished brass, as per my last post.
- IMG_0456.jpg (332.59 KiB) Viewed 2851 times
Philip
-
Peter Butler
- Driver
- Posts: 5245
- Joined: Sun Sep 09, 2012 10:33 pm
- Location: West Wales
Re: Building THORNAS
Wonderful Philip, great paint job and the tarnished brass effect looks just right.
The best things in life are free.... so why am I doing this?
Who is online
Users browsing this forum: No registered users and 6 guests