HGLW LB1 Loco - first 16mm scale model

A place for discussing battery-electric locomotives, whether they're diesel, steam or even electric outline
Post Reply
Redbaron25
Cleaner
Cleaner
Posts: 14
Joined: Fri Jun 28, 2013 11:17 am

HGLW LB1 Loco - first 16mm scale model

Post by Redbaron25 » Wed Dec 28, 2016 10:21 pm

Hello all,

This is my first 16mm loco kit build, the LB1 diesel body kit and Deluxe chassis from Houstoun Gate Locomotive Works, better known as HGLW http://www.hglw.co.uk/

As a total newcomer to 16mm scale, I bought this kit based mainly on the price - £9.75 for the body and £25 for the complete Deluxe chassis -  and also after reading very good reviews on the various garden railway sites. I hope this post will help to make up the mind of anyone like myself who is thinking about getting into 16mm scale but does not initally want to spend a lot of money. At £34.75 for a complete working 16mm loco it's a bargain - even cheaper than the locos in N and OO scale which I also model.

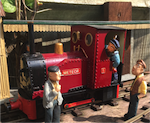
I'm very pleased with the simplicity of the kit and spent a pleasant Christmas building it with just a few basic tools. Take some time to seal and paint the loco - it's made from MDF - and add a few details like handrails, hatches, smokestack, etc to enhance the basic 'boxy' kit and you can have a loco that looks like a much more expensive model.

I will certainly be buying another (I have to anyway as my father is a narrow gauge fan and has taken this one off me!). The chassis is sold seperately too so no doubt I will have a few of those for my own scratch build subjects.

Definitely recommended, especially as a first-time foray into 16mm scale. I have no connection to HGLW, I speak purely as a satisfied customer.

Regards to all
Steve

Image

User avatar
LNR
Driver
Driver
Posts: 1542
Joined: Sat Feb 27, 2016 5:26 am
Location: Australia

Post by LNR » Wed Dec 28, 2016 10:42 pm

That looks like time well spent. Nice build. Good that you and your Dad share a common interest.
Grant.

Redbaron25
Cleaner
Cleaner
Posts: 14
Joined: Fri Jun 28, 2013 11:17 am

Post by Redbaron25 » Wed Dec 28, 2016 11:36 pm

Thanks Grant, at the moment it's just wired for manual control but I'll be adding Deltang r/c in the future as I've been reading up on the reviews and Youtube videos and it seems to be a very popular r/c system.

Will be nice to dispense with track power - used it for 50 years so it's going to be a hard habit to break!

Regards
Steve

User avatar
dougrail
Driver
Driver
Posts: 1532
Joined: Mon Mar 14, 2011 5:11 pm
Location: Salopia; on the edge of Arcadia

Post by dougrail » Wed Dec 28, 2016 11:42 pm

How did you seal the wood? Was it brush on or aerosol?

User avatar
LNR
Driver
Driver
Posts: 1542
Joined: Sat Feb 27, 2016 5:26 am
Location: Australia

Post by LNR » Wed Dec 28, 2016 11:50 pm

Do you have any track outside? I've never used track power outside, but it has always struck me as a poor combination, although many use it.
Grant.

User avatar
MDLR
Driver
Driver
Posts: 4027
Joined: Thu Jan 15, 2009 10:38 pm
Location: Near Ripley, Derbyshire, UK
Contact:

Post by MDLR » Thu Dec 29, 2016 12:27 am

That's a nice build - more power to your elbow! If you want more of the same (and are within reach of Peterborough on 8th April) you will be able to find more of the same on Budget Boulevard at the National Garden Railway Show.

http://www.nationalgardenrailwayshow.org.uk/
Brian L Dominic
Managing Director
Flagg Fluorspar Co
www.mdlr.co.uk/ff.html

User avatar
ge_rik
Administrator
Administrator
Posts: 6580
Joined: Sun Oct 25, 2009 10:20 pm
Location: Cheshire
Contact:

Post by ge_rik » Thu Dec 29, 2016 7:32 am

Redbaron25:121863 wrote: Will be nice to dispense with track power - used it for 50 years so it's going to be a hard habit to break!

Regards
Steve
Hi Steve
Nice looking loco.

It took me about 50 years to venture out into the garden with a length of track. Like you, I'd only ever used track power (indoors) and so it seemed the natural way to go in the garden. I tried it for 5-6 years before eventually going over to battery r/c and it was the best thing I ever did. Apart from occasional de-gritting, I've not done any track-cleaning for the past four years. It used to take me half a day to clean all the track before I could run my first train - which kinda took the edge off things.

Anything you want to know about Deltang, just ask. There's a few on here who use it.

Rik
------------------------
Peckforton Light Railway - Blog Facebook Youtube

Redbaron25
Cleaner
Cleaner
Posts: 14
Joined: Fri Jun 28, 2013 11:17 am

Post by Redbaron25 » Thu Dec 29, 2016 10:42 am

Thanks for the replies guys - most of the info I've gathered so far has actually come from reading Rik's Peckforton Railway blog; very informative and helpful. I will no doubt have a lot of questions to ask you guys in future.
dougrail:121864 wrote:How did you seal the wood? Was it brush on or aerosol?
The kit instructions recommend thin PVA, sealer or car primer. I didn't fancy using PVA as that would involve water and was worried the MDF would go 'mushy' so I just bought a cheap grey car primer rattle can and gave it about 4 very thin coats.  The porous edges of the MDF take the most sealing.

Next kit I build I'll prime the parts before I press them out of the sprue frame then paint the edges after assembly.  Blue top coat is Games Workshop acrylic followed by a coat of Windsor & Newton matt varnish. Think I'll use Satin next time for a bit more handling strength.
LNR:121865 wrote:Do you have any track outside? I've never used track power outside, but it has always struck me as a poor combination, although many use it.
Grant.
I have no track at all yet..not even a test section. I'll be building my own track so after getting a few bits of rolling stock I'll be diving into that next. I used to hate cleaning the rails of my small 5' long HO switching layout; can't imagine what it would be like to go round a garden and have to do it!

Can I ask a question regarding the plastic worm that's in the HGLW kit? I'd like to replace this with a metal one so can anyone recommend a suitable one? Cambrian Models sell metal worms (see pic) to fit HGLW 2mm  motor shafts so would this do? Seems to be a standard worm fits all gears.


Regards
Steve
Image

User avatar
LNR
Driver
Driver
Posts: 1542
Joined: Sat Feb 27, 2016 5:26 am
Location: Australia

Post by LNR » Thu Dec 29, 2016 11:10 am

Don't know if this is any help Steve (depends on your workshop machinery) but on quite a few occasions I have used a suitable diameter bolt of brass or steel generally finding a whitworth thread will match many plastic gears. As they are not a proper wormwheel they don't require a buttress style thread on the worm. Would need to be drilled and threaded for a grub screw so a lathe is required.
Grant.

DLRdan
Driver
Driver
Posts: 1083
Joined: Wed Nov 12, 2008 12:05 am
Location: Blyth
Contact:

Post by DLRdan » Thu Dec 29, 2016 11:50 am

I wouldn't worry about the plastic worm, I've got an IP Danny which is a similar size to the loco you have. It has run hundreds of real miles and shows no wear to the gears at all.

I think the idea behind having a metal gear and plastic worm is when the gears do get worn, the plastic worm goes first which is easily replaceable.
Dan,

James: "Dan, can you use your hearing and tell me if that trains coming ?"
DLR
www.freewebs.com/dlrail

User avatar
Busted Bricks
Trainee Driver
Trainee Driver
Posts: 750
Joined: Sat Jan 22, 2011 9:16 pm
Location: Denmark
Contact:

Post by Busted Bricks » Thu Dec 29, 2016 12:33 pm

Yes, the brass gear and plastic worm is a deliberate choice. The worm is easy to replace and costs very little. If you get the mesh right it will last quite a while.

Nicely built loco, I like the details.

Redbaron25
Cleaner
Cleaner
Posts: 14
Joined: Fri Jun 28, 2013 11:17 am

Post by Redbaron25 » Thu Dec 29, 2016 1:57 pm

Grant - I have no metalworking facilities other than basic files. I'll just stick with the plastic worm and see how it goes. I meant to mention in my initial post that it's very important to get the worm central to the gear wheel to minimise wear.

I had to add an extra washer to the axle ends as the drive axle was able to slide slightly out of mesh. Make sure you have almost no side play on this axle when you're building it.

Next one I build, I'll glue the axleboxes solidly on one side but just spot glue those on the other, so I'll be able to remove the wheel sets if needed for gear replacement.

On the subject of plastic worms and gears, I saw an interesting little drive unit from Mindset, available from Maplins for £6.99. 3v-6v motor (same as HGLW). My local store has 2 in stock so I think I'll get one at the weekend as I'd eventually like to build my own loco chassis. As long as it would pull even a couple of light wagons that would be fine. Anybody used these?

Image

Regards
Steve

User avatar
sstjc
Fireman
Fireman
Posts: 442
Joined: Mon Dec 22, 2008 10:47 am
Location: Faversham Kent
Contact:

Post by sstjc » Thu Dec 29, 2016 9:18 pm

HGLW kits are very good and I highly recommend them. I'm just in the process of turning a summer coach into a rail inspection car as I write this. The kits are very easy to bash as well....
Barry
Regards
Barry

www.5inchrail.com

User avatar
Chris Cairns
Driver
Driver
Posts: 2366
Joined: Mon Oct 29, 2007 7:25 pm
Location: Glasgow, Scotland

Post by Chris Cairns » Fri Dec 30, 2016 2:27 am

Nice customisation Steve.

Deltang R/C is ideal for these locos.

I have a few HGLW wagons & a coach kit - just adding some customisation to a Guards Van kit.
dougrail wrote:How did you seal the wood? Was it brush on or aerosol?
When I picked up some kits from David Hippey I asked him what he used, as I'd found a 50% water/50% PVA mix caused the MDF to go hairy. David uses Rustins Quick Drying MDF Clear Sealer. I called in at a couple of chain DIY Stores on the way home but no-one stocked it (B & Q told me to use a water/PVA mix!). Ended up getting it from eBay.

Top Tip that David & I came up with. If using wood filler to hide the construction tabbing, cover the area with MDF Sealer & your base coat first before applying the wood filler - it adheres better that way, rather than straight onto virgin MDF.
Busted Bricks wrote:Yes, the brass gear and plastic worm is a deliberate choice.
I wish IP Engineering would do that as well. I was given a IP Eng Ruston 18/20 HP kit which I customised for our Group's portable distillery themed layout. Brought it to a running day to show it running prior to our attendance at Peterborough 2016 show. It picked up a small piece of loose ballast which wedged between the worm & the gear, slowly shredding the gear. As the loose wheels had to be fitted to the axles (inside frame) using Loctite there was a lot of expletives trying to remove a wheel followed by the gear. I fitted a guard around the replacement gear to prevent a re-occurrence.

Chris Cairns

User avatar
robc_wa
Trainee Fireman
Trainee Fireman
Posts: 106
Joined: Wed Jun 08, 2011 11:41 am
Location: Perth, Western Australia

Post by robc_wa » Fri Dec 30, 2016 4:37 am

Redbaron25:121872 wrote: I saw an interesting little drive unit from Mindset, available from Maplins
I don't know if these are these same as the Tamiya ones but be careful that the "gearbox" will fit between the frames (or wheels if you are going for inside frame) of a 32mm gauge loco.
Definitely worth visiting the shop with a ruler rather than just ordering on line. SM32 back to back is 28 mm and you will need a little clearance

Regards

Rob

Redbaron25
Cleaner
Cleaner
Posts: 14
Joined: Fri Jun 28, 2013 11:17 am

Post by Redbaron25 » Fri Dec 30, 2016 12:47 pm

Some good tips there, thanks.

The primer I used was 'Auto Extreme Grey Primer' - only 99p a can from one of those great little cheap shops that sell everything from biscuits to batteries. Goes on very well but I think I'll add a couple more coats next time for an even smoother finish. The only thing I'd change about the HGLW kit would be to have it made from plastic but obviously that would push the price up.

Regarding the Maplins drive unit, I think it will fit inside the chassis frames okay but it's still worth buying for the motor/worm/gear to mess about with. The drive shaft is 1/8 too which will suit commercial wheels.

I've just sent off for another LB1/deluxe chassis kit which I'll convert to an open cab quarry-type loco. Need to scratchbuild some tippers too as they're the one wagon I MUST have :) Nothing says 'narrow gauge' more to me than a scruffy loco hauling a rake of rusty tippers.

HGWL do a 16mm version of the old Eggerbahn Works Loco (which I used to have) and no doubt I'll buy one of them eventually but I'd also like to build a 16mm version of the Egger Tram loco, another of my fave locos.

Just been giving the loco a coat of Vallejo Satin varnish which is giving a nice soft sheen. First time I've used Vallejo products and they seem good, if tiny bottles.

Regards
Steve

User avatar
Boustrophedon
Trainee Fireman
Trainee Fireman
Posts: 235
Joined: Wed May 22, 2013 7:43 pm

Post by Boustrophedon » Tue Jan 10, 2017 2:24 pm

I built one of these and had the plastic worm gear shredded to useless in a few minutes running. The brass gear had sharp burrs on the ends of the teeth that simply cut into the worm. Fortunately a spare worm was supplied and a few minutes with a diamond needle file removed the burrs and polished the ends of the teeth.

I also had to load the loco with large lumps of lead to give it enough grip to actually pull anything.

Putting my mechanical engineer's hat on, I have oft voiced my dislike of worm gears; because they are frictionally irreversible they waste at least 50% of the energy they transmit. OK if you are running from powered track, just about acceptable if you run rechargeable batteries, but running off AAs it's like buying four and throwing two away before you start. You also lose at least 50% of the tractive force which is never acceptable.

See here: http://gardenrails.myfreeforum.org/about10305.html

Redbaron25
Cleaner
Cleaner
Posts: 14
Joined: Fri Jun 28, 2013 11:17 am

Post by Redbaron25 » Wed Jan 18, 2017 4:02 pm

Thanks for the post - as I did a lot of reading-up on these kits before I bought one I'd already seen your previous thread regarding the gear shredding the worm so I checked the gear and dressed it with a fine file before I installed the axle.

I also used some 'Grease 'Em' graphite powder from Kadee (used on my HO knuckle couplers) to give a little non-sticky lubrication and the gear seems to work well...for now anyway.

I totally agree with your comments about worm drives being inefficient, I remember the old Hornby locos and how often the big clunky worm would jam. Only really good for belting round an oval at top speed. :)

Steve

User avatar
markoteal
Trainee Driver
Trainee Driver
Posts: 763
Joined: Mon Apr 18, 2016 6:23 pm
Location: Yorkshire

Post by markoteal » Wed Jan 18, 2017 8:04 pm

Can only agree with what is said above - great kits from these guys - I have a great loco (see my avatar) with the same worm and grub - works fine and mine's seen loads of action - eventually I guess i'll replace with all metal but at the mo its great.

I also use Deltang in both my petrol outlines - brilliant and faultless performance - there are guys on this forum that supply and plenty of others around the 16mm scene that also can help

Welcome aboard
Where did I put that uncoupler?

User avatar
sstjc
Fireman
Fireman
Posts: 442
Joined: Mon Dec 22, 2008 10:47 am
Location: Faversham Kent
Contact:

Post by sstjc » Wed Jan 18, 2017 10:45 pm

I would tend to suggest that anyone who suffers from this shredding due to rough gears is a rarity. I have several of these chassis and not had a problem. The quality for the price of the HGLW kits is unbeatable.

My current project is a version, sort of, of a narrow gauge wickham inspection car. For the drive unit I needed an inside frame power chassis. Because HGLW, which would have been my preference, don't do an inside frame power unit I used an IP Engineering budget chassis which cost £29 and ordered the gears and plastic drive chain from Motion Control for £12.86 which made a grand total of £41.86.

The HGLW power chassis comes in at £19.75 for the 4 wheel drive unit and in my opinion is a better unit.

This IP unit for instance which I ordered to be 32mm gauge came with the wheels set on 45mm gauge axles. They also supply a pair of axles for 32mm gauge as well but these were not of sufficient diameter and wheels just fell off them so no good at all but had I not been able to adjust the 45mm axles i'd have been quite unhappy. There were other minor issues with the IP chassis which were a lesser issue but you would expect after all these years of selling them they would be better. HGLW chassis went to gether first time straight out of the box.

However I would say that the supports around the motor mean it needs some considerable work to fit into non-hglw bodies.

So I know where my hard earned will go next time....

Barry
Regards
Barry

www.5inchrail.com

Post Reply

Who is online

Users browsing this forum: No registered users and 10 guests