Page 2 of 4
Re: Quarry Hunslet
Posted: Tue May 28, 2024 8:05 am
by FWLR
Thats really neat Philip. Have you made the housing box yourself. It great for protecting the gears from all the rubbish that gets picked up when running the locos.

I broke my wrist when I was working for the company some years ago and all I did was support myself when I slipped on a very wet bit of flatten cardboard that was by the back doors of the van I was getting into. Didn't think I had until I went to the hospital a few days later and had an X-ray.

It was still painful a few weeks after getting the plaster off....
Re: Quarry Hunslet
Posted: Tue May 28, 2024 8:34 am
by Trevor Thompson
That is a very nice loco you are building!
As others have said - very crisp printing.
What resin are you using?
Trevor
Re: Quarry Hunslet
Posted: Tue May 28, 2024 10:06 am
by philipy
Thanks Trevor.
That's a can of worms!
I started by using up the Sunlu "WaterWashable ABS Like" that I had left from the Watertower that absorbed moisture, if you remember. Working on the basis that the loco would be stored indoors and not run in the rain!
That ran out, so, crossing fingers, toes and everything else, I added some Sunlu standard waterwashable because I have read that resins can be mixed, although I'd never tried it before. I forgot that it was black though, so the next few bits came out a dark grey colour! That printed perfectly, so I added some more... and more... and more, until that ran out as well. Then I remembered that I had a part bottle of Elegoo WaterWashable that I hadn't liked and didn't use up, so crossing everything again, I added that in as well. It did work but not as cleanly as before, which came as no real surprise.
So when that was about used up, I chucked the remains of the 3-way mixture and bought some more of the Sunlu ABS like.
If you look back to the picture with various components, you'll see the colour changes as I added more black.

Interesting experiment and it appears that resins ARE mixable, at least within the same brand, but I don't like Elegoo and I haven't tried mixing water washable with IPA washable.
Re: Quarry Hunslet
Posted: Tue May 28, 2024 10:15 am
by philipy
FWLR wrote: Tue May 28, 2024 8:05 am
Thats really neat Philip. Have you made the housing box yourself. It great for protecting the gears from all the rubbish that gets picked up when running the locos.
Thanks Rod.
Yes, the gearmotor housing is custom drawn & printed. In three parts, the body in two halves glued together - saves messing about with supports, and the end cap which is a push fit. I'll probably also put a small screw in to hold it when I'm happy with everything

- Screenshot 2024-05-28 10.09.46.png (51.61 KiB) Viewed 37689 times
Re: Quarry Hunslet
Posted: Tue May 28, 2024 1:39 pm
by philipy
A couple of weeks ago, Peter Butler posted a writeup of a kit he was building where the manufacturers had provided two plastic jigs to simplify quartering. That gave me an idea

First I used my Sketchup drawing of the loco sideframes and copied the axle holes as a "group" and placed them onto a 2mm thick slab drawing. This gave me the exact axle centres. Next I copied the drawing outline of my cranks and placed one on top of each axle centre. The outline was then enlarged slightly ( by 0.2mm all round) to allow some working tolerance and both shapes pushed through the block to give two crank shaped holes.
The cranks were then turned through 90deg on the drawing and the process repeated.
This gave two templates at exactly 90deg to each other, and as Peter found with his kit, quartering is simple.


- IMG_0786.jpg (379.91 KiB) Viewed 37674 times
Obviously, this needs to be repeated for each loco build to ensure the axle centres are correct, but in the grand scheme of things it takes very little time and potentially saves a lot of cursing! For an 0-6-0 it ought to be even more of a godsend.
Re: Quarry Hunslet
Posted: Tue May 28, 2024 2:19 pm
by Peter Butler
I'm glad you found that useful Philip, I found it so easy to use and thought others might benefit from the idea too.
It might be possible to have individual units, thereby removing the need for accurate distance spacing, as long as they are set on flat surfaces and at perfect right angles.
Please remember.... I'm not an engineer!
Re: Quarry Hunslet
Posted: Wed May 29, 2024 4:24 am
by drewzero1
By a stroke of coincidence I happen to be working on a six-coupled loco at the moment, and will soon be ready to mount the axles and cranks... Perfect timing! I might have to give this method a try.
Re: Quarry Hunslet
Posted: Wed May 29, 2024 6:52 am
by FWLR
philipy wrote: Tue May 28, 2024 10:15 am
FWLR wrote: Tue May 28, 2024 8:05 am
Thats really neat Philip. Have you made the housing box yourself. It great for protecting the gears from all the rubbish that gets picked up when running the locos.
Thanks Rod.
Yes, the gearmotor housing is custom drawn & printed. In three parts, the body in two halves glued together - saves messing about with supports, and the end cap which is a push fit. I'll probably also put a small screw in to hold it when I'm happy with everything
Screenshot 2024-05-28 10.09.46.png
Would you be able to make the stl available Philip..
Re: Quarry Hunslet
Posted: Wed May 29, 2024 8:32 am
by philipy
Have done Rod. Please note though that it probably only fits this one variety of motor/gearbox.
https://www.aliexpress.com/item/1005006734665217.html spm=a2g0o.order_detail.order_detail_item.3.2c23f19cXMuIuf
Re: Quarry Hunslet
Posted: Thu May 30, 2024 7:14 am
by philipy
A query, folks. Can anyone tell me what these two blue circular objects are on the footplate just in front of the cab? Painted blue they presumably are part of the loco itself?

- Britomart cropped.jpg (191.02 KiB) Viewed 37538 times
Re: Quarry Hunslet
Posted: Thu May 30, 2024 8:30 am
by drewzero1
Oil cans, one for steam oil and the other for bearing oil? I can mostly only find stock images of this type of can so I'm uncertain of my sources.
Re: Quarry Hunslet
Posted: Thu May 30, 2024 8:33 am
by philipy
Thanks Drew. Oil cans were my best guess too, but the fact that on this (preserved) loco they were painted to match it, had me wondering, plus that there are smaller definite oil cans sitting in front of them. The spouts ( if thats what they are) seem to be at funny angle too.
Re: Quarry Hunslet
Posted: Thu May 30, 2024 8:43 am
by philipy
I've been looking round further, and I think they must definitely be oil cans. I have found a couple of pictures with unpainted cans in the same location and looking at similar shots of other locos, some have oil cans there and some don't, but none seem to be painted in livery. Net result...? I'm going to forget about them!
Re: Quarry Hunslet
Posted: Thu May 30, 2024 1:57 pm
by drewzero1
If I had to hazard a guess I'd say those are probably the jugs they would use to refill the smaller cans in front, but an engine that is regularly steamed up in a shed might just store the extra supply in the shed.
Re: Quarry Hunslet
Posted: Fri May 31, 2024 3:16 pm
by FWLR
Thanks Philip,
I have a couple of those very same motors but at the lower revs.
Re: Quarry Hunslet
Posted: Sat Jun 01, 2024 9:15 am
by Lonsdaler
drewzero1 wrote: Thu May 30, 2024 1:57 pm
If I had to hazard a guess I'd say those are probably the jugs they would use to refill the smaller cans in front, but an engine that is regularly steamed up in a shed might just store the extra supply in the shed.
Glad I finished reading the thread before offering my two penn'orth. I agree with Drew, presumably the smaller cans are easier to use accurately but don't hold enough for maintaining a days steaming.
Re: Quarry Hunslet
Posted: Tue Jun 25, 2024 4:43 pm
by philipy
Feeling lazy ( & stingy), I had a look around for a free download driver figure stl for my Quarry Hunslet, and I came across this site, which is offering Festiniog drivers for free!
https://tramfabriek.co.uk/figurines.html
They are 1:76 not garden rail sizes, but of course can be scaled in the slicer. I think they would look a little crude when scaled up, but might be OK when half hidden in a cab. There also seems to be a bit of a female bias too, not complaining, just noting!
They also do a load of other small scale stuff but some of it might be of wider use.
As for my build, it is progressing but very slowly. I've been having a problem with the clearance of the crossheads on the cranks and I can't see why. Currently waiting for some very thin head screws from China in the hope that they will save a fraction of a mm. Other than that, the battery pack is assembled and the R/C is working, and all the other various bits are painted, but I don't want to permanently fix anything until I'm happy with the running.
Re: Quarry Hunslet
Posted: Wed Jun 26, 2024 2:23 am
by drewzero1
Bookmarked for later... That fire woman is ducking just right to peer out of the cabs of some of our, ahem, vertically challenged locos.

Re: Quarry Hunslet
Posted: Wed Jun 26, 2024 10:51 am
by Old Man Aaron
Half the webpage won't load on my end, so I'll look forward to seeing your finished work.

Re: Quarry Hunslet
Posted: Sun Jul 21, 2024 2:58 pm
by philipy
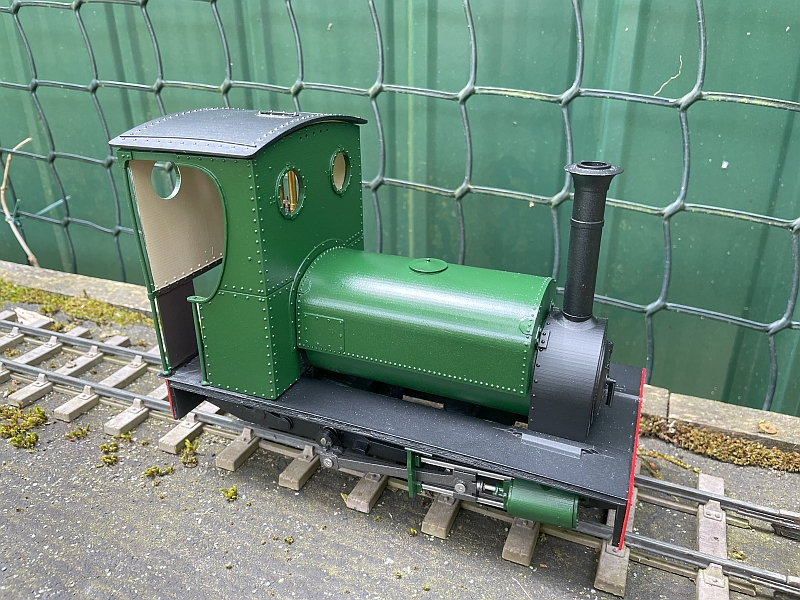
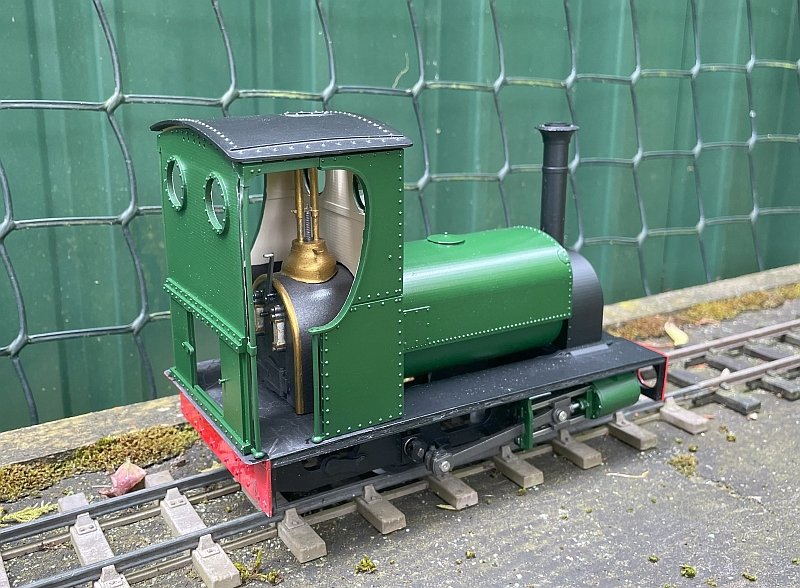
It's been virtually a month since I posted on this, but things have actually progressed somewhat in that time and it does at least run now! I'm still not entirely happy, but hopeful that the last little hesitation will disappear with some real running in.
So this is where I am at, today. The roof is still loose until I've installed the cab fittings, and of course it still needs the springs, various bits of pipework, cab steps and buffers/couplings, etc. Not to mention a driver.
- IMG_0846.jpg (436.45 KiB) Viewed 36455 times
- IMG_0847.jpg (407.01 KiB) Viewed 36455 times
I hope this shot might be of some use to others.
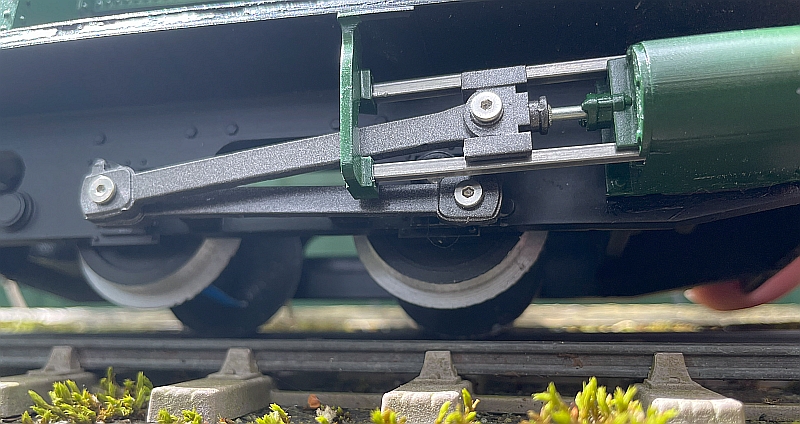
Right back near the beginning I mentioned that I had a plan for the wheels. One of the things that always slightly bugs me with 3D printed wheels is that they are always all black (or white, brown or grey), whereas wheels that are in service always have shiny treads and at least some shine on the flanges. You can of course paint them, but the paint soon wears and also seems to attract all the track muck. Sooo, I bought some Sunlu "Silk PLA+" in silver and used that to print the wheels. It isn't perfect but to my mind looks a lot closer to the real thing.
As an aside, I used the wheel drawing to create a mask for painting the centres and backs, which worked really well. All I did was to put a 6mm thick 3D box around the wheel drawing and then delete the wheel, leaving a correct size and shape hole in the slab. This fits over the wheel and allows spraying from both sides without getting wobbly edges.
- IMG_0852.jpg (289.46 KiB) Viewed 36455 times
Also clear in this shot are the slide bars. Brass ones don't look right, to me, and I'm not convinced that printed ones would be robust enough, but after a few mins on fleabay I came across some 2mm square keysteel and that fits the bill perfectly.
Finally, the piston rods are the pins from suitable sized pop rivets, with a brass sleeve inside the cylinders.