Building THORNAS - ADDING SOUND

A place where discussions are about 3D printing.
User avatar
philipy
Moderator
Moderator
Posts: 5098
Joined: Sun Jan 30, 2011 3:00 pm
Location: South Northants

Re: Building THORNAS

Post by philipy » Thu Nov 16, 2023 3:12 pm

It's done!!
OK, after several days of messing about with bits and pieces, my Thornas is now finished. Along the way there seems to have been a gender change ( keep taking the tablets!) and Thornas is now LUNA ( named after our dog).
So following the last update:
The front lamp is now wired and working, although I think I may change the resistor because it's a little bit bright.
The windows are glazed, the cab interior and driver are fitted and I've added some handrails to the smokebox, plus a 2nd lamp iron on the front of the footplate.
I haven't as yet put another lamp on the bunker although the wire is there in case I decide to do it later.
She runs quite nicely light engine, although I believe I'll need to add more weight to haul a train. Because of that, the bunker is empty of coal so that I can get some lead in first.

I do have one problem but that is to do with the r/c not the loco. For some strange reason although the Rx65b finds the Tx ok when first switched it doesn't provide power to the motor and I have to switch both on and off a few times before it starts working properly. Its only this Rx that seems to show the problem though, switching the Selecta to another loco on a different setting and its fine. I need to do some more investigating.
IMG_0468.jpg
IMG_0468.jpg (378.61 KiB) Viewed 5797 times
IMG_0465.jpg
IMG_0465.jpg (413.85 KiB) Viewed 5797 times
IMG_0471.jpg
IMG_0471.jpg (357.35 KiB) Viewed 5797 times
IMG_0458.jpg
IMG_0458.jpg (558.45 KiB) Viewed 5797 times
Apologies for the quality of this video but the weather is too manky to mess about outside today.


Finally I must thank Drew for his initial design and build work and for sharing his files.
Philip

User avatar
drewzero1
Administrator
Administrator
Posts: 486
Joined: Fri Apr 21, 2023 4:35 pm
Location: WI, US

Re: Building THORNAS - FINISHED

Post by drewzero1 » Thu Nov 16, 2023 6:22 pm

She looks amazing! I'm taking lots of notes on how I could improve the original Thornas. The backhead really completes the cab and the driver fits perfectly, and the look is completed by all of the smaller details I wouldn't have even considered. :bravo

Love the name too; I think it fits the little loco well. (How'd you know to finish it just in time for my birthday this weekend? :lol:)

User avatar
ge_rik
Administrator
Administrator
Posts: 6580
Joined: Sun Oct 25, 2009 10:20 pm
Location: Cheshire
Contact:

Re: Building THORNAS - FINISHED

Post by ge_rik » Thu Nov 16, 2023 7:15 pm

Looks great and runs really well.
Not sure why the Rx65 is playing up. The aerial isn't touching the motor by any chance...... ?

Rik
------------------------
Peckforton Light Railway - Blog Facebook Youtube

User avatar
Peter Butler
Driver
Driver
Posts: 5245
Joined: Sun Sep 09, 2012 10:33 pm
Location: West Wales

Re: Building THORNAS - FINISHED

Post by Peter Butler » Thu Nov 16, 2023 7:54 pm

A lovely little loco, the extra detail makes all the difference.
The best things in life are free.... so why am I doing this?

User avatar
philipy
Moderator
Moderator
Posts: 5098
Joined: Sun Jan 30, 2011 3:00 pm
Location: South Northants

Re: Building THORNAS - FINISHED

Post by philipy » Thu Nov 16, 2023 9:03 pm

drewzero1 wrote: Thu Nov 16, 2023 6:22 pm I'm taking lots of notes on how I could improve the original Thornas. The backhead really completes the cab and the driver fits perfectly, and the look is completed by all of the smaller details I wouldn't have even considered.
I thought I'd put together a zip of my modified and additional bits and add it to your thread for anyone else to play around with, if thats ok with you.
One thing I would have done if I'd thought of it sooner is to add front footplate steps when I ftted the cab steps to the footplate.

drewzero1 wrote: Thu Nov 16, 2023 6:22 pm Love the name too; I think it fits the little loco well. (How'd you know to finish it just in time for my birthday this weekend? :lol:)
Happy birthday :occasion4:

Well as I said, it's our dog's name ( she'll be 11 at the end of next month) and I have 2 other loco's named after our parrots and one named after my granddaughter!
Philip

User avatar
SimonWood
Trainee Driver
Trainee Driver
Posts: 658
Joined: Tue Apr 07, 2015 9:46 pm
Location: West Wales
Contact:

Re: Building THORNAS - FINISHED

Post by SimonWood » Thu Nov 16, 2023 9:39 pm

Stunning. And a really great write-up, thank you. Fascinating to see all the choices you made and why, and then see the overall effect on the final model.
Rheilffordd Moel Rhos: blog - photos - videos

User avatar
-steves-
Administrator
Administrator
Posts: 2444
Joined: Thu Jul 28, 2011 1:50 pm
Location: Cambridge & Peterborough

Re: Building THORNAS - FINISHED

Post by -steves- » Fri Nov 17, 2023 12:51 pm

Fantastic work and such a great runner :thumbup:
The buck stops here .......

Ditton Meadow Light Railway (DMLR)
Member of Peterborough and District Association
http://peterborough.16mm.org.uk/

User avatar
philipy
Moderator
Moderator
Posts: 5098
Joined: Sun Jan 30, 2011 3:00 pm
Location: South Northants

Re: Building THORNAS - FINISHED

Post by philipy » Fri Nov 17, 2023 6:42 pm

ge_rik wrote: Thu Nov 16, 2023 7:15 pm
Not sure why the Rx65 is playing up. The aerial isn't touching the motor by any chance...... ?
Thanks Rik, no that isn't the problem, but the suggestion gave me an idea.
I still don't know for certain what exactly the problem was but the aerial end of the Rx is pushed up into the smokebox where I can't see it, so it will have been pushed into who knows what configuration. In addition, the two wires to the front LED, repeating the pcb, are jumbled in there as well and it obviously flicks on and off as it is binding and might create interferance. Finally, I thought I noticed that the problem appeared to go away when I had the loco upside down, although difficult to be certain of that, but of course it will all flop up and down at random as it is inverted.
Sooo, I have stuck the Rx to a piece of thin card with masking tape and the aerial is fixed in a straight line away from the pcb. Have put it all back together and it seems to be Ok now, although only time will tell for sure, of course.
Philip

User avatar
ge_rik
Administrator
Administrator
Posts: 6580
Joined: Sun Oct 25, 2009 10:20 pm
Location: Cheshire
Contact:

Re: Building THORNAS - FINISHED

Post by ge_rik » Fri Nov 17, 2023 9:51 pm

philipy wrote: Fri Nov 17, 2023 6:42 pm ....... Have put it all back together and it seems to be Ok now, although only time will tell for sure, of course.
Fingers crossed..... 🫰

Rik
------------------------
Peckforton Light Railway - Blog Facebook Youtube

User avatar
tommygander1941
Cleaner
Cleaner
Posts: 5
Joined: Thu May 27, 2021 7:52 am

Re: Building THORNAS

Post by tommygander1941 » Fri Nov 24, 2023 5:39 am

GTB wrote: Mon Oct 30, 2023 9:10 am
philipy wrote: Mon Oct 30, 2023 6:33 am The tallest figure that will fit in the cab of Thornas is about 85mm high.
That makes the cab about the same height as a Kerr Stuart Skylark. The TVT engineer is 85mm tall and he just fits in the Skylark cab. I wouldn't worry too much, Skylarks weren't alone in having low cabs.

Anyway, the average male Brit was nowhere near 6' during the steam era, a steam loco driver was probably doing well to be 5'6" (88mm in 16mm/ft scale).

Graeme
The Skylarks actually had a cab that could fit someone of 6ft height, tall for their day but average now. Even the standard Tattoo class has an unusually tall cab
Attachments
Hadfields East Hecla Steelworks Kerr Stuart 'Skylark'.jpg
Hadfields East Hecla Steelworks Kerr Stuart 'Skylark'.jpg (1.31 MiB) Viewed 5583 times
Screenshot 2023-11-24 05.37.36.png
Screenshot 2023-11-24 05.37.36.png (928.99 KiB) Viewed 5583 times
Screenshot 2023-11-24 05.35.45.png
Screenshot 2023-11-24 05.35.45.png (853.62 KiB) Viewed 5583 times

User avatar
philipy
Moderator
Moderator
Posts: 5098
Joined: Sun Jan 30, 2011 3:00 pm
Location: South Northants

Re: Building THORNAS - ADDING SOUND

Post by philipy » Fri Dec 01, 2023 1:56 pm

I always had it in the back of my mind to add sound to this loco, but didn't want to do anything until I had it running satisfactorily. So, now that it is, sound was next on the agenda. Commercial soundcards are expensive and relatively bulky and space is at a premium so I decided to take inspiration from Rik ( Again! Thanks Rik) and play around with a DF Player Mini.
I won't bore everyone with my trials and tribulations getting it working because they were mainly to do wth my own incompetance, however what I wanted to do was have two sound tracks on the micro SD card, one being a "start up, moving off and running" track and the other being a "slow down and stop".
I searched high and low on the 'net but couldn't find what I wanted so in the end I set up another loco with an MLS sound card in it, on a rolling road, and recorded that doing the sequences that I wanted. I then opened the file in Audacity and firstly I copied the last 10 seconds of the clip and saved that separately then deleted it from the original. I then played around a bit with the main clip until I had the sequence that I wanted. This "running" clip was only about 90 seconds long at this point, so I copied it multiple times and joined them end to end until I had a clip that lasted about 20 minutes. That should last for approximately 2 complete circuits of my line without stopping. I then took the saved end clip and modified that slighly and re-saved it. I have read in several places that DFPlayer gives a smoother transition from one track to another with .wav files rather than .mp3, so the originals were saved as wav's and played back perfectly. However after the editing in Audacity, although they play perfectly in that program and VLC Player, and even Windows Media Player, the DF Player doesn't like them and just gives a strange "Bleuw" noise. After much mucking about and getting nowhere, in desperation I resaved both clips as mp3 files and DF Player plays those perfectly - I have no idea why the difference?

Anyway, I now had to get DF Player to play nicely with the loco and Deltang Rx65b.
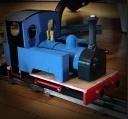
I have 6x AA Low self discharge NiMh batteries in the loco, which when fully charged push out a smidgeon over 8v, which is perfect for the Rx but the DF Player wants 5v or slightly less, so I rummaged in my bits box and came up a small variable voltage regulator board and set it to give 4.5v. By happy chance, this board just fits between the connection pins on the player so the two together make a nice neat little self contained package.
IMG_0504.jpg
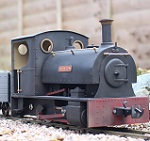
IMG_0504.jpg (1.52 MiB) Viewed 5205 times
The player has the ability to play many tracks plus various controls, depending on how it is wired but I only needed two. The first track ( start and run) play as soon as they are triggered by the Rx, the 'end' track is then triggered by sending a signal to the "Next" command on the DF P. This overides the track that is already playing so the loco sound slows down, comes to a stop and cuts out. Then sending the initial command again starts the main clip, etc. There is a slight click when it switches tracks, but it is faint and quick and I can live with it - might not even be noticeable to anyone else.
Philip

User avatar
ge_rik
Administrator
Administrator
Posts: 6580
Joined: Sun Oct 25, 2009 10:20 pm
Location: Cheshire
Contact:

Re: Building THORNAS - ADDING SOUND

Post by ge_rik » Fri Dec 01, 2023 2:04 pm

Sounds like (sorry about the pun) a good compromise solution.

Rik
------------------------
Peckforton Light Railway - Blog Facebook Youtube

User avatar
philipy
Moderator
Moderator
Posts: 5098
Joined: Sun Jan 30, 2011 3:00 pm
Location: South Northants

Re: Building THORNAS - ADDING SOUND

Post by philipy » Fri Dec 01, 2023 2:43 pm

This where the fun started! The Rx65b that I used in this loco is actually one that I took out of something else because I had unsuccesfully tried to change the programming and it appeared to be faulty. However the basic functions still seemed to be ok. To trigger the DF Player I need to send signals to connect its input to ground (0v) and this should be achievable using Channel 3 on Pads 9 & 10 but it didn't want to know. Eventually after going round in circles between the Deltang website, and Rik's various blogs, plus the original little leaflet that had come with it, I finally worked out that my Rx was a version 11/03 which is before there were significant changes to the Rx firmware at version 11/11 and that the Channel 3 outputs on mine are Pads 6 & 7 not 9 & 10. Not only that, but P6 & 7 output plus 3v not 0v. It is possible to reprogram them to give 0v but thats a real pain using a Tx22 so I opted for the easier solution and knocked up 2 small transistor inverters which are doing the job nicely and all is now working fine. Carefully wrapped evrything in heat shrink sleeving then wired it to the loco properly and took it out to test it...all fine... except for a strange rattley buzzing noise which seemed to coming from the sound system but hadn't been there on the bench.

Back indoors, a quick inspection revealed the problem to be the driver. The speaker is mounted on the underside of the cab roof, facing downwards. It is 40mm diameter, 5mm deep, 8R, 1W, and I had designed and printed a housing for it with the bottom level with the top of the sidesheets. When I set it up, the roof was still loose, however testing outside revealed that in fact the driver was slightly taller than the sidesheets, so the speaker cone was sitting on his head and had actually deformed slightly, hence the buzz! - Remember that I spoke about the height of the driver, before? A bit of filing of the top of his head, some careful measuring and a slight redraw of the mount, and the speaker now clears his head by a mil or two.
Screenshot 2023-12-01 14.20.56.png
Screenshot 2023-12-01 14.20.56.png (30.7 KiB) Viewed 5196 times
The speaker wires are two strands from an old grey ribbon cable and the slots in the sides allow them to exit the housing and run down inside the cab front to a hole in the top of the backhead.

IMG_0518.jpg
IMG_0518.jpg (423.56 KiB) Viewed 5196 times
[To be continued]
Philip

User avatar
philipy
Moderator
Moderator
Posts: 5098
Joined: Sun Jan 30, 2011 3:00 pm
Location: South Northants

Re: Building THORNAS - ADDING SOUND

Post by philipy » Fri Dec 08, 2023 2:41 pm

Phew...finally warmed up enough and stopped raining for long enough to grab a few minutes in the garden!

So a quick clip of my usual poor quality filming to demonstrate the sound installation and the loco pulling a short train.

Philip

User avatar
-steves-
Administrator
Administrator
Posts: 2444
Joined: Thu Jul 28, 2011 1:50 pm
Location: Cambridge & Peterborough

Re: Building THORNAS - ADDING SOUND

Post by -steves- » Fri Dec 08, 2023 2:42 pm

Loving that speaker in the roof, great idea! :thumbup:
The buck stops here .......

Ditton Meadow Light Railway (DMLR)
Member of Peterborough and District Association
http://peterborough.16mm.org.uk/

User avatar
ge_rik
Administrator
Administrator
Posts: 6580
Joined: Sun Oct 25, 2009 10:20 pm
Location: Cheshire
Contact:

Re: Building THORNAS - ADDING SOUND

Post by ge_rik » Fri Dec 08, 2023 3:06 pm

Looks and sounds great. Glad you got the outputs from the Rx sorted. As you say, sometimes it's easier to invert the output than to reprogram the Rx


Rik
------------------------
Peckforton Light Railway - Blog Facebook Youtube

User avatar
drewzero1
Administrator
Administrator
Posts: 486
Joined: Fri Apr 21, 2023 4:35 pm
Location: WI, US

Re: Building THORNAS - ADDING SOUND

Post by drewzero1 » Fri Dec 08, 2023 6:34 pm

:bravo Lovely to see (and hear) it pulling a train... that's about as many cars as mine can manage. It sounds like you've added quite a bit more weight than I have, something I didn't really consider enough in the design.

User avatar
philipy
Moderator
Moderator
Posts: 5098
Joined: Sun Jan 30, 2011 3:00 pm
Location: South Northants

Re: Building THORNAS - ADDING SOUND

Post by philipy » Fri Dec 08, 2023 8:16 pm

She can move 9 wagons indoors on 2 lengths of rail but I couldn't be bothered to take that many outside, but in the video the knob was only set at about 1/3. She weighs 875g, don't know how that compares with your Thornas?
Philip

User avatar
GTB
Driver
Driver
Posts: 1559
Joined: Sat Mar 05, 2011 2:46 pm
Location: Australia

Re: Building THORNAS - ADDING SOUND

Post by GTB » Sat Dec 16, 2023 2:19 am

philipy wrote: Fri Dec 08, 2023 8:16 pm She can move 9 wagons indoors on 2 lengths of rail but I couldn't be bothered to take that many outside, but in the video the knob was only set at about 1/3. She weighs 875g, don't know how that compares with your Thornas?
That's pretty impressive for something that light and fitted with plastic driving wheels.

Graeme

User avatar
drewzero1
Administrator
Administrator
Posts: 486
Joined: Fri Apr 21, 2023 4:35 pm
Location: WI, US

Re: Building THORNAS - ADDING SOUND

Post by drewzero1 » Fri Dec 22, 2023 5:54 am

philipy wrote: Fri Dec 08, 2023 8:16 pm She can move 9 wagons indoors on 2 lengths of rail but I couldn't be bothered to take that many outside, but in the video the knob was only set at about 1/3. She weighs 875g, don't know how that compares with your Thornas?
I finally got around to weighing mine and with 2 (of the expected 4) li-ion cells installed it's a measly 434g-- about half(!) of Luna. Two more 18650s should only add about 90g so it looks like I'd better start cramming in some lead somewhere! During my outdoor running session this summer Thornas managed to reliably pull six wagons around the loop, though half of those were smaller mineral wagons with a light load.

Post Reply

Who is online

Users browsing this forum: No registered users and 2 guests