A place where discussions are about 3D printing.
-
ge_rik
- Administrator

- Posts: 6679
- Joined: Sun Oct 25, 2009 10:20 pm
- Location: Cheshire
-
Contact:
Post
by ge_rik » Sun Dec 13, 2020 12:26 pm
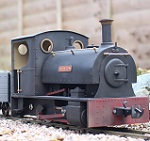
My latest effort ....

- IMG_1304.JPG (75.91 KiB) Viewed 4008 times

- IMG_1305.JPG (73.53 KiB) Viewed 4008 times
Drawn in TinkerCAD, yet to be painted ...
Rik
-
-steves-
- Administrator
- Posts: 2445
- Joined: Thu Jul 28, 2011 1:50 pm
- Location: Cambridge & Peterborough
Post
by -steves- » Sun Dec 13, 2020 12:33 pm
Very nice Rik, have you designed the entire wagon including base, axle carriers, wheels etc, or is it the top part to go on a ready made base?
-
ge_rik
- Administrator
- Posts: 6679
- Joined: Sun Oct 25, 2009 10:20 pm
- Location: Cheshire
-
Contact:
Post
by ge_rik » Sun Dec 13, 2020 12:42 pm
-steves- wrote: ↑Sun Dec 13, 2020 12:33 pm
Very nice Rik, have you designed the entire wagon including base, axle carriers, wheels etc, or is it the top part to go on a ready made base?
The whole wagon - apart from the wheels. I've used plasticard for the floor of the wagon but a ready-planked rectangle could easilyhave been drawn.
Rik
-
-steves-
- Administrator
- Posts: 2445
- Joined: Thu Jul 28, 2011 1:50 pm
- Location: Cambridge & Peterborough
Post
by -steves- » Sun Dec 13, 2020 12:51 pm
ge_rik wrote: ↑Sun Dec 13, 2020 12:42 pm
-steves- wrote: ↑Sun Dec 13, 2020 12:33 pm
Very nice Rik, have you designed the entire wagon including base, axle carriers, wheels etc, or is it the top part to go on a ready made base?
The whole wagon - apart from the wheels. I've used plasticard for the floor of the wagon but a ready-planked rectangle could easilyhave been drawn.
Rik
Very nice, I am yet again impressed. With a load in the wagon it won't matter what is at the bottom and cutting a bit of plasticard is way faster and cheaper to do, great idea

-
ge_rik
- Administrator
- Posts: 6679
- Joined: Sun Oct 25, 2009 10:20 pm
- Location: Cheshire
-
Contact:
Post
by ge_rik » Sun Dec 13, 2020 12:51 pm
Here are the parts straight off the printers - the light grey parts are off the Eryone Thinker SE and the dark grey parts are off the cheapo Anet A8 clone. I use brims on both printers to help with adhesion.

- IMG_1294-001.JPG (44.59 KiB) Viewed 4002 times
.

- IMG_1296-001.JPG (25.59 KiB) Viewed 4002 times
.

- IMG_1297-001.JPG (31.56 KiB) Viewed 4002 times
.

- IMG_1299-001.JPG (32.74 KiB) Viewed 4002 times
.

- IMG_1300-001.JPG (36.88 KiB) Viewed 4002 times
.
Rik
-
ge_rik
- Administrator
- Posts: 6679
- Joined: Sun Oct 25, 2009 10:20 pm
- Location: Cheshire
-
Contact:
Post
by ge_rik » Sun Dec 13, 2020 12:55 pm
Looks better in TinkerCAD

- solebar TinkerCAD.jpg (25.32 KiB) Viewed 4001 times
.
Rik
-
philipy
- Moderator
- Posts: 5168
- Joined: Sun Jan 30, 2011 3:00 pm
- Location: South Northants
Post
by philipy » Sun Dec 13, 2020 1:00 pm
ge_rik wrote: ↑Sun Dec 13, 2020 12:55 pm
Looks better in TinkerCAD
Yeah, they always look better from the drawings than the printed reality!

Nevertheless, the prints do look very good.
Philip
-
ge_rik
- Administrator
- Posts: 6679
- Joined: Sun Oct 25, 2009 10:20 pm
- Location: Cheshire
-
Contact:
Post
by ge_rik » Sun Dec 13, 2020 1:11 pm
-steves- wrote: ↑Sun Dec 13, 2020 12:51 pm
With a load in the wagon it won't matter what is at the bottom and cutting a bit of plasticard is way faster and cheaper to do, great idea
The floor and the inside sides are planked as well ...

- IMG_1308.JPG (41.07 KiB) Viewed 3996 times
.
Rik
-
ge_rik
- Administrator
- Posts: 6679
- Joined: Sun Oct 25, 2009 10:20 pm
- Location: Cheshire
-
Contact:
Post
by ge_rik » Sun Dec 13, 2020 10:49 pm
I've added a file for the floor to the set of .STL files in the new 3D download section so anyone wanting to print the wagon has the option of printing it or using a piece of plasticard.

- floor TinkerCAD.jpg (38.13 KiB) Viewed 3974 times
.
Rik
-
FWLR
- Driver

- Posts: 4353
- Joined: Sat Aug 05, 2017 9:45 am
- Location: Preston, Lancashire, UK
Post
by FWLR » Sun Jan 10, 2021 11:10 am
Hi Rik,
My memory has lapsed again. Did you do a thread on how you did your wagon sides in TinkerCad. I seem to remember someone doing it. It showed how to copy and paste, plus round off ends and put hinges on too. I can't seem to find it now.
I thought I had bookmarked it

-
Palmerston
- Trainee Fireman

- Posts: 194
- Joined: Mon Feb 02, 2009 5:56 pm
- Location: Southest of The Netherlands
Post
by Palmerston » Sun Jan 10, 2021 12:01 pm
Can be found on his Blog!
Live steam on 45 & 184mm, battery 45mm only.
Who is online
Users browsing this forum: No registered users and 0 guests