

The Development of the WLR
Been painting baseboards...
Check out my steam and engineering youtube channel at...
https://www.youtube.com/channel/UC8vX4P ... _PnvhldjjA
https://www.youtube.com/channel/UC8vX4P ... _PnvhldjjA
Re: The Development of the WLR
A bit of progress while I'm on furlough...
Engine shed nearing completion.
A coal store and a water tower. The water tower body was from the remains of an 0 gauge garden railway I was given many years ago - added to a base I think it looks the part. Wants the underscale chain replacing though, and some sort of valve fitted.
Platform and station building. I was going to repair the roof, but I reckon I'll leave it and have it under repair. Wonder what you'd do on the platform - wrap it in roofing felt perhaps?
Some sort of machine shop/boilerworks/ironworks. Not entirely sure how this is going to end up. Shall probably concrete the area in like I have around the engine shed and have a level crossing leading up to the edge of the baseboards to provide a road to haul items from the ironworks.
As you can see - I don't tend to plan things too much!
This was a right pigs ear to build...
Unfortunately I've run out of coffee stirrers for the time being, and I need to sort out some corrugated iron for the roof.
Engine shed nearing completion.
- 106491533_10164226046355497_3969525270791674725_o.jpg (101.6 KiB) Viewed 5621 times
- 75341008_10164228107965497_3216453865750028050_o.jpg (89.94 KiB) Viewed 5621 times
- 74705031_10164228108280497_7218446664922019723_o.jpg (95.55 KiB) Viewed 5621 times
- 106227208_10164228106620497_3781207794897347773_o.jpg (108.44 KiB) Viewed 5621 times
- 74437581_10164228161050497_533871960292751749_o.jpg (84.94 KiB) Viewed 5621 times
- 106208224_10164228107280497_8168142506449748430_o.jpg (161.58 KiB) Viewed 5621 times
- 83688573_10164228105975497_4275529453905150469_o.jpg (120.36 KiB) Viewed 5621 times
Last edited by steamyjim on Mon Jun 29, 2020 10:49 pm, edited 1 time in total.
Check out my steam and engineering youtube channel at...
https://www.youtube.com/channel/UC8vX4P ... _PnvhldjjA
https://www.youtube.com/channel/UC8vX4P ... _PnvhldjjA


Re: The Whitchurch Light Railway
Those buildings look great - chunky and bucolic. 
Rik
Rik
Re: The Whitchurch Light Railway
Coffee stirrers, I have hundreds of them..  Bought a load of eBay a few years ago. best place to get them however is cafes. But if you are like Anne and I, we can't get a coffee anymore due to COVID-19
ROD
Life is so easy when I run my trains.


https://gardenrails.org/forum/viewtopic ... 41&t=11364
https://www.youtube.com/@fairywoodlightrailway
Life is so easy when I run my trains.


https://gardenrails.org/forum/viewtopic ... 41&t=11364
https://www.youtube.com/@fairywoodlightrailway
Re: The Development of the WLR
I'll get an order in for some coffee stirrers on Amazon I reckon - I'm trying to avoid going out as much as possible at the moment...
Another productive day!
Made an imitation cast iron water tank for the rear of the engine shed to feed the water tower...
And added a vent into the vent hole...
Nearly finished, just needs tiling, the top of the water tank planked, and I reckon some nice LED gas lamps on the walls.
Another productive day!
Made an imitation cast iron water tank for the rear of the engine shed to feed the water tower...
- 75250824_10164231566815497_7325627610355789153_o.jpg (135.63 KiB) Viewed 5556 times
- 106195644_10164231565775497_4450957244055723446_o.jpg (130.82 KiB) Viewed 5556 times
- 106170165_10164231566125497_4944993938145740767_o.jpg (132.7 KiB) Viewed 5556 times
- 75341008_10164231565350497_6292100577478188088_o.jpg (152.78 KiB) Viewed 5556 times
Last edited by steamyjim on Mon Jun 29, 2020 10:49 pm, edited 1 time in total.
Check out my steam and engineering youtube channel at...
https://www.youtube.com/channel/UC8vX4P ... _PnvhldjjA
https://www.youtube.com/channel/UC8vX4P ... _PnvhldjjA
Re: The Whitchurch Light Railway
And I rescued this rather knackered crane that came from the same 0 gauge railway as the water tower. New side panels, base, jib, handle, platform, stone pillar, and new cross braces. Meccano hook and a dodgy set of Mamod wheels as a load!
- 84387933_10164231904265497_5161417480005314971_o.jpg (116.82 KiB) Viewed 5479 times
- 84273432_10164231903510497_3765123723063258173_o.jpg (160.8 KiB) Viewed 5479 times
- 106508686_10164231903955497_1637233940239862789_o.jpg (113.62 KiB) Viewed 5479 times
- 106133735_10164231902435497_4452023805270459461_o.jpg (112.79 KiB) Viewed 5479 times
- 79245094_10164231902855497_7593637693430263741_o.jpg (106.67 KiB) Viewed 5479 times
- 75550413_10164231903175497_4947231021689680338_o.jpg (133.87 KiB) Viewed 5479 times
Last edited by steamyjim on Wed Jul 01, 2020 10:06 am, edited 1 time in total.
Check out my steam and engineering youtube channel at...
https://www.youtube.com/channel/UC8vX4P ... _PnvhldjjA
https://www.youtube.com/channel/UC8vX4P ... _PnvhldjjA

Re: The Development of the WLR
That engine shed really does look good.
Grant.
Grant.

Re: The Development of the WLR
Some lovely modelling, thanks for sharing.
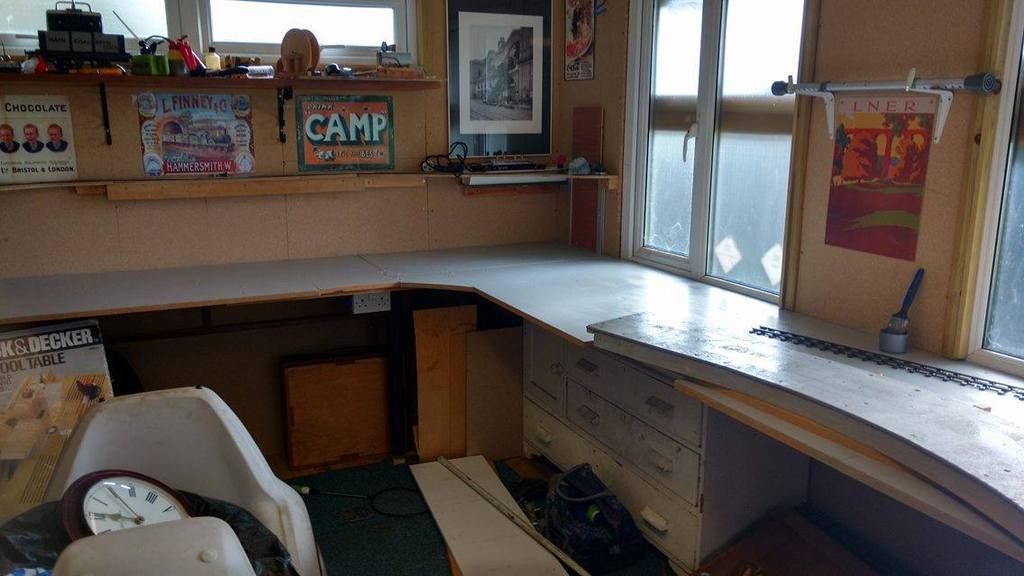
Thanks also for the couple of shots which show your workshop - impressively tidy and organised at the back ( unlike mine) but impressively untidy and disorganised on the bench ( exactly like mine!).
Thanks also for the couple of shots which show your workshop - impressively tidy and organised at the back ( unlike mine) but impressively untidy and disorganised on the bench ( exactly like mine!).
Philip
Re: The Development of the WLR
Nice job on the crane.
ROD
Life is so easy when I run my trains.
https://gardenrails.org/forum/viewtopic ... 41&t=11364
https://www.youtube.com/@fairywoodlightrailway
Life is so easy when I run my trains.
https://gardenrails.org/forum/viewtopic ... 41&t=11364
https://www.youtube.com/@fairywoodlightrailway
Re: The Development of the WLR
Issues with my 3D CAD package stopped me from working on the design of the Ironworks to go with the wooden loading shed, so I got on with something else. Started this coal mine 4-5 years ago with the engine shed, got it operational then got bored...
The coal mine winds into a piece of drainpipe sink into the baseboards. I've 12v variable power supplies dotted around the layout (old Hornby controllers) to power things like this.
Today I made the flywheel, the water tank (cooling water for the atmospheric engine), the firebox, the motor cover and a few other bits and bobs. As you can see, somewhat of a knife and fork modeller - no drawings, and I like strong robust structures that I then clad with finer detail. I also like to use laser cutting where possible to save time. The engine shed started out just as rough and ready as this.
I'd welcome your thoughts on cladding the 'firebox' for the boiler. The curves are going to make it difficult with the usual Peter Jones woodchip method so I'm thinking perhaps use an engraver to put a brick/stone effect on...?
Also, I've seen stick on injection moulded rivets, can someone tell me if nuts are available with a bit of thread stuck out of them?
This would've been a right pig to make without the laser cutter...!
You can see it in operation, when I first installed it here, along with what eventually will be a Gn15 feeder line... *Can anyone tell me how to embed the video here, please????*
The coal mine winds into a piece of drainpipe sink into the baseboards. I've 12v variable power supplies dotted around the layout (old Hornby controllers) to power things like this.
Today I made the flywheel, the water tank (cooling water for the atmospheric engine), the firebox, the motor cover and a few other bits and bobs. As you can see, somewhat of a knife and fork modeller - no drawings, and I like strong robust structures that I then clad with finer detail. I also like to use laser cutting where possible to save time. The engine shed started out just as rough and ready as this.
I'd welcome your thoughts on cladding the 'firebox' for the boiler. The curves are going to make it difficult with the usual Peter Jones woodchip method so I'm thinking perhaps use an engraver to put a brick/stone effect on...?
Also, I've seen stick on injection moulded rivets, can someone tell me if nuts are available with a bit of thread stuck out of them?
- 106476578_10164238927580497_598479964633427320_o.jpg (172.52 KiB) Viewed 5421 times
- 106707109_10164238928160497_7979756519703558646_o.jpg (156.74 KiB) Viewed 5421 times
- 106579430_10164238929315497_7229344919907585278_o.jpg (131.68 KiB) Viewed 5421 times
- 72949966_10164238928525497_2794709627747257274_o.jpg (142.38 KiB) Viewed 5421 times
- 75362508_10164238928820497_4877263787033409994_o.jpg (138.93 KiB) Viewed 5421 times
- 106909653_10164238929870497_246334734103035709_o.jpg (166.47 KiB) Viewed 5421 times
This would've been a right pig to make without the laser cutter...!
- 106986752_10164238982450497_6916720276035510397_o.jpg (123.33 KiB) Viewed 5421 times
You can see it in operation, when I first installed it here, along with what eventually will be a Gn15 feeder line... *Can anyone tell me how to embed the video here, please????*
Last edited by steamyjim on Wed Jul 01, 2020 10:06 am, edited 3 times in total.
Check out my steam and engineering youtube channel at...
https://www.youtube.com/channel/UC8vX4P ... _PnvhldjjA
https://www.youtube.com/channel/UC8vX4P ... _PnvhldjjA
Re: The Development of the WLR
I share the workshop with my granddad so there is a lot of stuff in there - I keep trying to have clear out but our definition of 'worth keeping' is very different! You can bet your bottom dollar that whenever I fill the bin up he roots through it and pulls stuff out before it goes! On the other hand, we are well equipped so if you can find some bench space you can plod on pretty well with a project!
Check out my steam and engineering youtube channel at...
https://www.youtube.com/channel/UC8vX4P ... _PnvhldjjA
https://www.youtube.com/channel/UC8vX4P ... _PnvhldjjA
-
Peter Butler

- Driver

- Posts: 5234
- Joined: Sun Sep 09, 2012 10:33 pm
- Location: West Wales
Re: The Development of the WLR
Plastic moulded rivet heads and bolts with nuts (range of shapes and sizes on one sprue) are available here....
http://cambrianmodels.co.uk/
I have used them on many models and although fiddly they look good when applied.
http://cambrianmodels.co.uk/
I have used them on many models and although fiddly they look good when applied.
The best things in life are free.... so why am I doing this?
Re: The Development of the WLR
Thank you Peter - some handy stuff on their website, I'll get a few sprues and other bits and pieces on order! I'm sure under a coat of my favourite quick drying matt black paint they'll look just the job!Peter Butler wrote: ↑Tue Jun 30, 2020 9:08 pm Plastic moulded rivet heads and bolts with nuts (range of shapes and sizes on one sprue) are available here....
http://cambrianmodels.co.uk/
I have used them on many models and although fiddly they look good when applied.
Check out my steam and engineering youtube channel at...
https://www.youtube.com/channel/UC8vX4P ... _PnvhldjjA
https://www.youtube.com/channel/UC8vX4P ... _PnvhldjjA
Re: The Development of the WLR
3d modelling back up and running so the shell of the Ironworks has been knocked up. Looking through various pictures of warehouses for inspiration there were a few features I wanted to add (the two buildings joined by a cast iron walkway, elevated outdoor steam pipe, the wooden overhang/extension and a wall mounted hoist) that I couldn't all fit on my initial scheme, so i've added the two low relief structures as shown in the 'fag packet' drawing too...
I suppose there ought to be a set of level crossing gates there - did narrow gauge lines generally have level crossings at all crossings? When the trains pass this section they're either imminently arriving at the station, or have just left, so I would assume they'd only be travelling slowly.
I suppose there ought to be a set of level crossing gates there - did narrow gauge lines generally have level crossings at all crossings? When the trains pass this section they're either imminently arriving at the station, or have just left, so I would assume they'd only be travelling slowly.
- Capture.JPG (27.49 KiB) Viewed 5393 times
- shs.jpg (110.67 KiB) Viewed 5393 times
Last edited by steamyjim on Wed Jul 01, 2020 10:06 am, edited 1 time in total.
Check out my steam and engineering youtube channel at...
https://www.youtube.com/channel/UC8vX4P ... _PnvhldjjA
https://www.youtube.com/channel/UC8vX4P ... _PnvhldjjA
Re: The Development of the WLR
You're really steaming along with progress. Some impressive developments. Love the crane and the water tank.
If you highlight the YouTube URL and then click on the "video" button on the right above the text window it will surround the link with the tags needed to embed it in the post.
Hope that makes sense.
Rik
If you highlight the YouTube URL and then click on the "video" button on the right above the text window it will surround the link with the tags needed to embed it in the post.
Hope that makes sense.
Rik
Re: The Development of the WLR
This is a screen shot Jim, showing the video icon. I have posted it for you. But you can try it yourself now. Hope this makes it clearer for you.
Also, it's up to you. If after our before you add whatever video you are posting, if you drop down a couple of places with the cursor, you will leave a space between photo/video so any message is better and clearer to read.
PS. If you click on Preview before you post, you can see what and how you are posting...
Also, it's up to you. If after our before you add whatever video you are posting, if you drop down a couple of places with the cursor, you will leave a space between photo/video so any message is better and clearer to read.
- 869B7561-EFB2-4E20-B9D7-FD2AA452B170.jpeg (82.6 KiB) Viewed 6509 times
PS. If you click on Preview before you post, you can see what and how you are posting...
ROD
Life is so easy when I run my trains.
https://gardenrails.org/forum/viewtopic ... 41&t=11364
https://www.youtube.com/@fairywoodlightrailway
Life is so easy when I run my trains.
https://gardenrails.org/forum/viewtopic ... 41&t=11364
https://www.youtube.com/@fairywoodlightrailway
Re: The Development of the WLR
Thank you both! Have embedded the video and added larger gaps between text and photos - odd that it wants two spaces to make a 'one space' gap, as I was already adding the one space.
Rik - along with Peter Jones' book, your blog has been the other main inspiration for how to go about the scenic work.
Rik - along with Peter Jones' book, your blog has been the other main inspiration for how to go about the scenic work.
Check out my steam and engineering youtube channel at...
https://www.youtube.com/channel/UC8vX4P ... _PnvhldjjA
https://www.youtube.com/channel/UC8vX4P ... _PnvhldjjA
Re: The Development of the WLR
Another productive day on t'pit!
That's the majority of the mechanical bits done - boiler next now. Conveniently Meccano nuts are square which looks the part on Georgian engineering, if a little over scale.
I've got one of those engraving tools that I'm going to have a go with for putting the stonework on the firebox tomorrow - not looking forward to that. Need to suss out a way of putting a taper on the four sides of the chimney (and find a longer bit of wood!)
What would you use for pipework? I'm thinking of trying it find some heavy gauge copper wire to bend to shape...?
Really enjoying this...
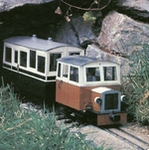
And the original inspiration at Coalbrokedale...
Oh, and it still runs, albeit a touch fast on 1.5v...
That's the majority of the mechanical bits done - boiler next now. Conveniently Meccano nuts are square which looks the part on Georgian engineering, if a little over scale.
I've got one of those engraving tools that I'm going to have a go with for putting the stonework on the firebox tomorrow - not looking forward to that. Need to suss out a way of putting a taper on the four sides of the chimney (and find a longer bit of wood!)
What would you use for pipework? I'm thinking of trying it find some heavy gauge copper wire to bend to shape...?
Really enjoying this...
- 106506405_10164246631035497_6843497604428623030_o.jpg (172.51 KiB) Viewed 6471 times
- 106453108_10164246631620497_4246376378207782554_o.jpg (148.22 KiB) Viewed 6471 times
- 106416990_10164246632860497_8636527723866867210_o.jpg (146.01 KiB) Viewed 6471 times
- 106422305_10164246632155497_5202156267931664175_o.jpg (146.88 KiB) Viewed 6471 times
- 80228740_10164246632560497_7815368396318405532_o.jpg (175.33 KiB) Viewed 6471 times
And the original inspiration at Coalbrokedale...
- 106603228_10164246632985497_7341495009444073553_n.jpg (91.2 KiB) Viewed 6471 times
Oh, and it still runs, albeit a touch fast on 1.5v...
Check out my steam and engineering youtube channel at...
https://www.youtube.com/channel/UC8vX4P ... _PnvhldjjA
https://www.youtube.com/channel/UC8vX4P ... _PnvhldjjA
Re: The Development of the WLR
Great to see you have got videos to work now. This video is brilliant and the model is superb, though yes it is a tad too fast.
ROD
Life is so easy when I run my trains.
https://gardenrails.org/forum/viewtopic ... 41&t=11364
https://www.youtube.com/@fairywoodlightrailway
Life is so easy when I run my trains.
https://gardenrails.org/forum/viewtopic ... 41&t=11364
https://www.youtube.com/@fairywoodlightrailway
Re: The Development of the WLR
Thanks Jimsteamyjim wrote: ↑Wed Jul 01, 2020 10:09 am Thank you both! Have embedded the video and added larger gaps between text and photos - odd that it wants two spaces to make a 'one space' gap, as I was already adding the one space.
Rik - along with Peter Jones' book, your blog has been the other main inspiration for how to go about the scenic work.
I'm delighted to hear that my musings have been helpful. Looking forward to seeing how things develop on your railway.
Rik
Who is online
Users browsing this forum: No registered users and 12 guests