Thank You very much for the compliment Invicta

As I don't do videos, perhaps words might suffice.
Firstly my best friend for this is an original Olympus airbrush. I understand there is a copy now, but I've no experience of them.
For the uninitiated they are a high quality double action, airbrush with adjustable material volume. This means the trigger has two actions, pressing it down gives you propellant air, pulling it back gives you material (paint in this case) and the amount of paint is adjustable. For weathering in particular this allows you to have air on, and then introduce tiny amounts of paint into the pattern and hence the job.
The next thing to know is where to put what colours and why. I suspect you guys in England might be at a slight disadvantage here, as your locos appear to be kept much cleaner, although the older generation of modellers should remember locos in hard working life when the demise of steam was imminent.
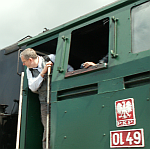
I have admitted I do terrible things with paint, but it works for me so I keep on. The Hunslet mentioned above was originally painted with automotive acrylic from an aerosol can. The smokebox was painted with high temp. stoving in matt black. All the weathering was done with Humbrol enamels, finishing off with Revell matt clear for most, and Cabots Urethane gloss with matting agent stirred in (I ran out of Revell matt) for the dome, funnel, safety valve etc.
The high heat of real loco smokeboxes ends up blistering the paint particularly the lower part of the door where ash collects inside so a rust colour gives this effect, the heat is also concentrated as it enters the funnel so more rust here. In hard water areas, also as the lids of the tanks are banged about you get rust or scale developing. Rust is obvious, scale shows up whiter or very pale grey (old dictum, "there is NO white or black in nature") everything else gets a liberal coating of soot and smuts falling vertically, so matt black can be used from a distance to simulate this. Rods and motion work all get my favourite darkish milk chocolate colour (used to be called Humbrol Brown Bess, but they've changed it now) and couplers rusty or brown or black.
A good source for weathering is Tipong Colliery ex B Class locos, but there are plenty of others. Just spraying a surface with blotchy dirt colour doesn't really cut it, dirt has a source and a reason for it appearing where it does, and a bit of thought can add a really authentic look.

- My Hunslet 1.JPG (69.26 KiB) Viewed 5622 times

- My Hunslet 2.JPG (73.27 KiB) Viewed 5622 times
Two views of the Hunslet after the weathering job.
My apologies for being so long winded, hope this goes a little way to explain things.
Grant.
PS just noticed I pulled back the rust on top of the smokebox door, the beauty of the airbrush, just keep going till you get it right!