
Managed to reprime to bring the riveting into grey then I started on applying theain colour - used Ford Burgundy rattle spray as CHLR's equivalent to Victorian Maroon - looked alright when i did it by eye (slightly lighter than my RH Millie ) but had a shock when I photo graphed it - just goes to show the difference between artificial and natural light - the first two photos are under workbench lighting whilst the third is in natural day light - just goes to show the difference.
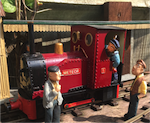
In the last one you can start to see my (well Ernie, the works painter, who you can see in the last pic busy on the panel) black painting work on the smokebox and rear panel - next step is sorting painting etc. the inside of the cab before assembly and brassing the dome and maybe the bands on the boiler (gulps)
- IMG_2109.JPG (461.69 KiB) Viewed 4829 times
- IMG_2110.JPG (397.8 KiB) Viewed 4829 times
- IMG_2111.JPG (436.03 KiB) Viewed 4829 times


