Hi all.
Has anyone got experience of making their own 16mm figures. I need a lady to work behind the counter in my buffet car and would love to make my own.
David.
16mm clay figures
-
River Lin

- Fireman

- Posts: 411
- Joined: Wed Dec 11, 2013 8:40 pm
- Location: Leicester
16mm clay figures
David T.
-
philipy

- Moderator

- Posts: 6043
- Joined: Sun Jan 30, 2011 3:00 pm
- Location: South Northants
Yes, I've made some of my own. Although they don't stand up to close scrutiny, they would be OK in a restricted situation such as behind the counter.
Basically I followed the method in this You Tube video
https://www.youtube.com/watch?v=Z089P3TdNoI
Basically I followed the method in this You Tube video
https://www.youtube.com/watch?v=Z089P3TdNoI
Philip
-
LNR

- Driver

- Posts: 1888
- Joined: Sat Feb 27, 2016 5:26 am
- Location: Melbourne, Australia
Hi David,
I made the Station Master using Fimo oven baked modelling clay. I'm hopeless at heads/faces (his head got rather large in the process). Using the clay over a foil skeleton worked well as I adopted a step by step approach, basically dressing him one item at a time, into the oven, next item and so on.

Grant.
I made the Station Master using Fimo oven baked modelling clay. I'm hopeless at heads/faces (his head got rather large in the process). Using the clay over a foil skeleton worked well as I adopted a step by step approach, basically dressing him one item at a time, into the oven, next item and so on.
Grant.
-
andymctractor
- Trainee Driver

- Posts: 712
- Joined: Fri Feb 01, 2013 12:03 am
- Location: Suffolk, UK
- Contact:
David,
there is a well written step by step description of the way to 'Sculpt your own realistic figures' using polymer clay in Garden Railways mag in the Dec. 2009, Feb. 2010, April 2010 and June 2010 issues.
This uses foil for the skeleton and suggests baking at each stage of construction similar to how Grant LNR describes his method.
I was a subscriber to the mag and they did sell past editions though you have to purchase them from the US.
Practice makes perfect but it is much harder than it looks.
Good Luck
Andy
there is a well written step by step description of the way to 'Sculpt your own realistic figures' using polymer clay in Garden Railways mag in the Dec. 2009, Feb. 2010, April 2010 and June 2010 issues.
This uses foil for the skeleton and suggests baking at each stage of construction similar to how Grant LNR describes his method.
I was a subscriber to the mag and they did sell past editions though you have to purchase them from the US.
Practice makes perfect but it is much harder than it looks.
Good Luck
Andy
Regards
Andy McMahon
If it moves, salute it. If it doesn't move, paint it. (RN sailors basic skills course 1968)
Andy McMahon
If it moves, salute it. If it doesn't move, paint it. (RN sailors basic skills course 1968)
-
LNR
- Driver
- Posts: 1888
- Joined: Sat Feb 27, 2016 5:26 am
- Location: Melbourne, Australia
David,
I'm working on memory here (not a particularly reliable source), but I found the hardest part was establishing a rigid framework, the foil being so flimsy, but the clay grabs the foil better than wire.
So twist the foil as thin as you can to make the stick figure, then roll very thin sheets to form tubes around the foil for legs arm torso etc kneading them well together to avoid "cold laps", don't worry about head at this stage, but do leave foil sticking up from neck. Wack him on a baking tray (don't worry about any slight dinting from laying on the tray, you'll cover that ) and into the oven.
Once he/she is solid, and if you have kept it nice and thin you should have a rigid thin stick figure to work on. You can then start padding out the body in stages.
Hope this is of some help, sorry it's so long winded.
Grant.
I'm working on memory here (not a particularly reliable source), but I found the hardest part was establishing a rigid framework, the foil being so flimsy, but the clay grabs the foil better than wire.
So twist the foil as thin as you can to make the stick figure, then roll very thin sheets to form tubes around the foil for legs arm torso etc kneading them well together to avoid "cold laps", don't worry about head at this stage, but do leave foil sticking up from neck. Wack him on a baking tray (don't worry about any slight dinting from laying on the tray, you'll cover that ) and into the oven.
Once he/she is solid, and if you have kept it nice and thin you should have a rigid thin stick figure to work on. You can then start padding out the body in stages.
Hope this is of some help, sorry it's so long winded.
Grant.
-
GTB
- Driver
- Posts: 1712
- Joined: Sat Mar 05, 2011 2:46 pm
- Location: Australia
My memory is not always a lot better, but in this case I recall discussing figures with Grant and he referred to a figure building tutorial that was on the US myLargescale.com group. It went west along with a lot of other archived stuff when they changed software a while ago, but it looks like someone has just resurrected those files.LNR:121348 wrote: I'm working on memory here (not a particularly reliable source),
The tutorial links are in the first post in this thread and are downloadable as pdf docs.
http://forums.mylargescale.com/28-figur ... walas.html
Regards,
Graeme
-
Peter Butler

- Driver
- Posts: 5715
- Joined: Sun Sep 09, 2012 10:33 pm
- Location: West Wales
I have made some figures myself, although a little larger than 1/19th scale for my Emetts. For the framework I used floral wire, the sort flower arrangers use to make blooms stay where they want them. It is very flexible and easily makes up into a human form with additional strength added by winding it around itself. Even then it can be altered in shape without breaking. For the torso I used DAS modelling clay, although this is not suitable for outdoor use. Fimo would be far superior and by baking in stages, give additional strength.
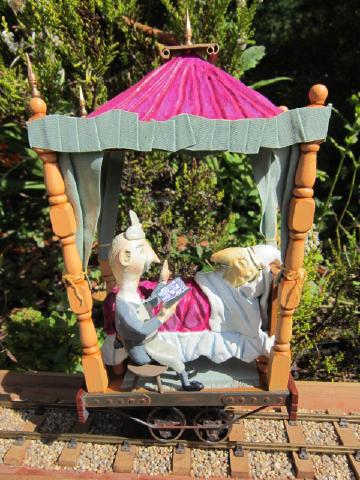
After spending time, and a significant amount of money, on materials etc. I think paying for the 3D printed ones suits me better.
They are not detailed as SM32 figures should be, rather more cartoon characters for my particular needs.

After spending time, and a significant amount of money, on materials etc. I think paying for the 3D printed ones suits me better.
They are not detailed as SM32 figures should be, rather more cartoon characters for my particular needs.
The best things in life are free.... so why am I doing this?
-
bazzer42
I have seen on the SE lounge someone using wooden art mannequins to build whether you can obtain them to scale 16mm size I don't know. There is also a quick 2 x A4 tutorial by Rob Bennett who makes it sound oh so simple...probably is to some.
I fancy trying the Grant method of baking layer by layer but I'm sure mine would be more onion than his brilĺiant station master.
I fancy trying the Grant method of baking layer by layer but I'm sure mine would be more onion than his brilĺiant station master.
-
Peter Butler
- Driver
- Posts: 5715
- Joined: Sun Sep 09, 2012 10:33 pm
- Location: West Wales
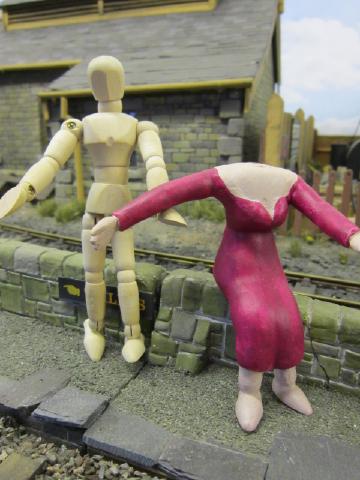
I use those too as they are suitable for the larger scales. Available from 'The Works' at about £1.00 each they can be used as a good strong adjustable mannequin. Designed for artists to draw figures in various poses they are almost infinitely adjustable.bazzer42:121357 wrote:I have seen on the SE lounge someone using wooden art mannequins to build whether you can obtain them to scale 16mm size I don't know.
Unfortunately too big for SM32....
The best things in life are free.... so why am I doing this?
Who is online
Users browsing this forum: No registered users and 21 guests