DIY brass etching


Not sure what the "it" in this sentence is, but if it's just Sulphates, they are not herbicides.Big Jim:115549 wrote:Be careful how you dispose of any solution as it is used as a herbicide.
- Ferrous Sulphate is used to kill moss without affecting grass.
- Copper Sulphate is used to kill fungi without affecting plants, and is also used as a source of essential traces of copper.
However excess copper IS detrimental to plant life, and once in the soil stays there long-term, so spent etch electrolyte could prove damaging and care is indeed needed when disposing of it.
On which point I have heard that copper roofing nails are good for killing stumps.
David


Sulphates aren't an issue (there's an appreciable amount in seawater) and gypsum (calcium sulphate) is commonly used as a soil conditioner.tuppenced:115565 wrote: Not sure what the "it" in this sentence is, but if it's just Sulphates, they are not herbicides.
The problem with disposing of used etching solutions is that copper salts in water are biocides. So is zinc, which will be present if etching brass, although it is a less powerful biocide.
Water authorities go troppo if they find someone is disposing of etching solutions into their sewers, or drains. The activated sludge in a sewage plant is very sensitive to copper salts.
Electrolytic etching has the advantage that the copper removed from the workpiece just ends up making the copper cathode thicker, so the electrolyte can be kept and re-used again. There's no need to dispose of it after use.
Graeme
First up, i would like to thank Jim for posting this tutorial. I would never have even considered etching my own plates if i hadn't read this.Big Jim:115513 wrote:Thanks for the kind words.
I should like to add that this is very much a cheap and cheerful way of doing it.
You can use proper toner transfer sheets. However they cost a lot more than inkjet paper. OHP transparency film is supposed to work as well.
If you could still find it, Letraset rub down transfers would do as a mask.
If you were feeling really clever, just a sharpie pen will work.
But what ever you do the mask has to be dense.
If you read about brass etching the issue of undercut is often mentioned. I don't know if this will be a problem with this method and really for my purposes it doesn't matter anyway.
The biggest problem I had was getting the image right. I found that if I just saved it as a MS Publisher file the quality was not as good as a PDF file.
I think the plates should have been spaced a little further apart as cutting them out will be a nuisance.
The brass needs to be at least .030 thick, trials with thinner stuff did not work so well.
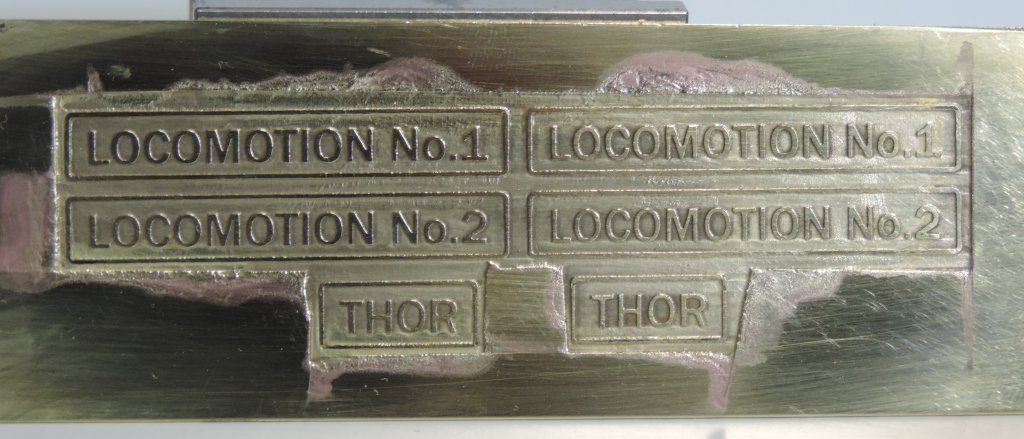
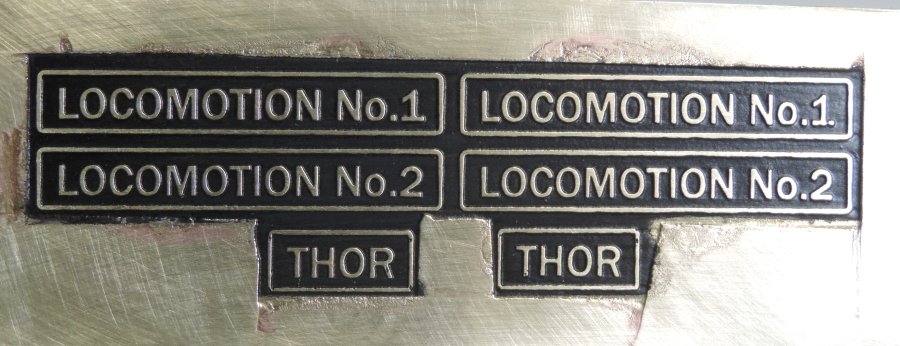
I've just successfully etched my first set of plates and would like to add a few notes to Jim's guide if i may.
I found to get the best transfer of toner to the brass, iron the paper until you can see the print showing through from the other side. This gained me a 100% transfer of toner to the brass.
I also used Ryman's own brand A4 150gsm Photo Gloss paper.
I found that i couldn't get 8oz of copper sulphate to fully disolve in a pint. I think about 6oz is the maximum.
I didn't cover the back of the etched plate and found that all the uncovered area (including the back) had been etched.
I used an identical bit of brass plate as the cathode and made a simple wooden jig to hold the 2 plates parallel to each other in the solution 2" apart. This appeared to work fine.
Anyway, here's a pic of my first effort.


This is a great thread! Thanks for posting it jim!
I it certainly something I will take a look at.
I it certainly something I will take a look at.
If it can be made full scale it can be made 16mm
My line: http://gardenrails.myfreeforum.org/about7200.html
My line: http://gardenrails.myfreeforum.org/about7200.html
Alan, I doff my cap to you Sir!
They have turned out brilliant, well done.
The etch seems to have given it a good bite into the brass.
How long did they take?
Come on folks have a go and post your results and tips, the more the merrier!
One thing I should add is if you are planning to use a lead acid battery charger, make sure it is an old fashioned, non computer controlled one, not a 'smart charger' as they may supply the juice in a slightly different way and might protest and could get a bit confused and end up letting the magic smoke out.
(for those who don't know, all electrical infernal machines run on magic smoke. If this smoke happens to escape they will never work again!)
If at first you don't succeed, use a bigger hammer!
Thanks Jim.
I left the plates in for 45 minutes as per your instructions, seems to be about right.
By far the most tricky bit of the whole process is ironing the transfer onto the brass. I just don't think the male of the species has a natural aptitude for it
If you have a bench power supply, needs to be able to supply at least 5 amps, then that will do in place of the battery charger.

Attached is an example of some that I etched a couple of years back, using Ferric Chloride ( from Maplin).Big Jim:115769 wrote:Alan, I doff my cap to you Sir!
....Come on folks have a go and post your results and tips, ...
It's a bit battered, having been trodden on a few times by clumsy 12":1ft feet that can't read, hence the flaking paint! It is soldered to a piece of brass BH rail as a post.
As for tips: give the back of the work piece a blast of any old rattle can paint. It will stop the etching process from wasting itself and speed up the etching of areas you do want removing.

Philip
Alan I quite agree with your comments about the use of an Iron.
What I would like to find is an old fashioned electric iron. The very heavy ones with no steam setting. Ours is very light weight and a trip to Currys to try and find a heavy one resulted in nothing.
I am going to try using a laminator machine next time to see I that will provide enough heat and pressure to transfer the toner. It might need a few passes though but would be less hassle than setting up the ironing board and risking being caught by the current Mrs Bigjim in a compromising position.
If at first you don't succeed, use a bigger hammer!
Jim,
I used a laser printer and printed it on to glossy magazine paper, then ironed it.
Essentially the same method as has been discussed.
The magazine paper idea came from some on-line articles that I read up on at the time. The point being that the glossy paper has a laquered finish, this prevents the laser toner from binding in to the paper fibres, so that the iron can then melt the toner on to the brass and the paper washes away cleanly.
FWIW, I wrote an article for the old "Model Railways" magazine back in the mid 80's, about DIY etching. I actually etched a complete 4mm coach sides and ends again using Ferric Chloride. The masking for that was done with Humbrol paint in a bow pen, not something I'd recommend really!
Philip
-
Trabant Dave
- Cleaner

- Posts: 10
- Joined: Tue Jun 18, 2013 4:44 pm
How DO you cut them out? When I've scratchbuilt stuff in the past, usually from plastikard, I would score the thicker stuff several times with a Stanley knife (other craft knives are available haha ) through over half the thickness and snap the item out, just leaving a little dressing with smaller blades and files......Alan P:115984 wrote:Not too unhappy with them Graham. Just finished the cutting & filing bit. Next tme i will definitely spread them apart more, it will make cutting them out easier.Gralyn:115981 wrote:I bet that you are very pleasd with the outcome.
Does this work with brass etchings too?
Who is online
Users browsing this forum: 90733 and 1 guest