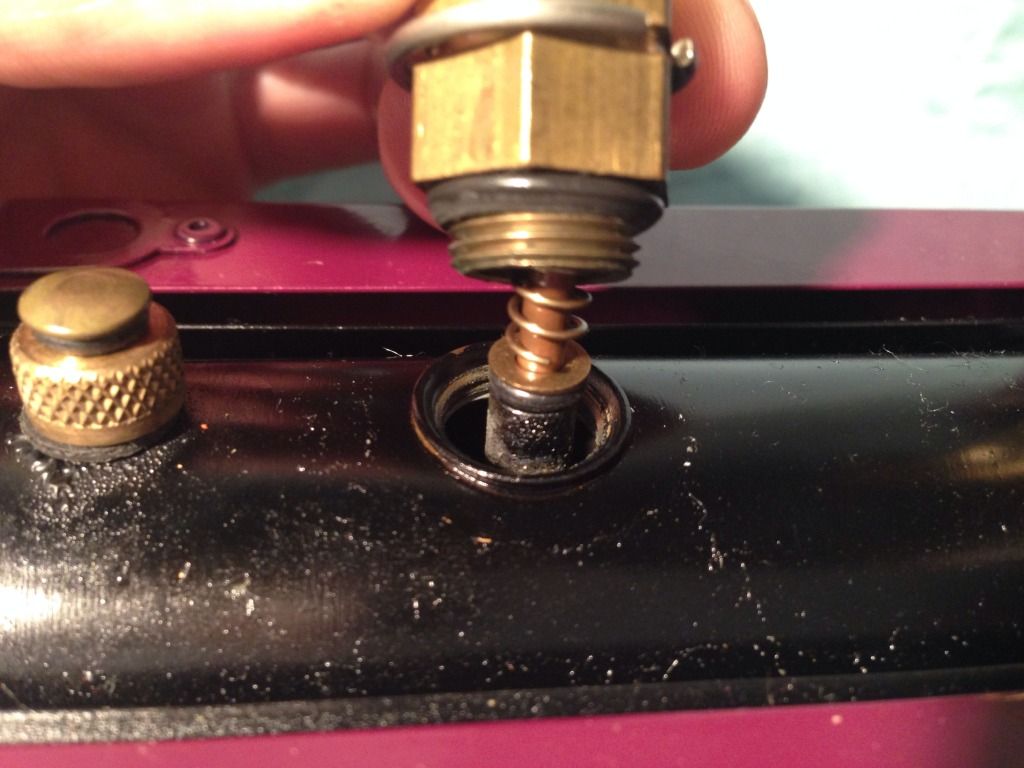
Blue Goblin, a basic repair turned into a full rebuild...

A very popular starting point for Live Steam. With their low cost comes a number of problems which can be discussed here
User avatar
Chris Cairns
Driver
Driver
Posts: 2366
Joined: Mon Oct 29, 2007 7:25 pm
Location: Glasgow, Scotland

Steam Dome Boiler Inserts

Post by Chris Cairns » Thu Nov 07, 2013 7:16 pm

Ace,

Thank You for your answer regarding sealing the steam dome nut. I've never managed to find an off the shelf fibre washer that fits properly but that may be because it is not a British thread size as you would think (the rest are) but a metric size (M12 x 1).

Another useless bit of Mamod/MSS trivia. Here is my workshop Mamod boiler which is a refurbished riveted back plate model.
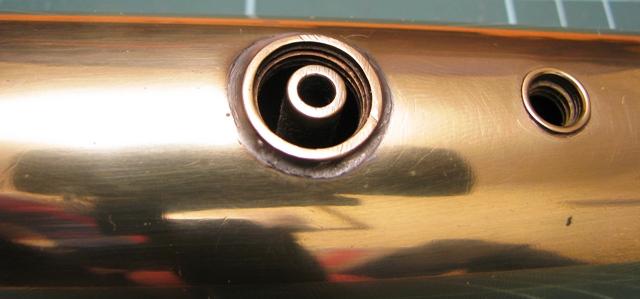
Image

This is typical of the type of steam dome insert I'm used to experiencing with a flat top (most are in worse condition than this one, possibly because of the sharp edges left on the dome nut after machining).

By comparison here is the steam dome insert on my MSS kit built loco.

Image

This one is clearly shaped on the inside edge so that an 'O' ring will mate with that surface.

However here is another interesting comparison.
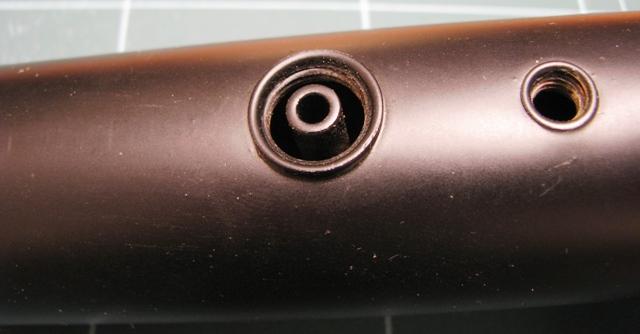
Image

Looks just like my MSS above, but in fact is the boiler from my collection unmade SL1K kit. This is an Ascot, Berkshire Mamod Limited version which would date it between June 1982 & Dec 1984. Be interesting to see what the insert looks like on my SL6 (the last SL to be made only in 1989) but it is currently buried in my collection boxes for now (just added to my "To Do" list the next time I rummage through them).

Chris Cairns.

User avatar
ace
Fireman
Fireman
Posts: 294
Joined: Sun Jul 14, 2013 9:03 am

Post by ace » Thu Nov 07, 2013 7:32 pm

Thanks for the triva Chris. It is interesting to see the difference, when I get home I'll check out my sl6 to see what is there.

If I could remember the packet or part number, there is an off the shelf washer that can be bought and lightly filed to fit. I see no point in doing this because the o ring is a better fit and very seldom gives trouble. I'd rather grind or file out the edge off the inside of the dome insert to fit it and it allows the dome nut to be done up finger tight.

User avatar
Lner fan Sam
Fireman
Fireman
Posts: 491
Joined: Sun Nov 25, 2012 7:57 pm
Location: Sunderland, north east of England

Post by Lner fan Sam » Thu Nov 07, 2013 8:03 pm

Thanks again guys. Ace you know you made that vid on deasembling a mamod cylinder, how about a vid on c-clips?
my first live steam engine build thread:
http://gardenrails.myfreeforum.org/about6685.html

Sam Wake

User avatar
Chris Cairns
Driver
Driver
Posts: 2366
Joined: Mon Oct 29, 2007 7:25 pm
Location: Glasgow, Scotland

Post by Chris Cairns » Thu Nov 07, 2013 8:14 pm

Until recently my MSS running experience was limited to their Saddle Tank which has a smaller steam dome nut which is not normally accessible. So I have adopted the practise of injecting steam oil into the cylinder back plate holes on locomotives without a dedicated lubricator.

Whilst I do not like the visual effect of the smaller MSS steam dome I can see the advantage of it being easily removable to allow steam oil to be injected down the main steam pipe instead. In fact I actually purchased another used MSS steam dome from Doug (dougrail) via eBay to experiment with further on my non-lubricator fitted Mamod SL's. So it is now just getting the right size 'O' ring and having a closer look at those steam dome boiler inserts.

Why is it my "To Do" list just gets bigger all the time!?!

Chris Cairns.

User avatar
Chris Cairns
Driver
Driver
Posts: 2366
Joined: Mon Oct 29, 2007 7:25 pm
Location: Glasgow, Scotland

Post by Chris Cairns » Thu Nov 07, 2013 8:20 pm

Lner fan Sam wrote:how about a vid on c-clips?
Sam, if you are really having difficulty with these e-clips I can take some still photographs of the process if that would help? Do you not still have the original MSS wheels to practise on?

Chris Cairns.

User avatar
Lner fan Sam
Fireman
Fireman
Posts: 491
Joined: Sun Nov 25, 2012 7:57 pm
Location: Sunderland, north east of England

Post by Lner fan Sam » Thu Nov 07, 2013 8:55 pm

That would very helpful thanks chris, just finding it hard to imagine these processes in my mind. :roll:
my first live steam engine build thread:
http://gardenrails.myfreeforum.org/about6685.html

Sam Wake

User avatar
Chris Cairns
Driver
Driver
Posts: 2366
Joined: Mon Oct 29, 2007 7:25 pm
Location: Glasgow, Scotland

Removing/Replacing Coupling Rod e-clips

Post by Chris Cairns » Thu Nov 07, 2013 10:03 pm

OK, here goes. Please excuse the darkish photos as it is night time now and I do not have a remote studio light.

So here is the e-clip secured on the crank pin. You can see there are 2 small slots either side of the middle tang on the e-clip.

Image

So you need to find a screwdriver which has a blade small enough to fit into that slot. Mine has No.3 marked on it. Place the blade inside that slot then lever the screwdriver gently against the crank pin with a finger on the outside of the e-clip so it does not spring off.

Image

You will get the e-clip out to this position where it can be carefully removed. This is also the position that you will slide the e-clip back to manually on refitting.

Image

This is the difficult part and where you can lose the e-clip if you are not careful. Place one jaw of your needle nose pliers over the extruding end of the e-clip, the other jaw needs to be placed over the crank pin but it must be high enough to allow the e-clip to fully engage in the slot, thus the pliers will be at an angle. You need to have a finger over the e-clip so that it does not spring off due to this sideways force being applied (I've left my finger out in the photo for clarity).

Image

Once the e-clip is fully home in the crank pin slot (make sure the middle tang is engaged as per the first photo above), then use your needle pliers to gently pinch it tight again.

Image

Job Done.

Hopefully you can now complete this relatively simple task, and not lose your e-clips in the process (you usually find them again after you have bought replacements - been there done that before now!).

Chris Cairns.

User avatar
ace
Fireman
Fireman
Posts: 294
Joined: Sun Jul 14, 2013 9:03 am

Post by ace » Thu Nov 07, 2013 10:27 pm

Right, just got in and took off the dome of my SL6.

It has an o ring fitment and a curved recess on the top of the insert.

Image

User avatar
Chris Cairns
Driver
Driver
Posts: 2366
Joined: Mon Oct 29, 2007 7:25 pm
Location: Glasgow, Scotland

Post by Chris Cairns » Thu Nov 07, 2013 11:14 pm

Excellent Ace, and saves me having to dig my SL6 out of hibernation.

So another small but subtle change to the Mamod SL carried out over the years. Interestingly with my SL1K kit it still uses a fibre washer as the seal there.

Another item to help you date your Mamod SL.

Chris Cairns.

User avatar
Lner fan Sam
Fireman
Fireman
Posts: 491
Joined: Sun Nov 25, 2012 7:57 pm
Location: Sunderland, north east of England

Post by Lner fan Sam » Fri Nov 08, 2013 4:04 pm

Thanks Chris.
my first live steam engine build thread:
http://gardenrails.myfreeforum.org/about6685.html

Sam Wake

Post Reply

Who is online

Users browsing this forum: No registered users and 13 guests