'Frozen Dawn' SL2 re-build

A very popular starting point for Live Steam. With their low cost comes a number of problems which can be discussed here
pauly
Driver
Driver
Posts: 1970
Joined: Tue Aug 12, 2008 9:18 pm

'Frozen Dawn' SL2 re-build

Post by pauly » Mon Mar 25, 2013 10:25 pm

A few years back I bought this tatty SL2 for £100 and since then shes just ben sat around doing very little and I reckon its time to rebuild her into something I can run more and take to 32MM railways.

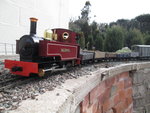
As she stands she has upgraded SV, filler valve and a rear center buffer.
Her paint is tatty and at some point in her past her frames have been hacked to presumably fit a large meths tank.

Image

Image

Image

the plan is to fit her with a gas burner and then run her like that until either
A. I can afford an upgrade boiler
or
B. The plastic sight glass melts

when I order the new boiler I will dismantle the loco, give her a new livery, might even mod her body while Im at it to give her a quarry loco look, get shot of that diamond smoke stack and fit a front center buffer set.
Ideally Id like to change her wheels while Im at it but thats a maybe til I have money to buy some inserts for the dreamsteam steel wheels which look a bit naff without such decoration.

At a later date I expect Ill upgrade her cylinders and fit an oiler at somepoint.
Yes she shall become like Flying Scotsman where nothing except the frames are original.

:EDIT:
Scratch that regarding her body I might as well do the mod now instead of waiting for a boiler.
What Id like to do is essentially cut a large viewing window out of the back cab plate leaving the edges of the cabplate to act as roof supports which allows me to still clip the plate in and out.
Now I just need to figure out how to cut such a hole with handtools without it looking terrible.
Any advice on performing such metal work would be greatly appreciated because Im clueless with it, I only ever work with wood and lego!
Last edited by pauly on Mon Mar 25, 2013 10:47 pm, edited 2 times in total.
A steam propelled life-style.

User avatar
Lner fan Sam
Fireman
Fireman
Posts: 491
Joined: Sun Nov 25, 2012 7:57 pm
Location: Sunderland, north east of England

Post by Lner fan Sam » Mon Mar 25, 2013 10:37 pm

Good to hear pauly, want to double head with pioneer, my loco.
my first live steam engine build thread:
http://gardenrails.myfreeforum.org/about6685.html

Sam Wake

User avatar
laurence703
Trainee Driver
Trainee Driver
Posts: 804
Joined: Fri Nov 25, 2011 1:49 pm
Location: Lost

Post by laurence703 » Mon Mar 25, 2013 10:59 pm

You could either... Chain drill the hole out or make one hole and then use a hacksaw and file to tidy it up...

I haven't had many dealings with Dream Steam but I have had parts from Roy Wood Models and I know they're good so I recommend him to you for parts :)
No one expects the SPANISH ACQUISITION!!!

User avatar
Lner fan Sam
Fireman
Fireman
Posts: 491
Joined: Sun Nov 25, 2012 7:57 pm
Location: Sunderland, north east of England

Post by Lner fan Sam » Mon Mar 25, 2013 11:09 pm

I second that, excellent service.
my first live steam engine build thread:
http://gardenrails.myfreeforum.org/about6685.html

Sam Wake

pauly
Driver
Driver
Posts: 1970
Joined: Tue Aug 12, 2008 9:18 pm

Post by pauly » Mon Mar 25, 2013 11:12 pm

Thanks for the tip, Iv just been looking at the site and those steel wheels with holes in them looks the business so Ill deffo be getting a set of those

Iv dealt with DreamSteam a fair bit in the past and his stuff is pretty good so Ill still be getting my burner set and boiler there.
A steam propelled life-style.

pauly
Driver
Driver
Posts: 1970
Joined: Tue Aug 12, 2008 9:18 pm

Post by pauly » Mon Mar 25, 2013 11:13 pm

laurence703:81583 wrote:You could either... Chain drill the hole out or make one hole and then use a hacksaw and file to tidy it up...

I haven't had many dealings with Dream Steam but I have had parts from Roy Wood Models and I know they're good so I recommend him to you for parts :)
I reckon Ill try chain drilling the holes and then attacking with a file to tidy up
this si gonna be fun... he lied
A steam propelled life-style.

User avatar
dougrail
Driver
Driver
Posts: 1532
Joined: Mon Mar 14, 2011 5:11 pm
Location: Salopia; on the edge of Arcadia

Post by dougrail » Mon Mar 25, 2013 11:28 pm

Might I third the recommendation for parts and service by from Roy Woods? His supercylinders are brilliant and made a world of difference for me.

In terms of boilers and oilers, I'd say get one where you can fit an inline lubricator if you can. Failing that, if you go for a 'deadleg' one, ensure its 'tailpipe' is long enough to pressure-fit all the way into the rev block or it will reduce performance. I had two deadlegs to play with; one was a shrt tail and gave me leaks but once I swapped it for one with a longer tail and used some car gasket seal over the pipe > luber-pipe join, it became all good. :)

The loco mods I'll resort to your MF thread...

pauly
Driver
Driver
Posts: 1970
Joined: Tue Aug 12, 2008 9:18 pm

Post by pauly » Mon Mar 25, 2013 11:35 pm

I think Ill be going with the deadleg lubricator, I cant afford to do this all in one go and the oiler is pretty low on my list right now.

also just noticed that the mamod wheels are becoming loose so I WILL be ordering a set of those steel wheels soon
A steam propelled life-style.

User avatar
dougrail
Driver
Driver
Posts: 1532
Joined: Mon Mar 14, 2011 5:11 pm
Location: Salopia; on the edge of Arcadia

Post by dougrail » Mon Mar 25, 2013 11:45 pm

By all means, deadlegs if right can be equally as useful. :) Just remember the long tailpipe is better.

pauly
Driver
Driver
Posts: 1970
Joined: Tue Aug 12, 2008 9:18 pm

Post by pauly » Mon Mar 25, 2013 11:46 pm

will do

Doug know an easy way to get the brass spectacles out of the cab plate?
A steam propelled life-style.

User avatar
dougrail
Driver
Driver
Posts: 1532
Joined: Mon Mar 14, 2011 5:11 pm
Location: Salopia; on the edge of Arcadia

Post by dougrail » Mon Mar 25, 2013 11:52 pm

Uhm....f***. :lol:

Seriously, because the way I remember operating on 'Gore Nova' was this: a pair of pliers, a lot of tugging and praying...!! They were reusable afterwards mind, but Allan Briggs gave me a set of IPE/PPS specs that were much easier to slip-in, slip-out [needed with my dual-bodywork loco].

pauly
Driver
Driver
Posts: 1970
Joined: Tue Aug 12, 2008 9:18 pm

Post by pauly » Tue Mar 26, 2013 12:06 am

well mine just poped out

all I needed to do was grip them with some pliers and give em a little twist one way :toothy2:
A steam propelled life-style.

User avatar
Chris Cairns
Driver
Driver
Posts: 2366
Joined: Mon Oct 29, 2007 7:25 pm
Location: Glasgow, Scotland

Post by Chris Cairns » Tue Mar 26, 2013 12:13 am

pauly wrote:Doug know an easy way to get the brass spectacles out of the cab plate?
Already discussed here - http://gardenrails.myfreeforum.org/sutr ... rings#3979

As for cutting out the cab back, after removing the spectacle rings you can drill a large hole (big enough to fit your hacksaw blade) in the corners just inside the final cut out line, use a hacksaw to cut the 4 edges out then use a file or dremel to clean up those edges.

You can see a modified cab back in this Discussion on Page 2 - http://gardenrails.myfreeforum.org/ftop ... -asc-0.php And on Page 1 of that discussion I have talked about the problem with the weakness of the solder joint on the bottom of the boiler - you will need to strengthen that up if you wish to use a gas burner.

Chris Cairns.

Narrow Minded
Driver
Driver
Posts: 4650
Joined: Wed Dec 30, 2009 2:27 pm
Location: Forgotten Realms
Contact:

Re: 'Frozen Dawn' SL2 re-build

Post by Narrow Minded » Tue Mar 26, 2013 10:27 am

pauly:81579 wrote: Now I just need to figure out how to cut such a hole with handtools without it looking terrible.
Any advice on performing such metal work would be greatly appreciated because Im clueless with it, I only ever work with wood and lego!
I've done a couple of these in the past - mark out the "panel" you want to cut out and then score around it.
Pop a cutting disc into a Dremel (or equivalent ~ Mini Drill in my case) and allow the disc to follow the score lines, cutting INTO the corners.
Piece of cake :D
Image

User avatar
DolwyddelanLightRail
Driver
Driver
Posts: 2579
Joined: Tue Sep 29, 2009 7:27 pm
Location: Lost

Post by DolwyddelanLightRail » Tue Mar 26, 2013 3:26 pm

Good to see you around once more Pauly! :D

Was that the loco you put outside for scrap cause of the cracked boiler or were that another loco :?:

pauly
Driver
Driver
Posts: 1970
Joined: Tue Aug 12, 2008 9:18 pm

Post by pauly » Tue Mar 26, 2013 3:28 pm

DolwyddelanLightRail:81619 wrote:Good to see you around once more Pauly! :D

Was that the loco you put outside for scrap cause of the cracked boiler or were that another loco :?:
that was another loco, a mixture of worn and broken bits.

Now serving as th estationary boiler for my factory

Iv been thinking and if I could get a large meths burner Id be able to save a fair bit of money on the purchases of both the gas burner and new boiler.

Iv contacted Gremlin to ask him about his custom burners
A steam propelled life-style.

pauly
Driver
Driver
Posts: 1970
Joined: Tue Aug 12, 2008 9:18 pm

Post by pauly » Tue Mar 26, 2013 7:57 pm

rotten bit of luck Gremlin doesnt make those burners anymore.

I have an IP meths burner but its capacity is infuriatingly small

if anyone knows where I can get a high capacity meths burner let me know
A steam propelled life-style.

pauly
Driver
Driver
Posts: 1970
Joined: Tue Aug 12, 2008 9:18 pm

Post by pauly » Wed Apr 03, 2013 3:22 am

Now that the parts I need are on the way I want to start stripping her down to bare metal.

Anyone got some good hints on paint stripping a mamod and prepping for a re-paint?
A steam propelled life-style.

Narrow Minded
Driver
Driver
Posts: 4650
Joined: Wed Dec 30, 2009 2:27 pm
Location: Forgotten Realms
Contact:

Post by Narrow Minded » Wed Apr 03, 2013 9:47 am

An old ice cream tub (with a snap-shut lid), a can of "Nitromors" (or equivalent) and an aerosol can of "Hyper Clean" (or similar).
You should also get a couple of brushes, I use a 1/2inch paint brush, and an old tooth brush, plus some disposable rubber gloves.

Give the parts a good lathering with the Nitromors and seal 'em in the tub to "pickle overnight.
The paint strippers aren't as powerful as they used to be thanks to our Nanny State government, so you might have to do this a couple of times.

The paint will simply scrub off the parts, which should then be rinsed clean and dried.

A squirt with the Hyper Clean (engine de-greaser) followed by another rinse & dry will see you ready for priming and paint! :D
Image

User avatar
dougrail
Driver
Driver
Posts: 1532
Joined: Mon Mar 14, 2011 5:11 pm
Location: Salopia; on the edge of Arcadia

Post by dougrail » Wed Apr 03, 2013 1:31 pm

Better paintstrippin than overnight can be found using BioStrip - my weapon of choice. Make some cuts/incisions into the paintwork and 1ather the Biostrip paste over the part 1ibera11y. Can take two app1ications mind.

Then just scrape the resu1tant rubbery-paint-remains off, start sanding and degreasing using engine degreaser or white spirit. Sand the parts to be repainted, go through at 1east three rades of sandpaper, oing from a coarse bite to a smooth bite.

Etch primer is the best out there but it shows where one has s1acked in the prep dept :D

Post Reply

Who is online

Users browsing this forum: No registered users and 6 guests