My Live Steam Loco's No.8 - Mamod SL1K

A very popular starting point for Live Steam. With their low cost comes a number of problems which can be discussed here
Post Reply
User avatar
Chris Cairns
Driver
Driver
Posts: 2366
Joined: Mon Oct 29, 2007 7:25 pm
Location: Glasgow, Scotland

My Live Steam Loco's No.8 - Mamod SL1K

Post by Chris Cairns » Mon May 12, 2008 3:28 pm

My eighth live steam loco is this Mamod SL1K.

Image

This was won on ebay a couple of years ago. It came with a water top-up valve, uprated safety valve, ceramic gas burner & replacement steel wheels. Sounded just like the ideal Mamod upgrade, but it was not to be. This ended up being nicknamed the ‘Troublesome Mamod’. It has spent most of its life as what we refer to in aviation as a ‘Xmas tree’, which means it has been robbed for parts to keep other locos running. With the recent purchase of some more Mamod bits, I’ve finally managed to get it running around my test loop of Mamod track.

Wheels - On receipt I found the wheels/pistons were stuck firmly, and ended up breaking one of the crankpins. These are just an 8BA screw, which had a small hole drilled through and used a small spring to keep the coupling rods in place. Of course this turned out to be a weakness of these crankpins and the other one broke soon after. Replacements were fitted, with an 8BA nut being thread locked to keep the coupling rods & washers in the right place. The crankpins are an even smaller fit into the piston rod ends than the standard Mamod ones, and thus there is quite a bit of play. Also the bearings on the driving axle are bigger than the standard Mamod ones (rear axles are the same), and the previous owner had badly enlarged the chassis frame holes, so again there was just too much play.

Image
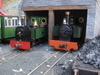
The steel wheels with the beat up chassis frames.

So I’ve removed these chassis frames & wheels, and fitted replacement chassis frames & Mamod wheels. These wheels came from a box of wheels I got from ebay some time ago, but were loose on the axles. I failed to get them re-punched satisfactorily (Mamod/MSS use a strange punch with 3 splines), and similarly cyanoacrylate glue failed to work on the driving axle. By removing these wheels from the axle completely, cleaning up the axle with sandpaper, and applying torque seal/thread lock to the axle before clamping the wheels back on, this has now produced 2 sets of working wheels, with a 3rd to be similarly treated for a wheel-less SL3 that I’ve won recently. This loco is currently running as a 0-2-2T, as removing those e-clips on the crank pins regularly leads to them popping off inconveniently. Fortunately as it has all been running in the kitchen I’ve managed to find them each time. I’ve not been able to find a source of these e-clips at a reasonable price so far, only as part of a huge box of various sizes in Halfords.

Boiler – This loco was fitted with a PPS ceramic gas burner, which had obviously been running too hot judging by the paint damage on the sidetanks. On the first steaming water was pouring out of the sight glass plastic as pressure was raised. This was due to the plastic being badly melted into the shape of the sight glass boiler cut-out. A new plastic, plus one of the Mamod SP range oval washers was fitted. These washers are much better than the thin ‘O’ ring that is usually supplied. Water was also leaking out of the bottom of the boiler to a varying degree, and a solder repair initially fixed this.

Image
The boiler with the solder repair.

I’ve read elsewhere online that some people believe this tube up through the boiler, through which the steam pipe passes, is held on by a rivet at the bottom of the boiler. This is incorrect. The tube has been flared at the bottom end and is just soft soldered to the boiler. Peter Longfils diagram clearly explains this.

Image
Peter Longfils Mamod & MSS Steam Path Diagram.

It seems I did not quite get that soldering sorted out as it still occasionally gets a jet of high pressure water/steam exiting there sometimes, so the boiler has been removed for a full overhaul, and my spare boiler fitted for running trials.

Cylinders/Pistons – These were getting lifted off the back plates due either to a blockage or all that play with the previous wheels. However it appears that the previous owner used some form of torque seal/thread lock and I broke a cylinder pivot bolt trying to fault find. A replacement cylinder was obtained from our Chairman, but it was still running very sluggish. Trying to fault find the 2nd cylinder ended up breaking its cylinder pivot bolt as well. This time a cylinder obtained from another online Forum's member was lost in the post due to the packing not being up to the Royal Mail’s gorilla handling. A 2nd set of cylinders obtained from another online Forum's member had been upgraded to ‘O’ ring pistons, but these require new ‘O’ rings, gaskets and some tidying up to be functional again. I tried fitting one of the pistons from a broken cylinder, but it was too big. Seems that there is a lot of tolerance with these factory produced units. After 2 attempts at sanding down this piston, I’ve finally got a working cylinder unit. Once I’ve obtained replacement ‘O’ rings it is my intention to fit these upgraded ‘O’ ring pistons together with an IP Eng lubricator which I have waiting in my spare parts box.

Reverser/Regulator – This was full of solder in the cutouts for the steam passage on the lever portion, and even after cleaning most of this out, I still have a misaligned reverser, with more steam available in reverse than in forward. Obviously poorly made with the lever not actually mounted centrally, and when time permits I’ll try repairing this lever portion.

Prior to having the PPS ceramic gas burner fitted (and that has been removed for fitting to my IP Jane [My Live Steam Loco’s No.3] with its silver soldered boiler), it obviously had a Merlin gas burner fitted, as the cab back has 2 holes drilled into it, and there is a large cut-out in the cab roof. These will need to be filled in at some point.

The water top up valve previously fitted to this loco has ended up being stuck under the bodywork of my modified MSS Saddle Tank loco (My Live Steam Loco’s No.4), and the above photo shows it fitted with the water top up valve from another SL1 (My Live Steam Loco’s No.7) which has been borrowed for the trial running. I’ve got another water top-up valve coming from Dream Steam (Mamodevon’s online shop).

My experiences with this loco have proved that not all Mamod locos are good runners, and suffering similar problems with another SL1K which was incomplete & unused when I got it, backs up the theory that I’ve read elsewhere online that the SL1K can be a rogue loco. I think this was due to it being produced during the period of the many Mamod takeovers & new owners.

Chris Cairns.
Last edited by Chris Cairns on Tue Jun 05, 2012 5:05 pm, edited 1 time in total.

SillyBilly
Retired Director
Retired Director
Posts: 3536
Joined: Sat Aug 18, 2007 11:00 pm

Post by SillyBilly » Mon May 12, 2008 4:26 pm

Great piece Chris, I like those wheels.

User avatar
Chris Cairns
Driver
Driver
Posts: 2366
Joined: Mon Oct 29, 2007 7:25 pm
Location: Glasgow, Scotland

Post by Chris Cairns » Mon May 12, 2008 4:44 pm

I like those wheels
But sadly they do not work as good as my wobbly Mamod set. They would need better fitting to new chassis frames, and some form of collar added to the 8BA screws to better fit the piston rod ends (I'd tried some heat shrink tubing).

User avatar
ACLR
Retired Director
Retired Director
Posts: 1592
Joined: Wed Oct 17, 2007 6:22 am
Location: Brisbane
Contact:

Post by ACLR » Mon May 12, 2008 8:07 pm

thanks Chris for the great information there.
I also have a rogue sl1k hopefully one day I will sort it out.

User avatar
Chris Cairns
Driver
Driver
Posts: 2366
Joined: Mon Oct 29, 2007 7:25 pm
Location: Glasgow, Scotland

Post by Chris Cairns » Mon May 12, 2008 11:55 pm

I've nailed the problems with these SL1Ks down to the badly manufactured rotating valve part of the reverser/regulator valve assembly (both of mine supply more steam in the reverse direction), and some poorly fitting pistons in the cylinders (I've had problems with them jamming when the piston rod is fully extended from the cylinder).

All the rest is the same as the riveted versions, with the exception of a screw fitted bolier back plate, and of course all the bodywork is screw & nut fitted (but this plays no part on the steam capability).

Dream Steam (Mamodevon) is supplying me with some replacement 'O' rings, so hope to fit a set of the 'O' pistons shortly. Just need to make another steam pipe and try to bend the pipe on the IP Eng lubricator without crimping it!

steamyjim
Retired Director
Retired Director
Posts: 1210
Joined: Tue Oct 16, 2007 9:19 pm

Post by steamyjim » Tue May 13, 2008 5:32 pm

Looks like a good project Chris!

I realy want to get me a SL1k :D

User avatar
Chris Cairns
Driver
Driver
Posts: 2366
Joined: Mon Oct 29, 2007 7:25 pm
Location: Glasgow, Scotland

Post by Chris Cairns » Tue May 13, 2008 7:09 pm

I realy want to get me a SL1k
Save your pennies, as I have a second SL1K which, when I get it running properly, will be for sale. And it comes with wheels for 32mm & 45mm as well.

steamyjim
Retired Director
Retired Director
Posts: 1210
Joined: Tue Oct 16, 2007 9:19 pm

Post by steamyjim » Tue May 13, 2008 8:22 pm

OOOH sounds good Chris!

User avatar
Chris Cairns
Driver
Driver
Posts: 2366
Joined: Mon Oct 29, 2007 7:25 pm
Location: Glasgow, Scotland

Post by Chris Cairns » Wed May 14, 2008 3:19 pm

OK, so the 'O' rings arrived courtesy of Dream Steam (Mamodevon) - Thank you.

As the last cylinder I fitted had a badly leaking rear cover where the piston exits, I decided to just upgrade that cylinder with the 'O' piston, until I get the pipe work sorted out for the IP Eng lubricator.

So after dismantling this cylinder I fitted the 'O' ring piston and used lots of steam oil. However the first attempt at steaming was a disaster as this piston would only move a little in or out but failed to rotate the wheels. So I disassembled this cylinder again, cleaned everything up and this time used lots of light lubricating oil (one of those £1 shop specials). Re-fitted this cylinder and the next steaming was successful.

I am well aware that these 'O' ring pistons take a lot of running in and require a lot of lubrication, having struggled with my IP Jane & a Mamod SL1 which has been upgraded with these 'O' ring pistons. However perhaps they do not like the thick steam oil (I use versions of the 460 oil), at least until it is well heated. Whilst in the real world we have carried the steam oil container on top of the firebox door to keep it hot & thin, what would be the best way to preheat this thick oil in the model world? Could it be heated up in a microwave for example?

Of course once the engine is in steam, the lubricators either on the cab floor or on the smoke box side will get heated up, and thin the oil.

I've started on the pipe work for fitting a former IP Eng lubricator (now Dream Steam), and will post a topic on that once completed.

The other great effect on fitting these 'O' ring pistons is the change to a nice chuff chuff from the exhaust steam, compared to a standard old Mamod or MSS.

User avatar
laalratty
Retired Director
Retired Director
Posts: 3887
Joined: Wed Jan 16, 2008 5:35 pm
Location: Morecambe

Post by laalratty » Wed May 14, 2008 8:39 pm

Perhapes the answer to the oil problem is to use thinner oil, eg Roundhouse which has a viscosity of 220, otherwise id have thought that the microwave would be fine although you should probebly clean it before cooking food after heating up the oil!
"What the hell is that?"
"It's a model icebreaker sir."
"It's a bit big isn't it?"
"It's a full scale model sir....."

User avatar
Chris Cairns
Driver
Driver
Posts: 2366
Joined: Mon Oct 29, 2007 7:25 pm
Location: Glasgow, Scotland

Post by Chris Cairns » Wed May 14, 2008 11:18 pm

laalratty Yes I've been considering getting some thinner oil, but I'll need to order that by post, as I'm only travelling with a hand bag on Ryanair to the Merstham Steam Rally on Saturday, and of course any liquids like steam oil will be confiscated by our over bearing security measures.

Just fitted the IP Eng lubricator to this loco and it does work.

Like my other IP Eng lubricator, it does not use up all of the oil like a Roundhouse, but there is evidence of oil on the piston rods after cleaning them off between runs.

So I must get on and repair the original boiler for this loco, and fit the second cylinder with an 'O' ring piston.

Interestingly the chuff chuff is now not so noticeable. Wonder if that is to do with the lubrication.

It is great to finally see this loco going around my test loop, as it has been a stalled project for too long.

User avatar
Chris Cairns
Driver
Driver
Posts: 2366
Joined: Mon Oct 29, 2007 7:25 pm
Location: Glasgow, Scotland

Post by Chris Cairns » Sun Jul 13, 2008 12:02 pm

This loco was one of those involved in the faulty reverser/regulator valves I discovered recently - http://gardenrails.myfreeforum.org/about423.html

I had taken the valve apart, reversed the cut-out portion and refitted, but the operating lever was fouling the smoke box thus causing a big steam leak.

Having just got a soldering brazing hearth off ebay I though I'd have a go at this valve again, plus the other faulty one as well. Although I managed to get the lever bent the right way this time, this valve has been badly misshaped in the process and I'm currently struggling to get a flat face at 90 degrees to the mounting bolt. So it is still badly leaking steam.

Good news is I got the other valve sorted out better, although it still has a slight leak. Fitted this to the 'Troublesome' SL1K and got it run around with 2 coal wagons.

Image

And for those who prefer YouTube - http://uk.youtube.com/watch?v=DEm7xpUMf_Y

I was amazed that the loco did not rollover after coming off the track. Must have been a function of removing the smoke box & chimney.

So some more careful sanding of this valve, plus fitting a 2nd spring for tightness, should have this loco working again properly. Just need to get its boiler re-soldered and painted again.

Chris Cairns.
Last edited by Chris Cairns on Tue Jun 05, 2012 5:08 pm, edited 1 time in total.

User avatar
ACLR
Retired Director
Retired Director
Posts: 1592
Joined: Wed Oct 17, 2007 6:22 am
Location: Brisbane
Contact:

Post by ACLR » Sun Jul 13, 2008 8:11 pm

looks like you have just about got it sorted mate :D

SillyBilly
Retired Director
Retired Director
Posts: 3536
Joined: Sat Aug 18, 2007 11:00 pm

Post by SillyBilly » Sun Jul 13, 2008 9:20 pm

I love that de-railment, deffinatley sorted :lol: .

User avatar
Chris Cairns
Driver
Driver
Posts: 2366
Joined: Mon Oct 29, 2007 7:25 pm
Location: Glasgow, Scotland

Post by Chris Cairns » Mon Jul 14, 2008 3:38 pm

Hmm!

Having purchased a soldering hearth off ebay, I soldered up the original boiler around all the inserts, and that weak solder joint on the bottom, and soldered in 2 x 6BA nuts for easier fixing to the smoke box.

Re-fitted this boiler and the smoke box. Now I know that the smoke box cut out allows less movement of the reverser/regulator valve, and it has been suggested elsewhere on this Forum that it is best to keep the surface of the boiler unpainted when using a Meths Burner (only paint stripped enough on the underside to effect that solder repair)

So I've now gone back to a lethargic SL1K which can barely pull 1 open wagon around my test loop.

The regulator/reverser valve is still leaking, particularly in the neutral position, and I'm finding difficulty getting it lapped at right angles to the rotating bolt. I've got a replacement valve from Dream Steam for the IPS Janet, so I'll try that next to see if there is a marked improvement.

I'll also consider cleaning out the boiler using a vinegar solution, but I'll need to read up about that on another Forum again.

Looks like the Mike Chaney loco will be next to steam properly, as I'm 2/3rds of the way through fixing the wheels on the axles again.

User avatar
Chris Cairns
Driver
Driver
Posts: 2366
Joined: Mon Oct 29, 2007 7:25 pm
Location: Glasgow, Scotland

Post by Chris Cairns » Mon Jul 14, 2008 5:56 pm

More Hmm!

I brought a vinegar solution to the boil in this boiler, lots of agitation, and flushed well with hot water. Did get some small black deposits out of it, but nothing major. No real change in performance.

So decided to fit the Dream Steam sourced MSS reverser/regulator valve. This had appeared to work OK in the SL3 until the whistle insert starting leaking, and that loco is now awaiting a de-rivet to repair it.

Raised steam with this replacement valve but was reluctant to go. Eventually got it to partly run, but it seems that at least one exhaust path is blocked as it is pushing one of the cylinders off the back plate with resultant steam leak.

I'm aware of this chassis holes misalignment problem, but it is some what strange here as both the chassis frames & the replacement valve are from MSS. Looks like I'll need to do some careful measuring of these holes and outlets.

Whilst removing the old valve I noticed it was leaking from the seam between the 2 pieces. I must have not soldered this up properly, and interestingly that is what happened on a replacement valve I got from Dream Steam. Just need to see if I can clamp these 2 pieces together tightly whilst I re-solder up the seam.

User avatar
Chris Cairns
Driver
Driver
Posts: 2366
Joined: Mon Oct 29, 2007 7:25 pm
Location: Glasgow, Scotland

Goodbye No.8

Post by Chris Cairns » Sat Sep 07, 2013 5:28 pm

Just to close this story as "No.8 has left the building".

Image

After finally getting a reverser/regulator valve to work properly it was fitted with a repaired cab roof from another Mamod SL that had also been fitted with a Merlin gas burner, a new replacement SL1K cab back, the high pressure safety valve was replaced with a standard Mamod whistle, the water top-up valve was replaced with a standard Mamod safety valve, and an extended exhaust pipe with forward facing slot fitted.

Image

I'll be very interested to see how the new owner transforms this locomotive.

Chris Cairns.

Post Reply

Who is online

Users browsing this forum: No registered users and 12 guests