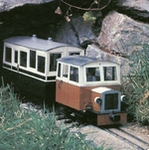
At the same time as I finished that one off I was giving the old platform shelter at Clarach a bit of a refresh. It's a Pendle Valley Workshop resin kit, always intended as a stopgap and so not built with quite the care it should have been - it started its life wonky, and exposure to the sun and a couple of tumbles from the platform to the patio have made it wonkier still. The recent work hasn't corrected that, but has smartened it up a bit - and it's usually only viewed from the back anyway!
- Clarch station building.jpg (222.4 KiB) Viewed 7016 times
It's posing in the front garden here (the line's not quite that overgrown!) and will now join Penlan's building in store until spring. Both stations need their platforms repairing/replacing, but I'll leave that until after winter now. I reckon Clarach's hut will do for another season or two, and by then I should have come up with a replacement - I'm thinking of a model based on Beddgelert's lamp hut, but with an open front where the double doors are.
In the meantime I think I've decided to go for making a signal box next -Trefechan's old toy station building is respectable enough for now, and the signal box will be an interesting challenge. I think I'll start wit the windows to get one of the more difficult bits out of the way first...
Cheers all,
Andrew