
Hi Peter,
On a 'Glass half full" basis, were the ends pre-bent in the right direction?
Looking forward to the other builds.
Tim
Time to build a railway...but where?
-
Peter Butler

- Driver

- Posts: 5244
- Joined: Sun Sep 09, 2012 10:33 pm
- Location: West Wales
Re: Time to build a railway...but where?
Unfortunately no!
But...... STOP PRESS....... STOP PRESS..... HOT NEWS.....
Without prior notification I have received a complete new kit in the post from Ivan this morning..... I have telephoned to thank him and express my surprise and gratitude and he assures me customer satisfaction is important.
There have been changes in the manufacture and materials since the previous one and I am looking forward to comparing the two during the build process.
The best things in life are free.... so why am I doing this?


Re: Time to build a railway...but where?
Thanks for this comprehensive guide, Peter. Sounds like your first kit had been in storage for a long time and suffered as a result. Reassuring though that Ivan sent you a replacement, gratis.
Rik
Rik
-
Peter Butler
- Driver
- Posts: 5244
- Joined: Sun Sep 09, 2012 10:33 pm
- Location: West Wales
Re: Time to build a railway...but where?
Moving on..... this is becoming confusing as the Bug Boxes have been re-built, restored and re-numbered over the years.
The second kit is:
'The Lineside Hut', Carriage No 4. Currently in service with panelled sides, modelled with vertical knife-boarding.
Laser-cut plywood Kit.... (with two build alternatives) £44.50 incl postage.
The kit arrived within days of ordering and came in sturdy cardboard box suitable for vehicle storage following the build.
Printed instructions included with black and white drawings to show how parts should be assembled. Clearly explained with arrows etc.
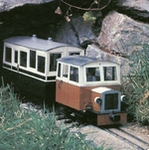
A large number of well cut plywood parts are included which give a choice of either all glazed windows or four blanked off either side, representing two vehicle types. I chose Number 4.....
The first assembly is the roof.... sounds odd but the roof is a composite structural section which forms the shape of the end panels later. I found my roof jig came in very useful again for this assembly.....
Next the side panels, which are in three layers sandwiching the glazing, plus an overlay..... a very sturdy structure indeed. Interior panels are engraved with door and window shapes and above door vents are cut out on all three sections. At this stage only the interior and centre panel are glued together and are attached to the floor and seating assembly. The bench seat has well engraved slatted seat and back......
At this stage the roof is placed (but not glued) and the assembly left to dry, care must be taken to ensure squareness as slight movement is possible. Elastic bands are wonderful for this purpose. Once dry the curved end panels can be attached, they are over-size to allow for movement during fitting and must be sanded flush afterwards....
The under-floor has cut-outs to accommodate the Binnie wheels supplied. I never use plastic/nylon wheels but this kit does not have an option to buy metal, so I found a replacement set and brass bushes from my stock box. As supplied, the axle boxes are cut from ply and have no bearings, so there is need for improvement here. The picture below shows the method of fitting wheels which gives good alignment but no possibility of altering the ride height for increased ground clearance, or the possibility of changing the wheels at a later date....
More to follow.
The second kit is:
'The Lineside Hut', Carriage No 4. Currently in service with panelled sides, modelled with vertical knife-boarding.
Laser-cut plywood Kit.... (with two build alternatives) £44.50 incl postage.
The kit arrived within days of ordering and came in sturdy cardboard box suitable for vehicle storage following the build.
Printed instructions included with black and white drawings to show how parts should be assembled. Clearly explained with arrows etc.
A large number of well cut plywood parts are included which give a choice of either all glazed windows or four blanked off either side, representing two vehicle types. I chose Number 4.....
- IMG_7211.JPG (98.76 KiB) Viewed 5423 times
- IMG_7223.JPG (80.8 KiB) Viewed 5423 times
- IMG_7224.JPG (82.17 KiB) Viewed 5423 times
- IMG_7233.JPG (117.29 KiB) Viewed 5423 times
- IMG_7239.JPG (91.95 KiB) Viewed 5423 times
- IMG_7241.JPG (80.2 KiB) Viewed 5423 times
The best things in life are free.... so why am I doing this?
-
Peter Butler
- Driver
- Posts: 5244
- Joined: Sun Sep 09, 2012 10:33 pm
- Location: West Wales
Re: Time to build a railway...but where?
Slight sequence break here.....
The I.P.Engineering coach is now complete and has worked out better than expected. As described earlier, it did require additional support and strengthening in areas which were still affected by the twisting of the material, which would not normally be the case. The new kit (kindly sent FOC by Ivan) shows none of the original issues and has some parts cut from different material, another build will be reported in due course.
To complete the coach I have added roof vent, crest transfers, lettering, and brass door handle to match the others.......
- IMG_7244.JPG (109.5 KiB) Viewed 5383 times
- IMG_7245.JPG (103.74 KiB) Viewed 5383 times
The best things in life are free.... so why am I doing this?

Re: Time to build a railway...but where?
Very interesting, thanks Peter.
I've got a couple of IP bug boxes tucked away somewhere which I ought to dig out sometime. I started them, but sort of lost interest. I'll go back to them at some point. My two bug boxes, the first carriages I scratchbuilt, have a Big Big Train coal truck chassis wedged between the seats to provide the running gear - hardly prototypical, but it works!
Cheers,
Andrew.
Re: Time to build a railway...but where?
Very nicely done Peter. Thank you for this post, it shows that with a little bit of patience you can make a very nice job from something that wasn't in the best of conditions to start with. I am sure more members will be building after your post... 
ROD
Life is so easy when I run my trains.


https://gardenrails.org/forum/viewtopic ... 41&t=11364
https://www.youtube.com/@fairywoodlightrailway
Life is so easy when I run my trains.


https://gardenrails.org/forum/viewtopic ... 41&t=11364
https://www.youtube.com/@fairywoodlightrailway
Re: Time to build a railway...but where?
That's turned out well, Peter. I'll be interested to see how the two versions of the same IP Engineering kit compare.
Rik
Rik
-
andymctractor
- Trainee Driver

- Posts: 705
- Joined: Fri Feb 01, 2013 12:03 am
- Location: Suffolk, UK
- Contact:
Re: Time to build a railway...but where?
Peter, where did you get your crests done and do you have to trim round the image to get it to look so neat?Peter Butler wrote: ↑Sat May 02, 2020 12:49 pm Slight sequence break here.....
The I.P.Engineering coach is now complete and has worked out better than expected. As described earlier, it did require additional support and strengthening in areas which were still affected by the twisting of the material, which would not normally be the case. The new kit (kindly sent FOC by Ivan) shows none of the original issues and has some parts cut from different material, another build will be reported in due course.
To complete the coach I have added roof vent, crest transfers, lettering, and brass door handle to match the others.......
IMG_7244.JPG
IMG_7245.JPG
Apologies again if this has been covered before and I've missed it.
Regards
Andy McMahon
If it moves, salute it. If it doesn't move, paint it. (RN sailors basic skills course 1968)
Andy McMahon
If it moves, salute it. If it doesn't move, paint it. (RN sailors basic skills course 1968)
-
Peter Butler
- Driver
- Posts: 5244
- Joined: Sun Sep 09, 2012 10:33 pm
- Location: West Wales
Re: Time to build a railway...but where?
Hi Andy, I can answer part of your question.... Yes, I do have to trim the edges with a very sharp blade.andymctractor wrote: ↑Sun May 03, 2020 9:12 am
Peter, where did you get your crests done and do you have to trim round the image to get it to look so neat?
But, the name of the supplier is a mystery, I did have an address and I bought them for another project but I will have to do some research to trace more detail for you.
Perhaps someone else can identify them from the pictures below....
- IMG_7249.JPG (132.12 KiB) Viewed 5318 times
- IMG_7247.JPG (101.13 KiB) Viewed 5318 times
The best things in life are free.... so why am I doing this?
-
Peter Butler
- Driver
- Posts: 5244
- Joined: Sun Sep 09, 2012 10:33 pm
- Location: West Wales
Re: Time to build a railway...but where?
Returning to the 'Lineside Hut' Bug Box,....this is the time to select the carriage type you wish to build, as previously stated, there are either glazed windows or window blanks which can be installed....
The glazing supplied is amazing, it is precisely cut/moulded into well fitting panels of 2mm and 3mm thickness. The 3mm are the smaller ones which represent fixed glazing, the 2mm ones allow for drop-light frames (supplied) to be fitted, surrounding the glazing and beneath the outer overlay.
Final detailing includes buffers and roof lamp-top in whitemetal (looks large to me so replaced with vent).
Completed as per the instructions the finished vehicle looks very nice....
But...... as shown earlier, the axle-boxes are fixed height with no option included to alter the ride height, which is very low indeed... only 5-6mm above rails. I doubt this would be acceptable in many garden railways as track-side obstructions are usually there to catch the unwary. To increase the ride height I fitted 3mm strips between the axle boxes and the underfloor to lower the wheel-sets.
This has brought the coach into line with the others.
Overall I have thoroughly enjoyed building this kit which has proved to be detailed, very well planned in design and construction, made of superior ply material and gives a choice of two types of coach in one kit.
Value for money.... very good indeed and highly recommended.
Edit.... the sequence of pictures appears different to that in my text... some are duplicated and others out of place. Sorry, they are relevant to the post anyway.
- IMG_7238.JPG (110.11 KiB) Viewed 5696 times
- IMG_7237.JPG (111.28 KiB) Viewed 5696 times
- IMG_7261.JPG (113.45 KiB) Viewed 5696 times
Completed as per the instructions the finished vehicle looks very nice....
- IMG_7264.JPG (100.72 KiB) Viewed 5696 times
- IMG_7270.JPG (81.97 KiB) Viewed 5696 times
- IMG_7261.JPG (113.45 KiB) Viewed 5696 times
Overall I have thoroughly enjoyed building this kit which has proved to be detailed, very well planned in design and construction, made of superior ply material and gives a choice of two types of coach in one kit.
Value for money.... very good indeed and highly recommended.
Edit.... the sequence of pictures appears different to that in my text... some are duplicated and others out of place. Sorry, they are relevant to the post anyway.
- Attachments
-
- IMG_7263.JPG (96.55 KiB) Viewed 5696 times
The best things in life are free.... so why am I doing this?
-
Peter Butler
- Driver
- Posts: 5244
- Joined: Sun Sep 09, 2012 10:33 pm
- Location: West Wales
Re: Time to build a railway...but where?
The third of my Bug Box kits is from Jeremy Irwin, he has a list of available kits here.... https://www.flickr.com/photos/107486657 ... 8655086333
The Bug Box I bought is the 'Porthole Carriage' which is laser cut in MDF and available with plastic wheels at £ 34.00 or metal wheels at £ 43.00 (plus £4.50 postage) both include ball axle bearings as standard.
The kit comprises a huge array of precisely cut MDF parts and includes a printed sheet of various other kits with links to You-tube video instructions. These are the most useful building tutorials as there is no chance of misinterpreting any written instruction.
The first part to construct is the complex chassis which even includes brake-gear, even though it will never be visible! The unit is self contained and fits snugly beneath the seating....
The ball bearings (included in all of Jerry's kits) ensure the coach rolls with next to no resistance....
As can be seen, I always use metal wheels on my stock and find it helps with weight and improved performance.
More to follow....
The Bug Box I bought is the 'Porthole Carriage' which is laser cut in MDF and available with plastic wheels at £ 34.00 or metal wheels at £ 43.00 (plus £4.50 postage) both include ball axle bearings as standard.
The kit comprises a huge array of precisely cut MDF parts and includes a printed sheet of various other kits with links to You-tube video instructions. These are the most useful building tutorials as there is no chance of misinterpreting any written instruction.
- IMG_7210.JPG (127.99 KiB) Viewed 5694 times
- IMG_7219.JPG (102.99 KiB) Viewed 5694 times
- IMG_7220.JPG (102.7 KiB) Viewed 5694 times
- IMG_7229.JPG (106.46 KiB) Viewed 5694 times
More to follow....
The best things in life are free.... so why am I doing this?
Re: Time to build a railway...but where?
Hi Peter.
Looking forward to this build has I haven't been able to get one of Jerry's kits yet, lack of funds is the main reason at the moment. They do have a lot of parts and your description for building them are brilliant to see. Has you say he does have videos on which to find out how to build his kits, I did watch one of them some time ago, but you improve the build with what you find and your experience on builds is next to perfection for me.
Looking forward to this build has I haven't been able to get one of Jerry's kits yet, lack of funds is the main reason at the moment. They do have a lot of parts and your description for building them are brilliant to see. Has you say he does have videos on which to find out how to build his kits, I did watch one of them some time ago, but you improve the build with what you find and your experience on builds is next to perfection for me.
ROD
Life is so easy when I run my trains.
https://gardenrails.org/forum/viewtopic ... 41&t=11364
https://www.youtube.com/@fairywoodlightrailway
Life is so easy when I run my trains.
https://gardenrails.org/forum/viewtopic ... 41&t=11364
https://www.youtube.com/@fairywoodlightrailway
-
Peter Butler
- Driver
- Posts: 5244
- Joined: Sun Sep 09, 2012 10:33 pm
- Location: West Wales
Re: Time to build a railway...but where?
The final part of the Jerry Irwin build....
Putting the sides together couldn't be easier or more accurate as there are templates included to ensure everything lines up precisely.
I prefer to paint the sides, ends and overlays before assembly, this makes for a tidier finish....
The whole thing is 'dry assembled' at this stage with no glue applied, the top is reinforced with another jig (part of which is removed later) to keep everything square....
Elastic bands are now used to hold the structure together while superglue is used to lock the parts together.
Following removal of the end jigs, the curved end panels (which are also pre-painted) are glued in place with elastic bands to hold them...
I chose to fit side screens using 2.5mm plastic tube (sliced open) with wire mesh slid in the grooves...
The roof is assembled with yet more jigs which are simple to use and form an independent and removable roof when finished....
And finally, the finished coach....
So, how do I rate this kit?
Just wonderful! I have no issue with the choice of MDF as I never use my stock in wet weather, although I left a piece of the material floating in water for two hours with no appreciable effect. It takes paint far better than ply and gives a far superior finish.
All of the parts are so well cut there is no movement between joints. The cut parts are completely removed from surrounding material. The jigs are included in the kit and make it so much more accurate and easier to assemble. Interior detail is complete right down to planking on the seats and even floorboards with fixing bolt heads visible.
Running characteristics are so much freer and smoother than any other kit, or scratch-build, I have ever made.
Jerry Irwin is certainly the 'Kit-Master' in my opinion, his kits are far superior to any others and extremely good value for money.
It is worth watching one of his videos so you can appreciate the skill and detail he puts into his work. You will become addicted, just like me!
Putting the sides together couldn't be easier or more accurate as there are templates included to ensure everything lines up precisely.
- IMG_7283.JPG (96.3 KiB) Viewed 5620 times
- IMG_7285.JPG (87.76 KiB) Viewed 5620 times
- IMG_7284.JPG (115.46 KiB) Viewed 5620 times
Following removal of the end jigs, the curved end panels (which are also pre-painted) are glued in place with elastic bands to hold them...
- IMG_7292.JPG (103.88 KiB) Viewed 5620 times
- IMG_7287.JPG (131.1 KiB) Viewed 5620 times
- IMG_7301.JPG (100.82 KiB) Viewed 5620 times
- IMG_7302.JPG (95.82 KiB) Viewed 5620 times
- IMG_7303.JPG (110.4 KiB) Viewed 5620 times
- IMG_7304.JPG (103.85 KiB) Viewed 5620 times
Just wonderful! I have no issue with the choice of MDF as I never use my stock in wet weather, although I left a piece of the material floating in water for two hours with no appreciable effect. It takes paint far better than ply and gives a far superior finish.
All of the parts are so well cut there is no movement between joints. The cut parts are completely removed from surrounding material. The jigs are included in the kit and make it so much more accurate and easier to assemble. Interior detail is complete right down to planking on the seats and even floorboards with fixing bolt heads visible.
Running characteristics are so much freer and smoother than any other kit, or scratch-build, I have ever made.
Jerry Irwin is certainly the 'Kit-Master' in my opinion, his kits are far superior to any others and extremely good value for money.
It is worth watching one of his videos so you can appreciate the skill and detail he puts into his work. You will become addicted, just like me!
The best things in life are free.... so why am I doing this?
-
Peter Butler
- Driver
- Posts: 5244
- Joined: Sun Sep 09, 2012 10:33 pm
- Location: West Wales
Re: Time to build a railway...but where?
I had an unfortunate experience with the first I.P. Engineering kit which I purchased, it arrived in poor condition and, following conversation with Ivan, instead of a replacement roof which I requested, he sent an entire kit! All credit to Ivan for that, good customer relations in action.
When it arrived I was still building other kits so only glanced at the parts. I noticed there was an MDF roof supplied in this one, so hoped other parts were also upgraded. I am now getting on with the build and am dismayed by the remainder of the kit being identical to the first, in which the very thin curved ends are etched too deeply and are splitting, while the thicker side walls are not cut through from the outer border material. Not a good start.
In fact, the roof, which was the worst part of the original kit is now the best part of the new one.
On the I.P.Engineering site it proudly boasts 'all prototype internal detailing' but the seating has no plank-work engraved at all, and the 'engraved detailing including axleboxes' are as shown below....
The interior of the side panels are engraved but some of it is now obscured by my method of securing the glazing strips....
Very little of the side panels will be visible once constructed, however, the seating will be more prominent!
As this is one of the more expensive kits of the type I remain unconvinced of 'value for money' but will continue with the build as before.
I will not be posting more build details on this kit as it has all been said before, however, there will be another Jerry Irwin kit along soon, so watch this space!
When it arrived I was still building other kits so only glanced at the parts. I noticed there was an MDF roof supplied in this one, so hoped other parts were also upgraded. I am now getting on with the build and am dismayed by the remainder of the kit being identical to the first, in which the very thin curved ends are etched too deeply and are splitting, while the thicker side walls are not cut through from the outer border material. Not a good start.
In fact, the roof, which was the worst part of the original kit is now the best part of the new one.
On the I.P.Engineering site it proudly boasts 'all prototype internal detailing' but the seating has no plank-work engraved at all, and the 'engraved detailing including axleboxes' are as shown below....
- IMG_7300.JPG (65.61 KiB) Viewed 5612 times
- IMG_7311.JPG (96.07 KiB) Viewed 5612 times
- IMG_7309.JPG (134.05 KiB) Viewed 5612 times
- IMG_7310.JPG (108.89 KiB) Viewed 5612 times
As this is one of the more expensive kits of the type I remain unconvinced of 'value for money' but will continue with the build as before.
I will not be posting more build details on this kit as it has all been said before, however, there will be another Jerry Irwin kit along soon, so watch this space!
The best things in life are free.... so why am I doing this?
Re: Time to build a railway...but where?
Thank you Peter for a brilliant post on the builds. Jerry Irwins do look good, better after your expert hands on them. The comparison between the two kits was well described and shows that you don't need to pay more for better quality.
Love the way you always paint first, it does look better. When I have painted HGLW kits which are MDF aren't they, I think. They always look slightly rough, even after I smooth them down a bit. I do know from experience though, if you rub them down too much they really start to look like a pan scourer. But then I suppose there is differences in quality of MDF you can buy I think.
Love the way you always paint first, it does look better. When I have painted HGLW kits which are MDF aren't they, I think. They always look slightly rough, even after I smooth them down a bit. I do know from experience though, if you rub them down too much they really start to look like a pan scourer. But then I suppose there is differences in quality of MDF you can buy I think.
ROD
Life is so easy when I run my trains.
https://gardenrails.org/forum/viewtopic ... 41&t=11364
https://www.youtube.com/@fairywoodlightrailway
Life is so easy when I run my trains.
https://gardenrails.org/forum/viewtopic ... 41&t=11364
https://www.youtube.com/@fairywoodlightrailway
-
Peter Butler
- Driver
- Posts: 5244
- Joined: Sun Sep 09, 2012 10:33 pm
- Location: West Wales
Re: Time to build a railway...but where?
Thank you Rod, I'm glad you found the exercise useful, I hope others do too.
From my experience MDF is a better material to give a smooth paint finish, if prepared correctly.... Most important thing is..... don't sand the surface as it will become furry. Spray a primer coat to seal the MDF, which usually absorbs the paint unevenly, so more than one coat is advised. Apply finish coat in light, even coverage, until a uniform finish is achieved.
Plywood almost always leaves grain effect, even after sanding, filling, priming and finishing. The finer the grain the better finish you can get, although not all manufacturers offer it. It is not easy to know in advance about material quality so I hope this report helps.
The best things in life are free.... so why am I doing this?
Re: Time to build a railway...but where?
I do, thanks Peter!Peter Butler wrote: ↑Tue May 12, 2020 10:36 am Thank you Rod, I'm glad you found the exercise useful, I hope others do too.
Those Jerry Irwin kits really do look good - I'm tempted! As I mentioned though, I've got a couple of barely-started IP ones, so I'd better have a look at those first. I'd forgotten, but mine are etched too deeply on the ends too, and the curving method looks much better on JI's... It's little things like that and the need to add detail to the seats, create new inner walls to allow for droplights etc that have put me off, I think - I buy the occasional kit to build as quick treats between scratchbuilds, but it's not so much fun if I end up doing lots of work.
Helpful tips on MDF, thanks. Have you tried MDF Sealer? I think I've got a tin somewhere. I actually quite like a little ply grain showing through - it's overscale, of course, but not too bad once it's sealed and sanded. As long as the grain's going the right way, of course - a pet hate is kits where the grain runs perpendicular to the planking...
You've got a couple more manufacturers to go to complete the set I think - Yatton (http://yattonmodelengineering.co.uk/festiniog.html) and Jurassic (are they still trading? http://www.summerlands-chuffer.co.uk/ju ... 4577586366), although that's going to be an awful lot of Bug Boxes.
Cheers,
Andrew.
-
Peter Butler
- Driver
- Posts: 5244
- Joined: Sun Sep 09, 2012 10:33 pm
- Location: West Wales
Re: Time to build a railway...but where?
Thank you Andrew, I hadn't spotted these two kit suppliers so perhaps they are less well known? The Yatton Engineering coach looks to be of similar construction to the 'Lineside Hut' kit but at £45.00 + £12.00 for postage..... (failed the value for money test there!) I will not be buying one.
Jurassic Models site is dated 2016 so may not still be trading. Unfortunately there are no illustrations included and the price list shows £40.00 (incl. postage) but excluding wheels and bearings. That would still make it over £50.00 in total, so unsure again about value for money?
We all have our favourites I'm sure and we all use them for different purposes but I only set out to compare design of construction, material quality and cost. Ultimately the finish can make or break a model and the manufacturers have no control over that.
The best things in life are free.... so why am I doing this?
Re: Time to build a railway...but where?
Wow, hadn't spotted the £12 postage charge on the Yatton version - if ever I want some of those, I'll pick 'em up in person, it's only £6 on the train from here!
You're absolutely right that finish is everything - running quality aside, I always reckon I can get away with a lot as long as I can manage a decent paint job...
Cheers,
Andrew.
You're absolutely right that finish is everything - running quality aside, I always reckon I can get away with a lot as long as I can manage a decent paint job...
Cheers,
Andrew.
Who is online
Users browsing this forum: No registered users and 13 guests