
Some of you may remember my previous railway, The Woodside Light Railway, which is in my parents garden. This was a 45mm line using LGB track. This line is still there, but has been shortened for ease of use.
After moving out, it was time for a new start. I also decided to use 32mm track for cost, look, scale and so more people could visit with their trains.
We moved in to our new house last May, and obviously the most important task was to build the garden railway...

The garden is modest sized, with a shed and large summer house that we wanted to keep. I always liked the idea of the track going around the outside of the lawn, however this would cross access to the lawn and summer house, so I knew removable sections would have to be made.

Firstly, I needed a base to operate from. The shed was watertight and in good condition, it just needed a facelift. A quick email to the Mid-Hants Railway secured me the correct paint codes for the Southern Railway green and cream and I was able to get this mixed at the local DIY shop.

I decided to build the yard/station and steam up area first. Investing in a cement mixer was a good idea! This was my second atempt at bricklaying! The outer walls were then filled with hardcore and a concrete top put on. This gave a nice flat area to lay track and build platforms.

Track laying begins. I have used peco track thoughout, with the larger radius points for the running line and the 38" radius for the sidings. The track is screwed down using small rawl plugs into the concrete. I needed an SDS drill for this, which was another good investment.

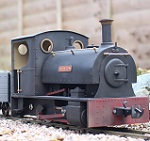
With track down and platforms cast I was able to ballast the track using 3mm joining aggregate and quick setting cement. A quick photo shoot followed.


After much thought, I decided to use Filcris for the rest of the trackbed. This will eventually be hidden by earthworks and rockery.

At the same time, the shed gained some more railway items!

Almost a full circuit, working anti-clockwise around the lawn. Using post-fix to set the posts really helped as this set in about 20 minutes. I could lay about 6 posts a day working on my own.


The left side of the lawn was laid only a week ago. The filcris has been very easy to work with, and quick too. I have read stories of the material expanding in the summer months, however some people have had no issues. Only time will tell on this, however I have left gaps for expansion and it will all be buried in a few months anyway.
The point will eventually lead to the quarry siding.

And to bring us up to date, the first steam train to make it around the garden!
Plenty more still to do, but I feel I have reached a major milestone in getting the track down. Now to make it all look pretty!