TVT Passenger Cars

Discussion of Rolling Stock related topics should go here
Post Reply
User avatar
GTB
Driver
Driver
Posts: 1559
Joined: Sat Mar 05, 2011 2:46 pm
Location: Australia

TVT Passenger Cars

Post by GTB » Tue Jun 11, 2013 3:53 pm

Haven't posted for a while, but haven't been completely idle.

These are the first passenger cars I've built in this scale and could well be the last. These three models were a real saga and fought me all the way.

The pass car design is loosely based on the smaller Tralee & Dingle carriages from Ireland, with some modifications to make them more Australian. The colour scheme chosen is one used by the VR for suburban electric trains from the early '30s through to the mid-'50s. The SAR-SAS used something similar in more recent years.

Construction is a polystyrene body, mounted on a wooden underframe with US style bogies. The VR used equalised US type bogies under most broad gauge pass cars and also under some of the narrow gauge ones, as they rode better on less than perfect track.

I built three cars, a first-second car and two second with van cars. These will run as a three car set with a van at each end so the train will not need to be shunted, or the van turned at each end of a run. This was standard VR suburban practice for fast turnaround, but less common on country trains and rare on the narrow gauge.

This pic shows the basic underframe, with truss rods built up from bits of K&S rod and tube, with LGB bogies and Accucraft couplers fitted. This was before I decided these would be completed as gas lit cars, so the pintsch gas tanks hadn't been fitted when this was taken.
Image

This pic shows an assembled first-second class car body sitting on the underframe, with the seats sitting in place, but not attached. The sides are my usual three layers, with recesses on the inside for the window material and with the beading built up using Evergreen strip. The seats were built up using homemade wood mouldings for the cushions and plywood frames. First class has head and armrests, while second class is more basic and the seating is 2+1.
Image

This is the same car fully assembled, but unpainted.
Image

This is a second class with van body showing the interior, with the same seating arrangement in the second class compartment and a combined guard and van compartment. There is no interior in the van, as it can't be seen once the roof and windows are in position.
Image

A second class with van car, again fully assembled but unpainted.
Image

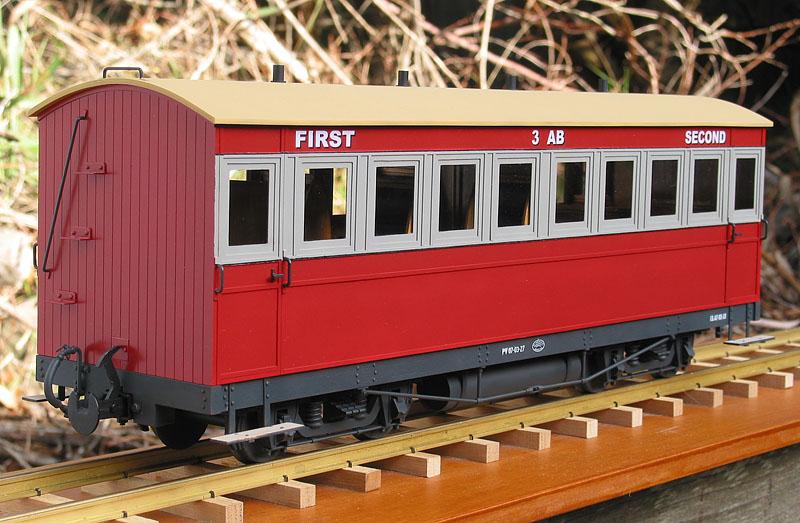
The sun finally appeared this afternoon and this pic shows the first-second car completed, painted and assembled, ready to enter service.
Image

This is one of the second class with van cars as completed. The other one is the same except that it was built as a mirror image, which was another quirk of some VR built passenger cars.
Image

My photo track isn't long enough to show all three cars, but here are two of them to give the idea. A standard TVT passenger train would have a van at each end, with extra cars added in the middle as needed. The white disc on the van end is a taildisc. The VR used these on the rear vehicle of a train during daylight to show railway staff that the train was complete. At night a red tail light would replace it.
Image

Construction Methods

The roof on these cars was too long for my usual method of forming a polystyrene sheet roof, so I made a wooden former and laminated three pieces of 0.020" sheet to form the roof. Three layers was enough to give a rigid roof that held it's shape without extra bracing after the glue dried. The pictures show the arrangement.
Image
Image

The grill in the van doors was soldered up out of brass wire and strip. These were drawn on an old tile with pencil and the parts held in place with kapton tape and Blu-tack, which isn't as heat resistant as the tape, but keeps parts in place if you are quick. The photo shows a soldered grill still in place on the tile.
Image

TVT Story

When first opened the TVT was like the early VR narrow gauge lines, with only only second class passenger accommodation. The local squattocracy soon objected to themselves and their womenfolk having to rub shoulders with the working classes, so the second class cars were divided into two compartments and one compartment was fitted out for first class.

Also at that time the guard and parcels travelled in 4 wheel vans, which were also used on goods trains. After WW1 the area was opened up to soldier settlement and the number of first class passengers reduced, but the van goods and mail loading increased. The guards also complained about the riding of the vans at passenger speeds.

The engineer accordingly had the first class compartment of a couple of the first-second class cars stripped out and rebuilt as a van compartment, as well as space for the guard. This increased van storage on mixed and passenger trains and reduced the total train weight, as the 4 wheel vans were no longer needed.

The passenger vans rode much better and the guards thought they were onto a good thing, until winter arrived. What they had forgotten was that the old vans had a stove as they were also used on goods trains, some of which could run at night. TVT mixed and passenger trains only ran during the day, so the management saw no reason to fit a stove for the guard in the rebuilt passenger cars. Especially as the paying passengers only got footwarmers as a source of heat in winter.............

Regards,
Graeme

Narrow Minded
Driver
Driver
Posts: 4650
Joined: Wed Dec 30, 2009 2:27 pm
Location: Forgotten Realms
Contact:

Post by Narrow Minded » Tue Jun 11, 2013 4:16 pm

Excellent modelling once again - and those First Class seats look LUSH! :D
Image

User avatar
paullad1984
Fireman
Fireman
Posts: 272
Joined: Sat Mar 09, 2013 11:18 am
Location: United Kingdom

Post by paullad1984 » Tue Jun 11, 2013 5:45 pm

i like the way you've recessed those couplings into the headstock, only thing i dont like about accucraft couplings is they're length, they stick out too far!

User avatar
90733
Driver
Driver
Posts: 1952
Joined: Wed Dec 16, 2009 6:17 pm
Location: West Yorkshire
Contact:

Post by 90733 » Tue Jun 11, 2013 6:36 pm

Very, very impressive models!
Thanks
Jack

User avatar
tom_tom_go
Driver
Driver
Posts: 4824
Joined: Wed Feb 23, 2011 3:08 am
Location: Kent, UK
Contact:

Post by tom_tom_go » Tue Jun 11, 2013 7:31 pm

Beautiful as always Graeme.

Could easily be a competition winner!

User avatar
hussra
Trainee Driver
Trainee Driver
Posts: 872
Joined: Tue Jul 28, 2009 2:06 pm

Post by hussra » Tue Jun 11, 2013 8:54 pm

Really lovely. Can you share any more on how you laminate the roof - what solvent you use, and how you get it done neatly, etc.? (I'm a bit useless at these things with plasticard - confess I normally buy the plastic roof mouldings from GRS.)
Richard Huss
in sunny Solihull

User avatar
laalratty
Retired Director
Retired Director
Posts: 3887
Joined: Wed Jan 16, 2008 5:35 pm
Location: Morecambe

Post by laalratty » Tue Jun 11, 2013 8:55 pm

Lovely models!
"What the hell is that?"
"It's a model icebreaker sir."
"It's a bit big isn't it?"
"It's a full scale model sir....."

User avatar
lukejpetch
Cleaner
Cleaner
Posts: 97
Joined: Thu May 16, 2013 8:27 pm
Location: Luton, Bedfordshire

Post by lukejpetch » Tue Jun 11, 2013 10:37 pm

Super nice! :)
Ames Light Railway
Chief Engineer - Luke Petch

"So Luke, is this the one that set fire to the track?"

User avatar
AndrewGVT
Cleaner
Cleaner
Posts: 54
Joined: Tue May 21, 2013 7:45 pm
Location: Hampshire
Contact:

Post by AndrewGVT » Wed Jun 12, 2013 7:14 am

tom_tom_go:84718 wrote: Could easily be a competition winner!
Sure could :D There amazing! :thumbright:
Andrew
=============
Proper engineering techniques; use a hammer, if that fails, get a bigger hammer.

User avatar
GTB
Driver
Driver
Posts: 1559
Joined: Sat Mar 05, 2011 2:46 pm
Location: Australia

Post by GTB » Wed Jun 12, 2013 10:42 am

hussra:84726 wrote: Can you share any more on how you laminate the roof - what solvent you use, and how you get it done neatly, etc.?
I normally use MEK for glueing polystyrene sheet together, but it evaporates too fast for laminating. MEK can also cause cracks in polystyrene that is under stress, eg. when being forced into a curve.......

For laminating polystyrene I use a solvent called d-Limonene. It evaporates fairly slowly so gives a little working time. To laminate sheets, I put the first one on the bench, brush a layer of solvent over it and quickly place the next layer in place. Repeat for the third layer then run a brush load of solvent around the edges in case any bits got missed. Being slow drying, there is some slip available for a few seconds, giving time to move the layers a little to line up the edges if necessary. In the case of a roof, the sheets are cut a few mm oversize to allow for trimming to final size when everything is hard.

For a roof, the layers are then placed on the former, the clamps put in place and it's then left for at least a few days to slowly harden. I leave them for a week to make sure and get on with something else. The wooden former I use is a little smaller in radius than the actual size needed, so that the roof pulls down to a neat fit along the sides when it is in place.

Once everything is nice and hard, I mark the roof to final length and width with a pencil and trim to the line. A file and a sanding block for the ends, a small block plane for the sides. Polystyrene sheet is actually easier to plane than wood as it has no grain, just make sure the plane blade is sharp and take only light cuts.

d-Limonene is a byproduct of making orange juice (it's the oil in the peel of citrus fruit which gives them the distinctive citrus odour) and is available in hobby shops in small quantities from several suppliers here in Aust. It goes off over time in the bottle when exposed to air, so is best bought in small quantities.

Microscale from the US sell it as 'Micro Weld', so it may be available in the UK from hobby shops that sell their products. It works well on injection moulded kits, which is why I think Microscale sell it.

Laboratory suppliers sell it, but the minimum quantity will probably be 1L and it's also available in industrial quantities. I'd be lucky to use 10ml a year, so I buy it in 30ml bottles from a hobby shop.

It may also be available from health food shops and similar places, as it is a 'natural' product. A Google search turned up some UK possibilities.

It can't be posted in Aust. or the US, as it's a class 3 DG. Probably the same in the UK.

Graeme

User avatar
hussra
Trainee Driver
Trainee Driver
Posts: 872
Joined: Tue Jul 28, 2009 2:06 pm

Post by hussra » Wed Jun 12, 2013 11:06 am

GTB:84737 wrote:For laminating polystyrene I use a solvent called d-Limonene. It evaporates fairly slowly so gives a little working time.
Brilliant info, thanks! Worth looking out for at a show.
Richard Huss
in sunny Solihull

User avatar
Chris Cairns
Driver
Driver
Posts: 2366
Joined: Mon Oct 29, 2007 7:25 pm
Location: Glasgow, Scotland

Post by Chris Cairns » Wed Jun 12, 2013 11:37 am

Truly exquisite work Graeme.

Thanks for sharing their progress with us.

Chris Cairns.

User avatar
Peter Butler
Driver
Driver
Posts: 5234
Joined: Sun Sep 09, 2012 10:33 pm
Location: West Wales

Post by Peter Butler » Wed Jun 12, 2013 7:51 pm

Stunning models, beautifully detailed and superbly finished.
Who could ask for more?

User avatar
Superbiker_uk
Fireman
Fireman
Posts: 371
Joined: Wed Apr 01, 2009 7:36 am

Post by Superbiker_uk » Wed Jun 12, 2013 9:11 pm

Seriously good modelling :) Great pictures - thank you.

Big Al
Fireman
Fireman
Posts: 496
Joined: Wed Apr 04, 2012 3:43 pm
Location: Romford,Essex.

Post by Big Al » Wed Jun 12, 2013 9:34 pm

Truly stunning coaches lovely photo's.
Allen Hopper - early retirement can't beat it !

User avatar
Andrew
Moderator
Moderator
Posts: 3265
Joined: Tue Jul 03, 2012 1:33 pm
Location: Bristol, UK
Contact:

Post by Andrew » Thu Jun 13, 2013 10:28 am

I agree with all of the above, beautiful carriages - thanks for the photos!

Andrew.

Post Reply

Who is online

Users browsing this forum: No registered users and 11 guests