NWNG Railways No.1

Re: NWNG Railways No.1
Grease from fingers can affect a paint finish, especially if it has not quite hardened yet. While I do not pretend to understand the chemistry behind it all, I am given to understand that some paints remain quite soft long after they have dried.
If at first you don't succeed, use a bigger hammer!


Re: NWNG Railways No.1
As a rough estimate i think i need about 72 slats in total for the 6 3rd class bench seats. I am thinking of 3mm wide and 2mm thick hardwood. This i know i can buy at my local model shop but i am getting satisfaction from cutting my own from larger sections using a Proxxon modellers circular saw. (A treat to myself after Peterborough this year.)
I know it might be classed as a little over the top, but i want them all exactly the same length. I am cutting them slightly over length with a knife and then sanding the ends on a shooting board that takes me back to my GCE woodwork days.
You can see that i have used this a lot over the past few projects. I have put a panel pin at the appropriate spot on the board so that i can sand one end of the slat lightly, turn it round and then sand the other end of the slat until the sanding block rubs on the end of the board and stops removing wood from the slat.
I then tried to start gluing the slats to the seat frames in the coach but found it too fiddly to hold the endframes in the correct position and to get the ends of the slats overhanging both ends of the frames by the same amount. I then found a low sided wooden box that had square corners and base.
Using this box, and once i had glued one slat in position with equal overhang at each end, i could hold the seat touching the back and one side of the box and glue all of the other slats in position, each one touching the side of the box thus ensuring that the overhang is the same on all.
Now to get back to cutting and sanding more slats. Only about another 60 to do.
D.
I know it might be classed as a little over the top, but i want them all exactly the same length. I am cutting them slightly over length with a knife and then sanding the ends on a shooting board that takes me back to my GCE woodwork days.
- IMG_20171124_133926.jpg (71.04 KiB) Viewed 4378 times
I then tried to start gluing the slats to the seat frames in the coach but found it too fiddly to hold the endframes in the correct position and to get the ends of the slats overhanging both ends of the frames by the same amount. I then found a low sided wooden box that had square corners and base.
- IMG_20171124_134024.jpg (31.76 KiB) Viewed 4378 times
Now to get back to cutting and sanding more slats. Only about another 60 to do.
D.
David T.


Re: NWNG Railways No.1
Putting your patience to the test again I see. The end result will be good I'm sure.
Grant.
PS rather you than me though!
Grant.
PS rather you than me though!
Re: NWNG Railways No.1
Looks good, it will be worth all the effort took to get them all looking the same. 
ROD
Life is so easy when I run my trains.


https://gardenrails.org/forum/viewtopic ... 41&t=11364
https://www.youtube.com/@fairywoodlightrailway
Life is so easy when I run my trains.


https://gardenrails.org/forum/viewtopic ... 41&t=11364
https://www.youtube.com/@fairywoodlightrailway
Re: NWNG Railways No.1
Hi all.
6 third class seats done.
72 slats 3mmx2mm were cut to approx length oversize and the ends then sanded to exact length on the shooting board. I made up the 6 seat frames first as in previous picture from the pairs of ends and one slat was added to each, as in the pic, setting the correct overhang at each end.
I didn't, in the end, use a wire spacer to set the gap when gluing the slats. Unless i let each slat dry before gluing the next they started sliding as i pushed the next one up to it with the spacer between. I realised that with 72 slats to glue it would take hours to glue them all.
So For the seat base i used the wooden box to help set in place the front and back slat. 5 minutes later i glued the middle two, setting the gap between the slats by eye. I was happy with the result and did the other five seat bases in the same way.
For the seat back i glued the top and bottom slats in place with the seat lying flat and used the box to set the overhang as before. I then glued in the other four back slats setting the gaps by eye before the glue set. Once dry i then glued the slat on the seat front and the one on the seat back top.
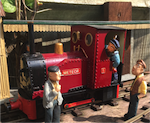
All the seats fit well into the coach and little Louis decided to try one out for comfort. He seems satisfied.
Now to think about the 1st class seats. I would like to think padded leather is possible. We shall see. 
D.
6 third class seats done.
- IMG_20171127_212121.jpg (75.08 KiB) Viewed 4200 times
I didn't, in the end, use a wire spacer to set the gap when gluing the slats. Unless i let each slat dry before gluing the next they started sliding as i pushed the next one up to it with the spacer between. I realised that with 72 slats to glue it would take hours to glue them all.
So For the seat base i used the wooden box to help set in place the front and back slat. 5 minutes later i glued the middle two, setting the gap between the slats by eye. I was happy with the result and did the other five seat bases in the same way.
For the seat back i glued the top and bottom slats in place with the seat lying flat and used the box to set the overhang as before. I then glued in the other four back slats setting the gaps by eye before the glue set. Once dry i then glued the slat on the seat front and the one on the seat back top.
- IMG_20171127_211106.jpg (53.18 KiB) Viewed 4200 times
- IMG_20171127_211142.jpg (58.66 KiB) Viewed 4200 times
D.
David T.
Re: NWNG Railways No.1
Nothing wrong with your eyesight then David. Superb job of lining up the slats, would have thought you did use a jig looking at them. When you originally mentioned the dimensions of the slats I thought they sounded a bit thick, but they look perfect. Buttoned padded seats, now that's the thing!!
Grant.
Grant.
Re: NWNG Railways No.1
Hi Grant.
Even though i cut the slats to 2mm thick in obeche hardwood, i don't think i would like to go any thinner as these were quite flexible. I'll be honest and say i broke one while sanding it. There might be a tough plywood but i wanted to use hardwood because it looks more realistic, but that's just me.
I can't make up my mind whether to stain them a bit darker but i quite like them as they are.
D.
Even though i cut the slats to 2mm thick in obeche hardwood, i don't think i would like to go any thinner as these were quite flexible. I'll be honest and say i broke one while sanding it.
I can't make up my mind whether to stain them a bit darker but i quite like them as they are.
D.
David T.
-
Peter Butler

- Driver

- Posts: 5245
- Joined: Sun Sep 09, 2012 10:33 pm
- Location: West Wales
Re: NWNG Railways No.1
I can see you get most satisfaction from DIY but there is a helping hand available should you choose it. I fitted out my Observation Car with padded sets which I bought from IP Engineering. They are cast resin in blocks of four seats and easily modified to suit your requirements....
- IMG_1998.JPG (134.52 KiB) Viewed 4086 times
- IMG_2006.JPG (150.77 KiB) Viewed 4086 times
The best things in life are free.... so why am I doing this?
Re: NWNG Railways No.1
Your seats look brilliant David, great job and well worth the effort you have put in. I like them has they are too.
ROD
Life is so easy when I run my trains.
https://gardenrails.org/forum/viewtopic ... 41&t=11364
https://www.youtube.com/@fairywoodlightrailway
Life is so easy when I run my trains.
https://gardenrails.org/forum/viewtopic ... 41&t=11364
https://www.youtube.com/@fairywoodlightrailway

Re: NWNG Railways No.1
David,
Personally I do think they should be a bit more coloured, not necessarily darker as such.
There ought to be a series of marks where the bodies sit most, i.e in the 4 corners and then couple in between those?
Philip
Re: NWNG Railways No.1
River Lin said,
Grant.
I don't know about the UK, but all the slatted seats I've seen are a varnished golden grain colour if that makes sense. It's a while since I've used Obechi but isn't it a fairly pale timber. Perhaps a golden oak colour would best represent many coats of varnish. As ever colour is a very personal choice.I can't make up my mind whether to stain them a bit darker but i quite like them as they are.
Grant.
Re: NWNG Railways No.1
You are correct about the UK, but does it always have to be done the way people expect them to be, I personally like the lighter colour, it stands out a lot more, for me anyway. But a little darkening were people have sit would look great too, it shows they have been sat on at least.
ROD
Life is so easy when I run my trains.
https://gardenrails.org/forum/viewtopic ... 41&t=11364
https://www.youtube.com/@fairywoodlightrailway
Life is so easy when I run my trains.
https://gardenrails.org/forum/viewtopic ... 41&t=11364
https://www.youtube.com/@fairywoodlightrailway
Re: NWNG Railways No.1
Hi all and thanks for the range of comments
I think that is much better. A much more natural oak colour. They looked stark white against the teak interior.
This is antique pine before sanding and a sealing coat.
D.
- IMG_20171128_192717.jpg (76.78 KiB) Viewed 4270 times
This is antique pine before sanding and a sealing coat.
D.
David T.
-
Peter Butler
- Driver
- Posts: 5245
- Joined: Sun Sep 09, 2012 10:33 pm
- Location: West Wales
Re: NWNG Railways No.1
Far better in a slightly darker colour. That gives them a more substantial appearance and more in keeping with the original timber used.
The best things in life are free.... so why am I doing this?
Re: NWNG Railways No.1
Very nice.
ROD
Life is so easy when I run my trains.
https://gardenrails.org/forum/viewtopic ... 41&t=11364
https://www.youtube.com/@fairywoodlightrailway
Life is so easy when I run my trains.
https://gardenrails.org/forum/viewtopic ... 41&t=11364
https://www.youtube.com/@fairywoodlightrailway
Re: NWNG Railways No.1
Hi all. Time to pick on your experience.
I know i can do imitation leather seating in 1st class but i have ordered some thin black leather samples online and would love to make buttoned and padded leather seat pads if possible. Any help and ideas would be welcomed. Especially how to cover a foam pad without the leather puckering up at the corners (or does that matter?) .
D.
David T.
Who is online
Users browsing this forum: No registered users and 18 guests