Page 1 of 5
Re: First time scratchbuild project - Bagnall steam loco
Posted: Sun May 24, 2020 12:52 am
by LNR
Tom85 wrote: ↑Sat May 23, 2020 6:22 pm
it's beginning to look like an actual loco...
It certainly is Tom. There's no stopping you now, your hooked!
Grant.
Re: First time scratchbuild project - Bagnall steam loco
Posted: Sun May 24, 2020 9:37 am
by Old Man Aaron
Impressive. Certainly looks like you've needed less filler than my first scratchbuild!
Re: First time scratchbuild project - Bagnall steam loco
Posted: Sun May 24, 2020 10:25 am
by Tom85
Thanks for the encouragement folks. I have used quite a lot of filler... And I haven't attempted the dome yet!
Re: First time scratchbuild project - Bagnall steam loco
Posted: Sun May 24, 2020 6:43 pm
by philipy
Tom85 wrote: ↑Sun May 24, 2020 10:25 am
I have used quite a lot of filler...
Haven't we all?


Re: First time scratchbuild project - Bagnall steam loco
Posted: Wed May 27, 2020 2:30 pm
by Andrew
That's looking very good indeed, nice one!
I look forward to seeing more progress in due course...
Andrew.
Re: First time scratchbuild project - Bagnall steam loco
Posted: Fri Jun 05, 2020 9:27 am
by Tom85
I haven't had as much time as I would like to work on the Bagnall recently (know the feeling, eh?) but have at least managed to get some work done to complete the chassis. The photo shows the underside of the chassis, now in primer, with the motor block removed for painting, with holes added for the various switches and connections. I spent some time deciding where these should go, given the loco's limited internal space. On the underside of the loco will be the DPDT switch (to switch between run and charge) and the charge socket. The speed controller will be mounted through the cab floor (hoping to disguise it as a handbrake standard) and the reversing switch on top of the tank extensions inside the cab. The inside of the boiler will house the 3x NIMH AA cells, which it's just the right diameter for. The temptation is to forget about all this and crack on with building the body, as I don't really enjoy wiring, but it certainly seemed wise to consider all of this before putting the whole thing together.
Also in this photo is the 'firebox' with a home-made regulator handle, so at least the driver will have something to hold on to. I'm also incorporating a light-up 'fire' using a flickering orange LED. Might come across as something of a gimick, but I think it will add a bit of interest and life to the model.
Hope everyone else's projects are going well, and wishing you a good weekend.
Tom
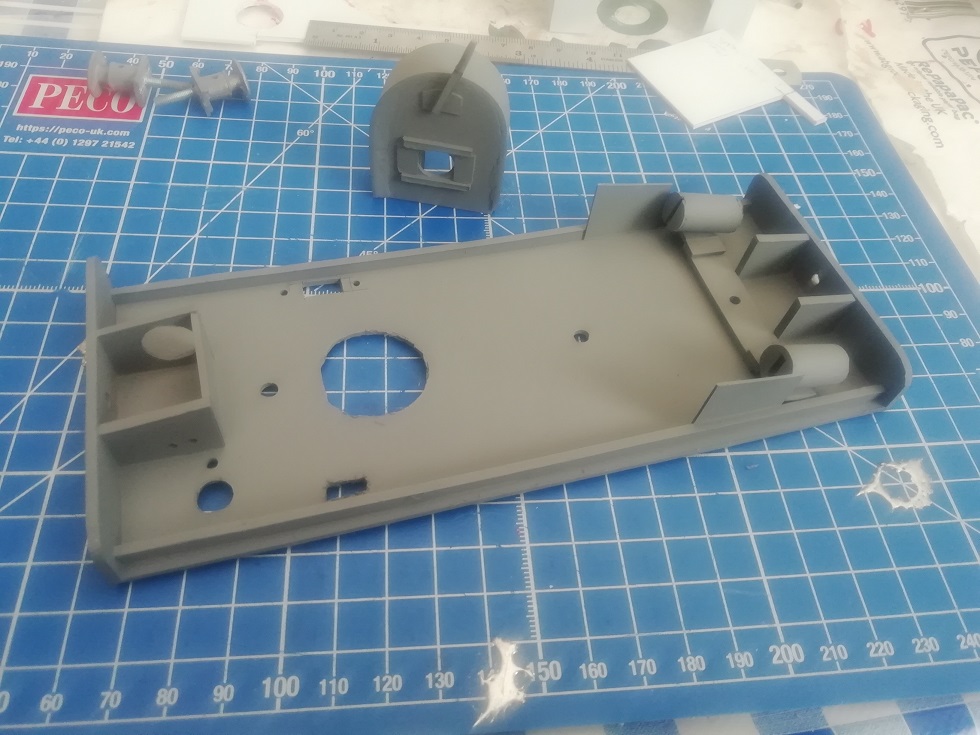
- IMG_20200605_091705.jpg (200.11 KiB) Viewed 8350 times
Re: First time scratchbuild project - Bagnall steam loco
Posted: Fri Jun 05, 2020 10:15 am
by philipy
Looking good so far.
Yep, I agree its a good idea to get it all planned ahead ( something I'm woefully bad at doing, myself!) and as for flickering fires.. THAT I agree with 100%!
Re: First time scratchbuild project - Bagnall steam loco
Posted: Fri Jun 05, 2020 2:59 pm
by Garethh
This is looking ace, I can’t get my head around working with plasticard for some reason so am especially impressed!
Re: First time scratchbuild project - Bagnall steam loco
Posted: Sat Jun 06, 2020 9:04 am
by FWLR
Plasticard is very easy to work with Garethh. You just need to take your time when cutting it. The possibilities are huge in modelling building and rolling stock. Have ago, you might be quietly suppressed. Have a look at Peter Butler's thread, just put a search in for his "Time to build a railway...but where" a little warning though, it's a very big thread....
Re: First time scratchbuild project - Bagnall steam loco
Posted: Sat Jun 06, 2020 1:15 pm
by Tom85
FWLR wrote: ↑Sat Jun 06, 2020 9:04 am
Plasticard is very easy to work with Garethh. You just need to take your time when cutting it. The possibilities are huge in modelling building and rolling stock. Have ago, you might be quietly suppressed. Have a look at Peter Butler's thread, just put a search in for his "Time to build a railway...but where" a little warning though, it's a very big thread....
I agree. I've never worked with it before this project and have found it pretty easy to work with. Give it a go

Re: First time scratchbuild project - Bagnall steam loco
Posted: Sat Jun 06, 2020 3:29 pm
by Garethh
Cheers for the encouragement, maybe the next build will involve some plasticard!
Re: First time scratchbuild project - Bagnall steam loco
Posted: Sun Jun 07, 2020 6:49 am
by FWLR
FWLR wrote: ↑Sat Jun 06, 2020 9:04 am
Have ago, you might be quietly suppressed.
Suppressed......
.....Surprised.

Re: First time scratchbuild project - Bagnall steam loco
Posted: Sun Jun 14, 2020 4:49 pm
by Tom85
Hope everyone's having a good weekend. A quick update on this weekend's progress on the Bagnall. I've been adding overlays to the cab and side tanks using a method (as usual) picked up from Rik's blog. I used thin, oversized overlays of plasticard, with 'rivets' embossed in them with an old centrepunch, glued to the body and then trimmed to shape. In the photo, some parts are more or less finished but others still need to be trimmed and filed to shape (front spectacle plate).
Meanwhile, the boiler section has been completed and primered. I'm particularly pleased with the smokebox door, home-made from odds and ends. The dome, on the other hand, is a whitemetal item - the only non-homemade part I have so far used (other than the motor block). Sadly, no-one has yet put a dome specifically for a 16mm scale Rye and Camber Bagnall on the market yet (expecting a bit much there, I suppose) so finding one that looked right was a bit of a chore, specially since dimensions aren't usually given. The one I eventually found is for a Gauge 1 LNWR 0-8-0 apparently, from Walsall Model Industries. I think it looks the part, even if it perhaps isn't quite tall enough. The safety valve was made from offcuts of plasticard, masking tape, and solder wire.

- IMG_20200614_163648.jpg (374.73 KiB) Viewed 8162 times
Re: First time scratchbuild project - Bagnall steam loco
Posted: Mon Jun 15, 2020 12:25 am
by LNR
Coming along nicely Tom, with the boiler in primer you can start to see what you've done. The smokebox door does look good.
Grant.
Re: First time scratchbuild project - Bagnall steam loco
Posted: Mon Jun 15, 2020 5:45 am
by FWLR
Great start on your loco Tom.
Can I help with a suggestion on the holes for the spectacle plate. If you have any wood drill bits, the ones that have the long point, you can drill the plasticard quite easily and get a better finish. I do mine secured on a wooden block with clamps and going slowly with the speed on the drill, it does do a much better finish and only needs some light rubbing with sandpaper or emery block. I use the nail files that women use and men if they admit it.
You can use normal bits, but they tend to bite the Plasticard and you end up ripping the card...And you never know, one day the wood bit may come in useful.
Re: First time scratchbuild project - Bagnall steam loco
Posted: Tue Jun 16, 2020 9:00 am
by Tom85
Thanks for the idea Rod - I'll certainly invest in an appropriately sized wood bit for my next model.
The main panels are made of 1.5mm plasticard and I used a hole-cutter (the plumber's sort that you put in an electric drill) and they did ok, but not the smoothest cut. For the 0.5mm overlays that didn't work at all - just tore the material, as you say. I spent last night finishing them off by trimming the overlays bit by bit around the holes in the thicker material, and obtaining a smooth finish by wrapping some sandpaper around the same hole-cutter bit and using that as a sort of make shift reamer. All trial and error but got a nice smooth spectacle plate hole in the end
Re: First time scratchbuild project - Bagnall steam loco
Posted: Wed Jun 17, 2020 8:35 am
by FWLR
Just remember though Tom, no matter which way or how you cut Plasticard, slow and steady is the best. Taking time to cut any material for building models is the best. For cutting Plasticard with a knife I always try to cut along a metal ruler that is clamped down on to the card if possible. And cutting away from the piece you want to use. It's so easy for the knife to slip, it sometimes has a life of it's own...

Re: First time scratchbuild project - Bagnall steam loco
Posted: Wed Jun 17, 2020 12:41 pm
by pandsrowe
One way of dealing with the problem of tearing in the thinner sheets of plastic card is to sandwich the card between two pieces of scrap timber, clamp together and then drill the required hole/s. I have done this on a number of occasions using whatever I had to hand, sometimes ply sometimes MDF and certainly on one occasion a couple of scraps of 2" x 1" battens. However that was when I was using an ordinary twist drill to make the required hole, normally a hole saw would not have enough depth of cut to go through the thickness of the batten.
Re: First time scratchbuild project - Bagnall steam loco
Posted: Wed Jun 17, 2020 5:02 pm
by ge_rik
For some reason, I've missed the updates on this thread. It looks really interesting. Great to see the progress you're making and I'm really happy you've pinched an idea or two of mine (which I probably pinched from someone else).
Keep up the good work. So far so (really) good.
Rik
Re: First time scratchbuild project - Bagnall steam loco
Posted: Fri Jun 19, 2020 10:22 am
by Lonsdaler
I've found this tool excellent for cutting circular holes in plastic sheet
http://www.olfacutters.co.uk/Olfa-CMP-1 ... ass-cutter
They sell sturdier versions too.