bambuko loco works 0-6-2 (Fowler)
- bambuko
- Trainee Fireman
- Posts: 212
- Joined: Tue Dec 12, 2017 12:11 am
- Location: UK, England, North Devon
Re: bambuko loco works 0-6-2 (Fowler)
Thank you Dazza!
Any praise coming from you, is particularly nice indeed
It would have been great to have mouldings from Mike in NZ for both pony truck frame and axleboxes.
Maybe next time...
For now it is just rough, coarse representation of swing link truck in the prototype, but it will do (especially from 10ft away ).
Main thing is, that functionally it promises to work OK.
Re: bambuko loco works 0-6-2 (Fowler)
Well I for one think you've done a really superb job. It just looks so professionally done. You should be really happy with how well you have done with what could and can be a real pain to get right.
You have in abundance...
ROD
Life is so easy when I run my trains.
https://gardenrails.org/forum/viewtopic ... 41&t=11364
https://www.youtube.com/@fairywoodlightrailway
Life is so easy when I run my trains.
https://gardenrails.org/forum/viewtopic ... 41&t=11364
https://www.youtube.com/@fairywoodlightrailway
- bambuko
- Trainee Fireman
- Posts: 212
- Joined: Tue Dec 12, 2017 12:11 am
- Location: UK, England, North Devon
Re: bambuko loco works 0-6-2 (Fowler)
It took two attempts to get pony truck frame right ...
and the second time I put (almost) as much time into making a fixture that held everything for silver soldering as I did into making the bits for the frame
but I got it right in the end - if you look closely at the photos you will see even solder lines at 0.15mm all around.
- bambuko
- Trainee Fireman
- Posts: 212
- Joined: Tue Dec 12, 2017 12:11 am
- Location: UK, England, North Devon
Re: bambuko loco works 0-6-2 (Fowler)
Next update is about cranks.
First a "test run" to make sure everything works as planned
I have spare axle with wheel from when I was making them, so will use this and one test crank to check some of my ideas.
Each crank starts as a rectangle of steel, with holes drilled and reamed (using DRO means everything should be quite accurate):
Next the crank start taking shape:
Balance weight are angled at 20deg, so simple fixture makes sure they will look OK:
Round face of balance weight is turned on the lathe, using simple mini faceplate:
It even has little "dog" to push crank round - when I first tried without it, just using centre screw and relying on friction, things went pear shaped
and.. finally little buttons and bit of filing to round the crank.
Didn't have silver steel to make them hardened, but regular mild steel was just fine for one off (silver steel on order)
That's it for today. Next... crankpins and loctiting and pinning it all in place.
Which leads me to a question:
In Brian Wilson's book both crankpin and axle are pinned to the crank (page 22).
Axle bit makes perfect sense, but why pin crankpin? - it's not as if it is going to twist itself off (unlike possibly axle/crank joint).
- Hydrostatic Dazza
- Driver
- Posts: 1167
- Joined: Tue Sep 19, 2017 4:17 am
- Location: Brisbane
- Contact:
Re: bambuko loco works 0-6-2 (Fowler)
For what it is worth, I made the driving crank pin from silver steel (or was it an off cut of a 1/8" HSS drill shank?) as it was pressed on and did not need any threads. The eccentric crank will be cross pinned using 1.00mm HSS drill shanks, this is yet to be done after test steaming. The rest of the pins I made as per BW book and I case hardened the threaded pins with "Cherry Red" , which seems to work well. Not sure how deep the case hardening goes but a file skids over it. I used PB for the rod bushes. I cannot see why you would cross pin the crank pins to the cranks. I could not find where B. W mentions this in the book ??
I made the Quartering jig as like in the book and added lock nuts to the centre screws to enure they did not wobble about and also wooden wedges to ensure positive engagement of the pins to the jig. I felt this was very worth the effort.
Last edited by Hydrostatic Dazza on Fri May 08, 2020 10:34 pm, edited 1 time in total.
Cheers from Dazza, The Hydrostatic Lubricator
The chances of finding out what’s really going on in the universe are so remote, the only thing to do is hang the sense of it and keep yourself occupied. Douglas Adams
- bambuko
- Trainee Fireman
- Posts: 212
- Joined: Tue Dec 12, 2017 12:11 am
- Location: UK, England, North Devon
Re: bambuko loco works 0-6-2 (Fowler)
There it is (scanned from the book):Hydrostatic Dazza wrote: ↑Thu May 07, 2020 10:23 pm ... I cannot see why you would cross pin the crank pins to the cranks. I could not find where B. W mentions this in the book ??...
I guess it's another poetic licence by the illustrator and book's ghost writer
I have every intention of ignoring it, but thought I'd do sanity check here, just in case I've missed something.
I suppose someone will tell me that I am "overthinking it" but that's fine
- Hydrostatic Dazza
- Driver
- Posts: 1167
- Joined: Tue Sep 19, 2017 4:17 am
- Location: Brisbane
- Contact:
Re: bambuko loco works 0-6-2 (Fowler)
bambuko wrote: ↑Fri May 08, 2020 8:05 amThere it is (scanned from the book):Hydrostatic Dazza wrote: ↑Thu May 07, 2020 10:23 pm ... I cannot see why you would cross pin the crank pins to the cranks. I could not find where B. W mentions this in the book ??...
I guess it's another poetic licence by the illustrator and book's ghost writer
I have every intention of ignoring it, but thought I'd do sanity check here, just in case I've missed something.
I suppose someone will tell me that I am "overthinking it" but that's fine
I found it now. Blind in one eye and I cannot see out the other.
Roll pins = ERRR Yukk in my thinking. If you have to cross drill and pin a driving crank pin then something went wrong. 0.01mm interference would be fine, but put a little step on the pin. The next time I will do it I will make the pin over length, with a size to size fit to the hole to the excess length and thus the pin is lined up nicely as it is pressed in. 0.010 will make a nice interference fit and will be lined up but the excess lead it part. A drop of Loctite but it should be a waste of time as it will be wiped off if the interference is correct. After the excess is cut off, Dremel cut off wheel and diamond file to finish it off. I think one of my pins went a wee bit off, annoying but noticeable minor tight spot, so next time I will have the lead in portion to be cut off after.
Cheers from Dazza, The Hydrostatic Lubricator
The chances of finding out what’s really going on in the universe are so remote, the only thing to do is hang the sense of it and keep yourself occupied. Douglas Adams
- Old Man Aaron
- Trainee Driver
- Posts: 807
- Joined: Wed Oct 19, 2016 11:08 am
- Location: Sunshine Coast QLD, Australia
Re: bambuko loco works 0-6-2 (Fowler)
Simply stunning work here. Having worked on full-size Fowlers and other canefield kettles, it's nice to see their construction scaled down like this. Certainly well beyond what I could manage, I'll stick with assembling Roundhouse bits on frames cut from an old road sign!
Regards,
Aaron - Scum Class Works
- bambuko
- Trainee Fireman
- Posts: 212
- Joined: Tue Dec 12, 2017 12:11 am
- Location: UK, England, North Devon
Re: bambuko loco works 0-6-2 (Fowler)
Thank you for your very kind (and generous ) comments Old Man Aaron
I enjoyed your blog, in particular this post:
https://anzaccreekworkshops.blogspot.co ... owler.html
Whilst it is different prototype to my loco, family resemblance, many identical components etc make it very useful for my project - thank you.
I only have one, half decent photo of my protoype (https://www.angrms.org.au/cpages/airdmill.pdf) as shown in an earlier post in this thread.
Apparently it is in storage at Woodford?
I would greatly appreciate any more info (and possibly photos? ... when you are next at Woodford ).
- Old Man Aaron
- Trainee Driver
- Posts: 807
- Joined: Wed Oct 19, 2016 11:08 am
- Location: Sunshine Coast QLD, Australia
Re: bambuko loco works 0-6-2 (Fowler)
Happy to hear you're getting something out of the blog. It usually functions merely as a backup for my failing memory.
Aye, Airdmillan is up the front of our storage compound. Like most things at Woodford, it looks worse than it really is, but we'll likely never get around to doing anything with it, due to having too large a collection and an extreme shortage of active hands. No shortage of armchair enthusiasts whinging about it all slowly returning to the earth, though..
Here's the only shot I have of the loco. Ironically, I took loads of photos of it for a mate of mine last year, whom decided to build a static model, and needed reference material. Sorry to tell you I no longer have them, as I don't need the photos myself, and am running out of hard drive space. There's too many photos for him to email me any useful number of them, and what with this plague about, I can't visit him to get copies. For the same reason, (among others) I won't be getting to Woodford any time soon..
Quite sorry about that - normally, I'd be in much better a position to help.
I do however have a few shots of our flagship, Bundaberg Fowler No.5, taken when it's drivers were returned from re-machining back in September. Being a virtually-identical copy of Airdmillan, I hope these photos might be of some use to you.
Regards,
Aaron - Scum Class Works
- bambuko
- Trainee Fireman
- Posts: 212
- Joined: Tue Dec 12, 2017 12:11 am
- Location: UK, England, North Devon
Re: bambuko loco works 0-6-2 (Fowler)
Good to have confirmationOld Man Aaron wrote: ↑Sun May 10, 2020 12:22 pm...Aye, Airdmillan is up the front of our storage compound. Like most things at Woodford, it looks worse than it really is...
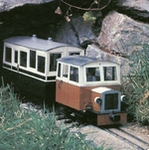
It's the last steam loco (I understand) build by Fowler in UK.
Yes, that's her allright.
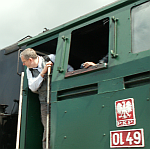
Old Man Aaron wrote:...Here's the only shot I have of the loco...
Every single photo is useful - thank you.
Such a shame I didn't have all this before I started my model.
Had to guess too many things, making it in essence freelance representation of Airdmillan
That is ironic indeedOld Man Aaron wrote:...Ironically, I took loads of photos of it for a mate of mine last year, whom decided to build a static model, and needed reference material. Sorry to tell you I no longer have them, as I don't need the photos myself, and am running out of hard drive space. There's too many photos for him to email me any useful number of them, and what with this plague about, I can't visit him to get copies...
but not to worry - you could ask him to upload them to (for example) to:
https://wetransfer.com/
and I would have them the next day
Alternatively I am going to have to wait...
I thought you guys in Australia have managed to eradicate Covid19 ?
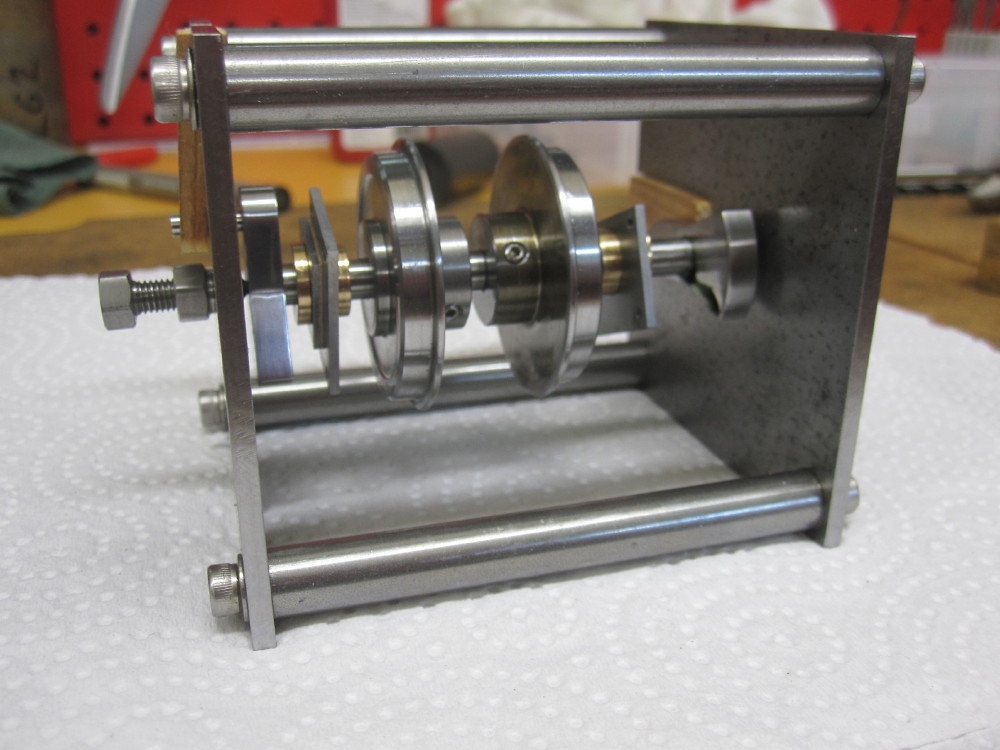
All is useful - thank you, but I know there were quite a few "improvements" made when it was copied in Bundaberg.Old Man Aaron wrote:...I do however have a few shots of our flagship, Bundaberg Fowler No.5, taken when it's drivers were returned from re-machining back in September. Being a virtually-identical copy of Airdmillan, I hope these photos might be of some use to you...
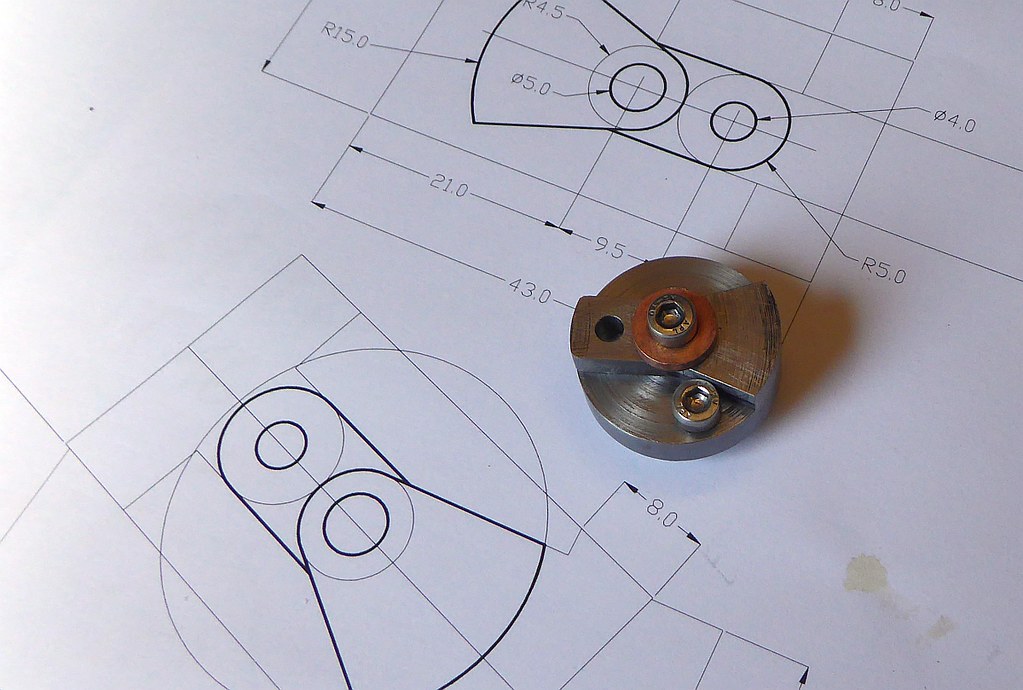
For example, right now I am working on cranks and factory drawing shows the cranks thinner than balance weights, like so:
yet Bundaberg Fowler has them the same thickness throughout...
so is it Bundaberg "improvement"? or was it the same for Airdmillan ??
- Old Man Aaron
- Trainee Driver
- Posts: 807
- Joined: Wed Oct 19, 2016 11:08 am
- Location: Sunshine Coast QLD, Australia
Re: bambuko loco works 0-6-2 (Fowler)
Huh, I never knew about any real differences between the two. You seem to know more about Airdmillan & Bundy than I do! To be honest though, I've never worked on the Bundy Fowler as it's well down the list of priorities at Woodford. The wheels were only turned last year because we were getting other wheels done at the same time.
That file transfer link is a good idea. I'll email my mate asking if he can help out. A reply could be a few days, though. I'll let you know how it goes, via PM.
First I've heard about eradicating the plague, though I avoid the media like, well, the plague.
That file transfer link is a good idea. I'll email my mate asking if he can help out. A reply could be a few days, though. I'll let you know how it goes, via PM.
First I've heard about eradicating the plague, though I avoid the media like, well, the plague.
Regards,
Aaron - Scum Class Works
- bambuko
- Trainee Fireman
- Posts: 212
- Joined: Tue Dec 12, 2017 12:11 am
- Location: UK, England, North Devon
Re: bambuko loco works 0-6-2 (Fowler)
They are not really significant in a grand scheme of things but to OCD afflicted, anally retentive old git like me, they are interesting...Old Man Aaron wrote: ↑Mon May 11, 2020 2:51 am Huh, I never knew about any real differences between the two...
I enjoy research part of the project as much as I do enjoy designing and building the modelOld Man Aaron wrote:...You seem to know more about Airdmillan & Bundy than I do!
No worries, thanks for trying. You have PM as well.Old Man Aaron wrote:...That file transfer link is a good idea. I'll email my mate asking if he can help out. A reply could be a few days, though. I'll let you know how it goes, via PM...
- bambuko
- Trainee Fireman
- Posts: 212
- Joined: Tue Dec 12, 2017 12:11 am
- Location: UK, England, North Devon
Re: bambuko loco works 0-6-2 (Fowler)
Continuing with cranks, I have made another fixture to allow me to machine different thickness of crank and balance weight, as per:
Here, I am setting up the fixture (with crank blank) on rotary table:
The result is quite satisfactory:
Bit more filing and shaping and I will have a pait of cranks to test the next steps
Here, I am setting up the fixture (with crank blank) on rotary table:
The result is quite satisfactory:
Bit more filing and shaping and I will have a pait of cranks to test the next steps
- bambuko
- Trainee Fireman
- Posts: 212
- Joined: Tue Dec 12, 2017 12:11 am
- Location: UK, England, North Devon
Re: bambuko loco works 0-6-2 (Fowler)
Test cranks continue
Crankpins loctited in. I am trying pinning/pegging the crankpins using pivot steel (0.8mm dia) in a fashion used in larger models rather than across as suggested in Brain Wilson's book.
Hex bolt is there to secure coupling rod retaining washer.
Crankpin has a shoulder to keep coupling rod away from the crank face (as per full size practice) and to increase loctiting surface area.
BTW I am planning to use the same method (and pivot steel) to secure cranks to the axle.
- bambuko
- Trainee Fireman
- Posts: 212
- Joined: Tue Dec 12, 2017 12:11 am
- Location: UK, England, North Devon
Re: bambuko loco works 0-6-2 (Fowler)
Drilling peg hole freehand on my drill wasn't entirely satisfactory
so I have decided to do it proper way on my milling machine, secured to holding fixture.
Here I am using a wiggler to position the hole exactly half way between (it's 0.4mm in one half and 0.4mm in the other):
Checking with centre drill (last chance to correct):
0.8mm dia 5mm deep:
I have spent some time sorting out a quill on my milling machine (it was stiff) - my fault, caused by overtightening the four bolts holding mill head.
When correctly torqued to 50 lbs/ft it has recovered and quill is now smooth and light
End result is quite acceptable
- tom_tom_go
- Driver
- Posts: 4824
- Joined: Wed Feb 23, 2011 3:08 am
- Location: Kent, UK
- Contact:
- bambuko
- Trainee Fireman
- Posts: 212
- Joined: Tue Dec 12, 2017 12:11 am
- Location: UK, England, North Devon
Re: bambuko loco works 0-6-2 (Fowler)
thank you
now I have to repeat this performance six times for the cranks proper (this one is just a test), but before I do it, I want to make (and test) quartering fixture.
More to follow...
- bambuko
- Trainee Fireman
- Posts: 212
- Joined: Tue Dec 12, 2017 12:11 am
- Location: UK, England, North Devon
Re: bambuko loco works 0-6-2 (Fowler)
My take on a quartering fixture.
V block in the centre (to locate the axle) and two stops, vertical on the left and horizontal on the right:
With the axle secured in place (one wheel is missing, but that's because it is just a test piece).
Brass clamps securing the axle, also makes sure the crankping is tight against the stop.
and ... ready to Loctite the other crank.
I guess, I will have to come up with some means of securing crank/crankpin against the stop?
Although I am reluctant to do it
Who is online
Users browsing this forum: No registered users and 13 guests