Dinowic light railway- The rebuild

What is your latest project?
DLRdan
Driver
Driver
Posts: 1083
Joined: Wed Nov 12, 2008 12:05 am
Location: Blyth
Contact:

Post by DLRdan » Wed Jul 02, 2014 11:59 pm

Update time

We left off having just moved the wall for the flowerbed. The plan was to make a straighter line between the cutting and fence, thus removing two of the tighter curves.

Image

After the old track was removed the new track bed could be laid. I decided instead of a straight line I would follow the curve of the wall giving more room for sidings on the right.

Image
Dan,

James: "Dan, can you use your hearing and tell me if that trains coming ?"
DLR
www.freewebs.com/dlrail

DLRdan
Driver
Driver
Posts: 1083
Joined: Wed Nov 12, 2008 12:05 am
Location: Blyth
Contact:

Post by DLRdan » Thu Jul 03, 2014 12:16 am

Once the oute line was laid the inner one was easier. I used a 2 inch spacer between the bricks to give 6 inches between the center of the rails, hopefully this will be enough clearance.

Image

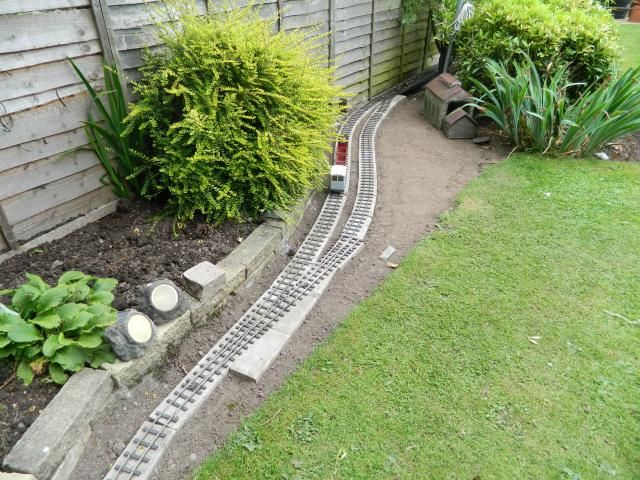
Once the track was down I got a loco out to test the new layout. The new areas were fine but it showed that a couple of the older areas needed attention also.

Image

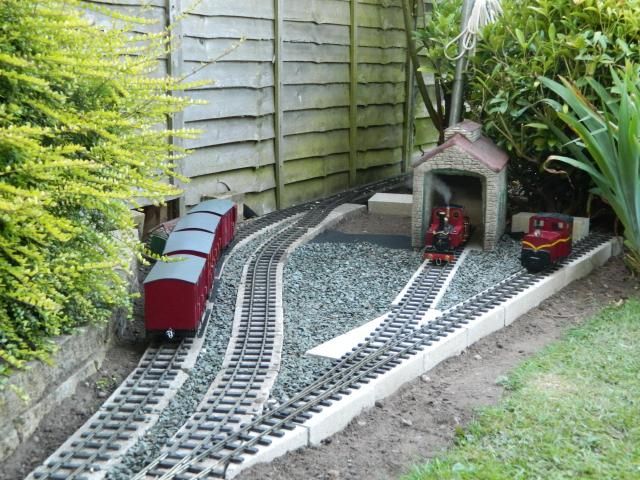
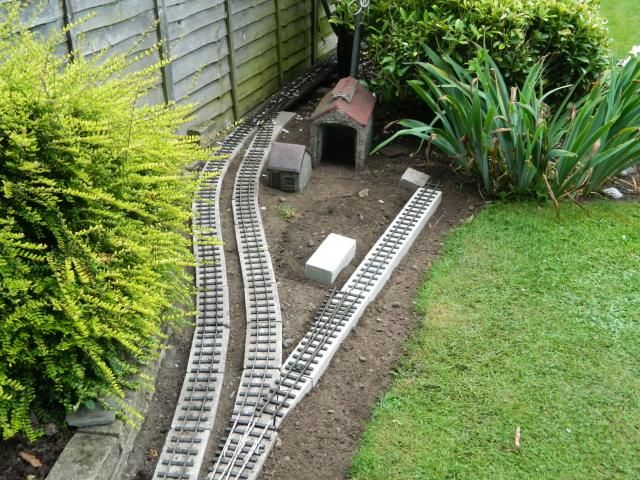
The sidings took a lot of thinking about, wether to go with one or two and their position. In the end I went for two sidings giving more storage and also a place for the engine shed.

Image

After all the track was down i filled the areas between the track with small gravel ontop of weed fabric. This area has been prone to things growing next to the track so hopefully this will be significantly reduced. This photo also shows how the grass falls away, the bricks almost being out the soil.

Image
Dan,

James: "Dan, can you use your hearing and tell me if that trains coming ?"
DLR
www.freewebs.com/dlrail

Maple
Trainee Fireman
Trainee Fireman
Posts: 175
Joined: Sat Jun 29, 2013 3:17 pm
Location: Bournemouth

Post by Maple » Thu Jul 03, 2014 8:47 am

Thats looking great! Are you cementing your blocks down or not, i have heard of a few rebels who dontlately, thinking of trying it.
'Professional Bodge artist '

DLRdan
Driver
Driver
Posts: 1083
Joined: Wed Nov 12, 2008 12:05 am
Location: Blyth
Contact:

Post by DLRdan » Thu Jul 03, 2014 11:39 am

The blocks are not cemented in, just well packed with soil. Doesn't work for everyone but its quick and easy to try, I've used it for years and providing you don't disturb the soil immediatly round it, it lasts well. Also seems imune to frost heave.


I didn't get photos of the inbetween stages but this is the finished bottom loop.

Image

This curve was 30" radius so was opened out to 38", a big improvement.

Image

The trees in the station have had a serious hair cut and the building has been cleared of the bits of unwanted moss. I also managed to find the cat !

Image
Dan,

James: "Dan, can you use your hearing and tell me if that trains coming ?"
DLR
www.freewebs.com/dlrail

User avatar
Andrew
Moderator
Moderator
Posts: 3275
Joined: Tue Jul 03, 2012 1:33 pm
Location: Bristol, UK
Contact:

Post by Andrew » Thu Jul 03, 2014 12:29 pm

That's looking really good!

I've previously gone for the relatively heavy "create foundations then mortar bricks/blocks on top" approach, but it takes yonks and is lots of work. Recently I've heard of a couple of people setting their chosen building material into the ground using postcrete/fix (guess Old School cement and sand would work as well, just more slowly...) and am trying that technique in my current station re-build. So far so good, it certainly seems to give the desired solid level base.

Anyway, thanks for the photos Dan, the line looks excellent...

Andrew.

User avatar
Soar Valley Light
Driver
Driver
Posts: 1451
Joined: Sun Dec 08, 2013 5:18 pm
Location: North West Leicestershire

Post by Soar Valley Light » Thu Jul 03, 2014 9:09 pm

Wow, great progress Dan. I was wondering how you were getting on.

You've got a nice alignment there, was it set out or did you eye it in? The track looks very well constructed and the finish is very neat and tidy. It's good to see how others achieve their results, I'm still only planning so have chance to take some of these ideas on board or to see how some of the ideas I've had myself work out in reality when someone else has tried them and posted the results. thanks for sharing.

Regarding foundations for blocks, I guess it's all about having enough in the ground, adequately compacted, to hold it against the forces it can reasonably be expected to have imposed on it. The problem with concrete and mortar bases is that you can end up with a bigger lump of loose material than the block itself in the wrong circumstances! It's the reason I always prefer well rammed earth as a backfill material for fence posts rather than concrete.
"Smith! Why do you only come to work four days a week?
"'cause I can't manage on three gaffer!"

Big Jim
Moderator
Moderator
Posts: 2694
Joined: Sat Jul 06, 2013 5:28 pm
Location: Near Llanelli

Post by Big Jim » Fri Jul 04, 2014 8:31 pm

Looks good Dan.
Keep the pictures coming.
If at first you don't succeed, use a bigger hammer!

User avatar
Matagami
Cleaner
Cleaner
Posts: 7
Joined: Mon Jul 07, 2014 2:09 pm
Location: Lost in deep space...

Post by Matagami » Tue Jul 08, 2014 8:57 pm

DLRdan:102315 wrote:

Image

This curve was 30" radius so was opened out to 38", a big improvement.
I'll be very happy to know how you made that.
Nice layout.
Last edited by Matagami on Wed Jul 09, 2014 11:31 am, edited 1 time in total.
Regards,
Kris

DLRdan
Driver
Driver
Posts: 1083
Joined: Wed Nov 12, 2008 12:05 am
Location: Blyth
Contact:

Post by DLRdan » Tue Jul 08, 2014 9:44 pm

It was relatively simple. The sections were cut from a piece of 12mm exterior plywood using a jig saw. To draw each one a centre line was drawn onto the wood. Then 41 inches measured back from the top edge along the centre line to give the centre of the arc. The compass( made from a bit of wood with 3 holes in) was then placed at this point and the two pencils, one at 41" radius and one at 35" radius draw the section. The posts are only in the soil and are fitted the same way as the bricks with a pair of batterns screwed along the top of each one to screw the plywood sections to.
Dan,

James: "Dan, can you use your hearing and tell me if that trains coming ?"
DLR
www.freewebs.com/dlrail

kandnwlr
Trainee Driver
Trainee Driver
Posts: 998
Joined: Fri Dec 02, 2011 3:14 pm
Location: Alsace, France

Post by kandnwlr » Wed Jul 09, 2014 7:06 am

That´s a very neat little viaduct. Looking forward to trains running on it :D

User avatar
Matagami
Cleaner
Cleaner
Posts: 7
Joined: Mon Jul 07, 2014 2:09 pm
Location: Lost in deep space...

Post by Matagami » Wed Jul 09, 2014 11:28 am

Many thanks for your answer Dan. Very helpful.
Regards,
Kris

User avatar
IrishPeter
Driver
Driver
Posts: 1400
Joined: Wed Feb 23, 2011 3:24 am
Location: 'Boro, VA

Post by IrishPeter » Fri Jul 11, 2014 4:49 am

Matagami - the chap in your atavar looks as though he has just realized he has arranged an "air meet" on a single track railway!  The phone is even of the right vintage.

Peter in AZ
Traffic Pattern? What pattern? Spuds out; grain in, but cattle, sheep and passengers are a lot less predictable.

User avatar
Matagami
Cleaner
Cleaner
Posts: 7
Joined: Mon Jul 07, 2014 2:09 pm
Location: Lost in deep space...

Post by Matagami » Fri Jul 11, 2014 8:31 pm

IrishPeter:102562 wrote:Matagami - the chap in your atavar looks as though he has just realized he has arranged an "air meet" on a single track railway!  The phone is even of the right vintage.
Peter in AZ
In fact, this guy is "The Big Bopper" a famous american rock'n'roll musician. Unfortunately, he died very young. RIP
http://en.wikipedia.org/wiki/The_Big_Bopper
Regards,
Kris

Post Reply

Who is online

Users browsing this forum: No registered users and 9 guests