I can fully reccomend a slip-eccentric Bertie, I have a friend who has trains two to three times the price who when I showed him the Bertie the first time round, he couldn't believe how good and smooth running it was for the price. With a pressure gauge added, it really is the business, as it really aids steaming. Obviously I can't say anything on a Hackworth valve gear version.
Building of the PFLR
-
Dannypenguin
- Trainee Driver

- Posts: 632
- Joined: Tue Feb 26, 2013 9:57 am
- Location: Forest of Dean, UK
- Contact:
My first choice would have been IP, but when I purchased my new wagons at Llanfair, they were so chunky, strong, and well produced, I decided that Brandbright was the way to go. I like the look of their brake van as well. However, I sent an email a couple of days ago and haven't had a reply, and when my Dad originally telephoned them, no-one answered. I need to know how many wheels there are in a pack, to know how many to order. Same with the axleboxes. [Edit: Scrub that, If i had read the thing properly (like I never do) I would have seen it, which I now have.  ]
]
I can fully reccomend a slip-eccentric Bertie, I have a friend who has trains two to three times the price who when I showed him the Bertie the first time round, he couldn't believe how good and smooth running it was for the price. With a pressure gauge added, it really is the business, as it really aids steaming. Obviously I can't say anything on a Hackworth valve gear version.
I can fully reccomend a slip-eccentric Bertie, I have a friend who has trains two to three times the price who when I showed him the Bertie the first time round, he couldn't believe how good and smooth running it was for the price. With a pressure gauge added, it really is the business, as it really aids steaming. Obviously I can't say anything on a Hackworth valve gear version.
Dan
Visit the PFLR website - http://poultonfarmlightrailway.webs.com/
Dean Forest Railway Society website - http://dfrsociety.org/
Visit the PFLR website - http://poultonfarmlightrailway.webs.com/
Dean Forest Railway Society website - http://dfrsociety.org/
Hi Dan, I've just ordered a Brandbright paneled coach kit, the three-compartment four-wheeler, with wheels and couplers. It looks like a "pack" of wheels gets you two axles, or four wheels.
Maybe you and I will be building our coaches at the same time and we can compare notes. I spent a lot of time looking at their website and I decided that, even though I love IP stuff, I do spend a lot of time on scratch building interiors, and it would be very nice indeed to build one of the Brandbright ones with all the built-in help! And the glazing looks easier to do too. I didn't do such a nice job on my last IP coach, because I decided I wanted it to look like a couple of the droplights were down so I had to cut individual panes to fit into the window frames, and of course it's almost impossible to do without getting glue on the windows. The brandbright coach doesn't even need glue on the windows! What a relief that will be.
Maybe you and I will be building our coaches at the same time and we can compare notes. I spent a lot of time looking at their website and I decided that, even though I love IP stuff, I do spend a lot of time on scratch building interiors, and it would be very nice indeed to build one of the Brandbright ones with all the built-in help! And the glazing looks easier to do too. I didn't do such a nice job on my last IP coach, because I decided I wanted it to look like a couple of the droplights were down so I had to cut individual panes to fit into the window frames, and of course it's almost impossible to do without getting glue on the windows. The brandbright coach doesn't even need glue on the windows! What a relief that will be.
-
Dannypenguin
- Trainee Driver
- Posts: 632
- Joined: Tue Feb 26, 2013 9:57 am
- Location: Forest of Dean, UK
- Contact:
I'm not building coaches, I'm building the brake van and the box van, but still we can compare notes, you might persuade me to buy some coaches and I might persuade you to buy some wagons!
Sounds like a plan, I like the IP stuff too but my other wagons are really well produced and the words of 'not having to fit glazing with glue' sound extra good! I haven't had any emails or updates from them though. Seems odd.
Sounds like a plan, I like the IP stuff too but my other wagons are really well produced and the words of 'not having to fit glazing with glue' sound extra good! I haven't had any emails or updates from them though. Seems odd.
Dan
Visit the PFLR website - http://poultonfarmlightrailway.webs.com/
Dean Forest Railway Society website - http://dfrsociety.org/
Visit the PFLR website - http://poultonfarmlightrailway.webs.com/
Dean Forest Railway Society website - http://dfrsociety.org/
-
Dannypenguin
- Trainee Driver
- Posts: 632
- Joined: Tue Feb 26, 2013 9:57 am
- Location: Forest of Dean, UK
- Contact:
It was odd, and 7 days on I still haven't received my stuff, so I phoned them, and they said they haven't got the brake van or box van in stock but they'll be sending the rest today and I'll get the brake van and box van asap. Never mind, at least I'll be able to build my long awaited flat wagons, just got to wait a bit longer for the train to be completed!Dannypenguin:88003 wrote:Seems odd.
Dan
Visit the PFLR website - http://poultonfarmlightrailway.webs.com/
Dean Forest Railway Society website - http://dfrsociety.org/
Visit the PFLR website - http://poultonfarmlightrailway.webs.com/
Dean Forest Railway Society website - http://dfrsociety.org/
-
Dannypenguin
- Trainee Driver
- Posts: 632
- Joined: Tue Feb 26, 2013 9:57 am
- Location: Forest of Dean, UK
- Contact:
Just to clarify I'm doing this correct, I sprayed the valve gear with WD40 type spray, wiped it with a rag, then I used a paint brush to get to the bits my fingers couldn't get to, then I made up some warm water with soap in and used a rag to put it on. I'm now leaving it to dry. Is this the correct method?IrishPeter:87695 wrote:
Thoroughly clean your loco, use WD40 to get the muck and dust out of the valve gear, wash in warm soapy water, allow to dry, and then relubricate using 3 in 1 or similar light lubricating oil.
Tanks in advance.
Dan
Visit the PFLR website - http://poultonfarmlightrailway.webs.com/
Dean Forest Railway Society website - http://dfrsociety.org/
Visit the PFLR website - http://poultonfarmlightrailway.webs.com/
Dean Forest Railway Society website - http://dfrsociety.org/
-
Dannypenguin
- Trainee Driver
- Posts: 632
- Joined: Tue Feb 26, 2013 9:57 am
- Location: Forest of Dean, UK
- Contact:
An interesting and awaited parcel arrived today with some great contents (but not quite a great as 90733's  ). It contained a Brandbrigh GS10 goods van kit and a GS11 brake van kit, to complete the PFLR's frieght train. Want to see if I can start on them tonight, so watch this space!
Dan
Visit the PFLR website - http://poultonfarmlightrailway.webs.com/
Dean Forest Railway Society website - http://dfrsociety.org/
Visit the PFLR website - http://poultonfarmlightrailway.webs.com/
Dean Forest Railway Society website - http://dfrsociety.org/

-
IrishPeter
- Driver

- Posts: 1400
- Joined: Wed Feb 23, 2011 3:24 am
- Location: 'Boro, VA
It is the method I favour as it gets the gunge out of the moving parts. Slip eccentric Roundhouse locomotives are the 'mut's nuts' ain't they! I have a Millie that beats locos four time's its price into a cocked hat.Dannypenguin:88753 wrote:Just to clarify I'm doing this correct, I sprayed the valve gear with WD40 type spray, wiped it with a rag, then I used a paint brush to get to the bits my fingers couldn't get to, then I made up some warm water with soap in and used a rag to put it on. I'm now leaving it to dry. Is this the correct method?IrishPeter:87695 wrote:
Thoroughly clean your loco, use WD40 to get the muck and dust out of the valve gear, wash in warm soapy water, allow to dry, and then relubricate using 3 in 1 or similar light lubricating oil.
Tanks in advance.
Peter in AZ
Traffic Pattern? What pattern? Spuds out; grain in, but cattle, sheep and passengers are a lot less predictable.
-
Dannypenguin
- Trainee Driver
- Posts: 632
- Joined: Tue Feb 26, 2013 9:57 am
- Location: Forest of Dean, UK
- Contact:
Couldn't agree with you more Peter!IrishPeter:90583 wrote: Slip eccentric Roundhouse locomotives are the 'mut's nuts' ain't they! I have a Millie that beats locos four time's its price into a cocked hat.
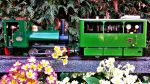
Anyway, an update on the van and brake van. We've constucted the main structure of the van tonight, and very good it is too. Well made and easy to build, I can reccomend it to anyone be it a newbie or a experienced modeller.

The unpacked parts.

The current condition of the van, just waiting for the glue to dry now before construction can reccomence.
The van will be painted in the same grey as the flat wagons, to make a uniform frieght fleet for the railway. What the brake van will be painted in hasn't been decided just yet.
Hope to have more for you soon.
Dan
Visit the PFLR website - http://poultonfarmlightrailway.webs.com/
Dean Forest Railway Society website - http://dfrsociety.org/
Visit the PFLR website - http://poultonfarmlightrailway.webs.com/
Dean Forest Railway Society website - http://dfrsociety.org/


Ooh, how about the same colour grey, but with red ends? I love red ends on a brake van...Dannypenguin:90613 wrote:The van will be painted in the same grey as the flat wagons, to make a uniform frieght fleet for the railway. What the brake van will be painted in hasn't been decided just yet.

Happy building,
Andrew
-
tom_tom_go

- Driver
- Posts: 4824
- Joined: Wed Feb 23, 2011 3:08 am
- Location: Kent, UK
- Contact:
Hi Danny,
WD40 will just attract dirt so I would clean your running gear using white spirit and a clean paint brush and leave to dry and then use a 20w50 oil for the motion (classic car oil).
I would never use water as it will rust steel.
Cheers,
Tom
WD40 will just attract dirt so I would clean your running gear using white spirit and a clean paint brush and leave to dry and then use a 20w50 oil for the motion (classic car oil).
I would never use water as it will rust steel.
Cheers,
Tom
I like Andrew's about the red painted ends on the guards van. I think coaches look good with their ends painted black as well.Dannypenguin:88753 wrote:Just to clarify I'm doing this correct, I sprayed the valve gear with WD40 type spray, wiped it with a rag, then I used a paint brush to get to the bits my fingers couldn't get to, then I made up some warm water with soap in and used a rag to put it on. I'm now leaving it to dry. Is this the correct method?IrishPeter:87695 wrote:
Thoroughly clean your loco, use WD40 to get the muck and dust out of the valve gear, wash in warm soapy water, allow to dry, and then relubricate using 3 in 1 or similar light lubricating oil.
Tanks in advance.
-
Dannypenguin
- Trainee Driver
- Posts: 632
- Joined: Tue Feb 26, 2013 9:57 am
- Location: Forest of Dean, UK
- Contact:
I will consider the red ends on the brake van, one thing I prefer about this hobby instead of OO is that if you don't like it you can simply repaint it! You can with OO too but it's so fiddly and irritating, so I know if I paint it red and don't like it I can just paint it grey again!
Oopsy, too late, already done what Peter suggested...tom_tom_go:90629 wrote:Hi Danny,
WD40 will just attract dirt so I would clean your running gear using white spirit and a clean paint brush and leave to dry and then use a 20w50 oil for the motion (classic car oil).
Dan
Visit the PFLR website - http://poultonfarmlightrailway.webs.com/
Dean Forest Railway Society website - http://dfrsociety.org/
Visit the PFLR website - http://poultonfarmlightrailway.webs.com/
Dean Forest Railway Society website - http://dfrsociety.org/
-
IrishPeter
- Driver
- Posts: 1400
- Joined: Wed Feb 23, 2011 3:24 am
- Location: 'Boro, VA
Funnily enough I happen to prefer WD40 to white spirit because I have found white spirit leaves too much crap behind. Any decent solvent that won't affect the paint will do. I always use soap and water to clean locomotives to make sure the dirty oil is gone. The caveat there is always allow to dry thoroughly, and relubricate. I have never had any rust problems, and my bug bear is the dust/sand that is part of the dry running environment here.
The nasty thing about forums like this is that it is a bit like the old joke -
What do you get when you have five Italian socialists -
Seven opinions!
However, despite the different methods, we are going for the same result which is a clean locomotive. The main thing about cleaning locomotives is to do so regularly and thoroughly so as to reduce wear. Oil is a good lubricant, but dirt and oil is a pretty good grinding paste, so clean regularly and thoroughly, and relubricate after cleaning.
Cheers,
Peter in AZ
Traffic Pattern? What pattern? Spuds out; grain in, but cattle, sheep and passengers are a lot less predictable.
-
Lner fan Sam

- Fireman

- Posts: 491
- Joined: Sun Nov 25, 2012 7:57 pm
- Location: Sunderland, north east of England
-
IrishPeter
- Driver
- Posts: 1400
- Joined: Wed Feb 23, 2011 3:24 am
- Location: 'Boro, VA
Personally, I am not keen on red ends, as it does not improve visibility that much, but a few railways used them - the Southern and the LT spring to mind. Up north, where I am from grey, indian red, or Bauxite were more common. My old van was light grey, and it stood out well enough. Red is a funny colour. The ordinary signal red stands out OK, but is nowhere near as visible as the vermilion used by GSR/CIE/IE in poor light. The slightly orange slant of vermilion makes it easer to see in bad light.Andrew:90634 wrote:Here's an LT one in grey with red ends, mmmmmmm...
Just don't blame me if you go for it and don't like it!
Andrew
Peter in AZ
Cheers,
Traffic Pattern? What pattern? Spuds out; grain in, but cattle, sheep and passengers are a lot less predictable.
-
Dannypenguin
- Trainee Driver
- Posts: 632
- Joined: Tue Feb 26, 2013 9:57 am
- Location: Forest of Dean, UK
- Contact:
Thanks SamLner fan Sam:90637 wrote:Looking good Danny
I do like it but I think I'm gonna go with all over grey?Andrew:90634 wrote: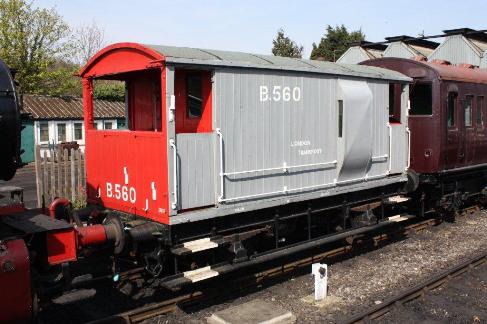
Anyways, heres an update!

The first coat of grey has gone on the van. Some of the black details have been picked out. There is still another coat to go, but I've finished for tonight so it'll have to wait till tomorrow before it gets finished.

The brake van was started when I was waiting for the paint on the van to dry, and I got to here before remembering I had to check the van had dried, which it had a long time ago!
Hope to have more for you soon.
Dan
Visit the PFLR website - http://poultonfarmlightrailway.webs.com/
Dean Forest Railway Society website - http://dfrsociety.org/
Visit the PFLR website - http://poultonfarmlightrailway.webs.com/
Dean Forest Railway Society website - http://dfrsociety.org/
-
Dannypenguin
- Trainee Driver
- Posts: 632
- Joined: Tue Feb 26, 2013 9:57 am
- Location: Forest of Dean, UK
- Contact:
Just a note to say although I have no pictures (sorry! :oops:) , the box van has been completed - almost. It is ready to run, but has not been applied with transfers. I will be sourcing these soon. The brake van is almost finished as well and just needs the roof, chimney and transfers applying. Both are having 'rail trials' (in comparision to the ship version, sea trials) at my local model railway club tonight.  I hope to have pictures for you tomorrow.
Oh, and sorry Tom, the brake van has been painted all over grey!
Oh, and sorry Tom, the brake van has been painted all over grey!
Dan
Visit the PFLR website - http://poultonfarmlightrailway.webs.com/
Dean Forest Railway Society website - http://dfrsociety.org/
Visit the PFLR website - http://poultonfarmlightrailway.webs.com/
Dean Forest Railway Society website - http://dfrsociety.org/
Who is online
Users browsing this forum: No registered users and 17 guests