The Reading and Squamish Light Railway Stock Thread

What is your latest project?
Post Reply
big-ted
Trainee Fireman
Trainee Fireman
Posts: 235
Joined: Fri Nov 25, 2011 4:13 pm
Location: Vancouver, BC, Canada.

Re: The Reading and Squamish Light Railway Stock Thread

Post by big-ted » Sun Apr 05, 2020 4:35 pm

Do you ever make ambitious plans of doing everything perfectly, then wake up the next day and think "S*d it?!"

Despite writing a mental shopping list of all the things I was going to go out and buy yesterday (flux remover, etch primer, top coat...) I woke up in the morning and figured why bother? I've got literally the cost of the wheelsets into these wagons, why go buying lots of fancy paint?

So instead I had a rummage through my paint box. I found some automotive epoxy primer in red oxide brown, and some satin clear lacquer of a different brand intended for 'craft' applications. No cleaning. No sanding. Done.
IMG_20200405_081955.jpg
IMG_20200405_081955.jpg (405.67 KiB) Viewed 8888 times
It's very easy to repaint again if necessary. The colour is a bit too red for my tastes, but maybe it will tone down.

The one trick I did do was to use a product called liquid mask on the wheel treads before painting. It's a liquid latex solution used in painting RC car body shells. You brush it on, let it dry into a rubbery film, and then cut and peel away segments as you want to paint them. It just saves having to mess around wiping wet paint off the wheels whilst the rest of the wagon is wet.

User avatar
Old Man Aaron
Trainee Driver
Trainee Driver
Posts: 807
Joined: Wed Oct 19, 2016 11:08 am
Location: Sunshine Coast QLD, Australia

Re: The Reading and Squamish Light Railway Stock Thread

Post by Old Man Aaron » Mon Apr 06, 2020 12:51 pm

If you can tolerate the smell, I find cotton swabs dipped in enamel or lacquer thinners, makes a quick tidy job of removing paint from the running surfaces of wheels.
Regards,
Aaron - Scum Class Works

User avatar
FWLR
Driver
Driver
Posts: 4283
Joined: Sat Aug 05, 2017 9:45 am
Location: Preston, Lancashire, UK

Re: The Reading and Squamish Light Railway Stock Thread

Post by FWLR » Tue Apr 07, 2020 8:33 am

Great paint job Ted. And cheap too. If you have any weathering powders, you can easily tone the paint down, some black, brown and grey mixed up to a dirty mud colour. Experiment on a bit of scrap of whatever you have and you will get something that will work.

big-ted
Trainee Fireman
Trainee Fireman
Posts: 235
Joined: Fri Nov 25, 2011 4:13 pm
Location: Vancouver, BC, Canada.

Re: The Reading and Squamish Light Railway Stock Thread

Post by big-ted » Sat Jun 06, 2020 7:48 pm

The Reading & Squamish workshops recently commissioned some supporting motive power in light of the increased stock arriving on the line...

The work experience kid already managed to drive it into the workshop doorway, incurring some minor roof damage. The manager had some coarse language to share!
Attachments
IMG_20200606_113959.jpg
IMG_20200606_113959.jpg (56.94 KiB) Viewed 8724 times

User avatar
sjrixon
Trainee Fireman
Trainee Fireman
Posts: 150
Joined: Wed Jul 11, 2018 3:13 pm
Location: Reading

Re: The Reading and Squamish Light Railway Stock Thread

Post by sjrixon » Sat Jun 06, 2020 7:58 pm

OOOhh. That will look nice pushing the skips around.

User avatar
LNR
Driver
Driver
Posts: 1542
Joined: Sat Feb 27, 2016 5:26 am
Location: Australia

Re: The Reading and Squamish Light Railway Stock Thread

Post by LNR » Sun Jun 07, 2020 12:40 am

Nice one Ted, I like the way the windows drop down either side of the engine casing, very prototypical.
Grant.

big-ted
Trainee Fireman
Trainee Fireman
Posts: 235
Joined: Fri Nov 25, 2011 4:13 pm
Location: Vancouver, BC, Canada.

Re: The Reading and Squamish Light Railway Stock Thread

Post by big-ted » Sun Jun 07, 2020 5:15 am

LNR wrote: ↑Sun Jun 07, 2020 12:40 am Nice one Ted, I like the way the windows drop down either side of the engine casing, very prototypical.
Grant.
Heh. It's an IP Glaslyn kit, built exactly per the instructions, so I can't take too much credit!

I'll be honest, I was a bit disappointed with some aspects of the kit. The website description describes it as "made from CNC machined & cast metal parts." This is a bit of clever wording, as the only CNC-ing is on plastic parts, which make up the bulk of the construction. Further, as far as I can tell, the supplied battery box is too large to fit under the bonnet (where the motor also sits) so for now it's in the cab in plane sight. I plan on reconfiguring the electronics at some point anyway. Still, it'll be fun to have trundling around between steam-powered runs.

User avatar
FWLR
Driver
Driver
Posts: 4283
Joined: Sat Aug 05, 2017 9:45 am
Location: Preston, Lancashire, UK

Re: The Reading and Squamish Light Railway Stock Thread

Post by FWLR » Sun Jun 07, 2020 6:36 am

Nice.
Is the roof plastic Ted, or aluminium. :?:

big-ted
Trainee Fireman
Trainee Fireman
Posts: 235
Joined: Fri Nov 25, 2011 4:13 pm
Location: Vancouver, BC, Canada.

Re: The Reading and Squamish Light Railway Stock Thread

Post by big-ted » Sun Jun 07, 2020 4:24 pm

FWLR wrote: ↑Sun Jun 07, 2020 6:36 am Nice.
Is the roof plastic Ted, or aluminium. :?:
Plastic. Whilst the kit has no interior I wanted to make the roof removable when/in case I make one. I heated the roof a bit to help it form around the supports but overdid it slightly I guess, hence the warped corner.
Last edited by big-ted on Thu Sep 17, 2020 5:48 pm, edited 1 time in total.

User avatar
sjrixon
Trainee Fireman
Trainee Fireman
Posts: 150
Joined: Wed Jul 11, 2018 3:13 pm
Location: Reading

Re: The Reading and Squamish Light Railway Stock Thread

Post by sjrixon » Mon Jun 08, 2020 8:15 am

Up 99% of adverts are clever with their descriptions ;)

But with a 9v? motor and some weight, she should do ok..

big-ted
Trainee Fireman
Trainee Fireman
Posts: 235
Joined: Fri Nov 25, 2011 4:13 pm
Location: Vancouver, BC, Canada.

Re: The Reading and Squamish Light Railway Stock Thread

Post by big-ted » Thu Sep 17, 2020 6:00 pm

Diesel had it's first outing last weekend.
diesel_day_1.jpg
diesel_day_1.jpg (132.4 KiB) Viewed 7721 times
I now have far more stock than I can reasonably store in my apartment, so I'm going to make a conscious effort to hold back on building anything new and instead focus on quality rather than quantity. My Lady Anne is set to receive some detailing bits and get some paintwork done over winter. First up though, some builders plates. I've been trying to 3D print these on and off as time allowed for a while now. The printer I usually use just didn't have the resolution to produce the text, so I had to bight the bullet and learn how to use the new one. You can see I'm just about at the limit, but I think they look pretty good.
plates_1.jpg
plates_1.jpg (49.14 KiB) Viewed 7721 times

User avatar
philipy
Moderator
Moderator
Posts: 5079
Joined: Sun Jan 30, 2011 3:00 pm
Location: South Northants

Re: The Reading and Squamish Light Railway Stock Thread

Post by philipy » Thu Sep 17, 2020 7:45 pm

Those plates do look very good. What are the dims and what printer did you use for them?
Philip

big-ted
Trainee Fireman
Trainee Fireman
Posts: 235
Joined: Fri Nov 25, 2011 4:13 pm
Location: Vancouver, BC, Canada.

Re: The Reading and Squamish Light Railway Stock Thread

Post by big-ted » Thu Sep 17, 2020 8:51 pm

Sorry, I should have left something in the picture for scale! The plates are 17 x 13 mm. I'm using a Form 3 printer. Up until now I had been using an Ultimaker 2+. The Form 3 definitely has better resolution, and gives a smoother finish without visible layering. But it's a bit more involved in terms of handling all the chemicals associated with it. The other thing I struggle with is removing the support structure. I find it impossible to remove from the part without leaving some kind of divot in the surface of the part itself. Fortunately with these plates I was able to print them so that all the support structure was on the back...

User avatar
FWLR
Driver
Driver
Posts: 4283
Joined: Sat Aug 05, 2017 9:45 am
Location: Preston, Lancashire, UK

Re: The Reading and Squamish Light Railway Stock Thread

Post by FWLR » Fri Sep 18, 2020 8:08 am

I think they look superb Ted. :thumbright: :thumbright:

big-ted
Trainee Fireman
Trainee Fireman
Posts: 235
Joined: Fri Nov 25, 2011 4:13 pm
Location: Vancouver, BC, Canada.

Re: The Reading and Squamish Light Railway Stock Thread

Post by big-ted » Thu Dec 17, 2020 4:25 pm

I'm going to make a conscious effort to hold back on building anything new and instead focus on quality rather than quantity.
I am weak... :silent:
IMG_20201217_080552-1.jpg
IMG_20201217_080552-1.jpg (61.46 KiB) Viewed 7334 times
This is a very early meths fired Dylan kit courtesy of Anything Narrow Gauge. I'll need to convert it to 45mm gauge, which shouldn't be too hard thanks to some tips from Tony at Rhos Helyg Loco Works. However, it's definitely going to be a step up from my Lady Anne build. Step 1 is to decide on the wheelbase and axle configurations and drill frames and coupling rods accordingly... :? I sense I might be doing some 'overtime' in the machine shop at work over the holidays...

Two other immediate concerns on inspection are that it has a brass boiler, and both the exhaust pipes need re-soldering into the cylinder blocks. Reading around it seems brass boilers want tap water and to be drained after every run. Since I do both these things anyway (Vancouver water is very soft) I'm hoping I needn't be too concerned?

Regarding resoldering the exhaust pipes, they look to be soft soldered, but I'm thinking these likely get pretty hot and I'd be better off silver soldering them? I can easily soft solder at home, but silver soldering is going to require me to borrow a propane torch.

Oh, and whilst the chassis instructions appear very detailed, I seem to be missing the instructions for assembly of the bodywork. Longshot, but if anyone happens to have a copy...

11thHour
Trainee Fireman
Trainee Fireman
Posts: 116
Joined: Mon Mar 26, 2012 4:00 am
Location: Wodonga, Vic. Land of Oz

Re: The Reading and Squamish Light Railway Stock Thread

Post by 11thHour » Thu Dec 17, 2020 11:25 pm

big-ted wrote: ↑Thu Dec 17, 2020 4:25 pm
I'm going to make a conscious effort to hold back on building anything new and instead focus on quality rather than quantity.


Regarding resoldering the exhaust pipes, they look to be soft soldered, but I'm thinking these likely get pretty hot and I'd be better off silver soldering them? I can easily soft solder at home, but silver soldering is going to require me to borrow a propane torch.
Anyone who can get silver solder to take over soft solder is a wizard. I think the chemistry has to do with lead and silver repelling each other. I also understand that soft solder heated to the temperature needed to silver solder will cause corrosion to brass

Not helpful, but at least you need more research😁

Tim

User avatar
Old Man Aaron
Trainee Driver
Trainee Driver
Posts: 807
Joined: Wed Oct 19, 2016 11:08 am
Location: Sunshine Coast QLD, Australia

Re: The Reading and Squamish Light Railway Stock Thread

Post by Old Man Aaron » Fri Dec 18, 2020 3:11 am

That's a very nice find! Simon at ANG is excellent to deal with, I've found. If you do decide to silver solder, I highly recommend a dremel-type motor tool for removing every trace of soft solder. But then maybe soft is adequate for those joints? Surely someone here owns one of these older locos and could better inform..
Regards,
Aaron - Scum Class Works

User avatar
philipy
Moderator
Moderator
Posts: 5079
Joined: Sun Jan 30, 2011 3:00 pm
Location: South Northants

Re: The Reading and Squamish Light Railway Stock Thread

Post by philipy » Fri Dec 18, 2020 6:32 am

big-ted wrote: ↑Thu Dec 17, 2020 4:25 pm I seem to be missing the instructions for assembly of the bodywork. Longshot, but if anyone happens to have a copy...
I'd try enquiring directly to Roundhouse themselves. They are usually pretty good at customer service.
Philip

big-ted
Trainee Fireman
Trainee Fireman
Posts: 235
Joined: Fri Nov 25, 2011 4:13 pm
Location: Vancouver, BC, Canada.

Re: The Reading and Squamish Light Railway Stock Thread

Post by big-ted » Fri Dec 18, 2020 3:27 pm

Oh, I've already started an email with a list of questions to send to them in the new year, along with an order for a cylinder rebuild kit & some buffers...

big-ted
Trainee Fireman
Trainee Fireman
Posts: 235
Joined: Fri Nov 25, 2011 4:13 pm
Location: Vancouver, BC, Canada.

Re: The Reading and Squamish Light Railway Stock Thread

Post by big-ted » Mon Dec 21, 2020 6:12 am

Well, 70mm of rain over the weekend meant I had plenty of excuses to get stuck in.

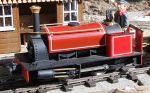
Before starting to put my new loco together, I had to begin by taking it apart. I first checked the wheel back-to-back measurement with my Roundhouse gauge from my Lady Anne to make sure the modern tool was still ok to use with the older wheelsets. Since the 32mm spacing seemed to match the gauge, I figured the 45mm would too. The wheelsets were attacked with a propane torch (I would later find out my little butane torch works fine too) to brake the ~30 year old loctite so that they could be reset to 45mm. Loctite 603 is recommended as it's a wicking grade that will seep into the space around the axle, but it's pricey stuff, and I had some 620 already. This is plenty strong enough, but has to be applied to the axle then the wheel slid over as the 620 is too viscous to seep into the gap.
IMG_20201220_163242.jpg
IMG_20201220_163242.jpg (387.58 KiB) Viewed 7032 times
Then I marked out the frames and coupling rods with where the axle holes needed to be drilled. These early kits allowed the builder to build either a 2 or 3-axle chassis. This does, however, mean that builder has a few significant extra steps to complete before reaching what is essentially 'step one' of a modern kit build. I decided to go for an 0-6-0 as I thought it might look odd to have a loco the same size as my Lady Anne with one less axle. At this point, I relocated to our shop at work. I had it in mind to use the drill press to make sure I drilled everything square. However, once I started setting up I realised that it would be daft not to use the mill, where the linear slide and digital read out allowed me to drill everything in one go with much greater accuracy. So I dusted off my (very rusty) shop skills...
IMG_20201219_171547-1.jpg
IMG_20201219_171547-1.jpg (142.2 KiB) Viewed 7032 times
IMG_20201220_103033-1.jpg
IMG_20201220_103033-1.jpg (35 KiB) Viewed 7032 times

In all honesty, I don't envy anybody who built one of these kits without access to at least a drill press, as it must be very hard to drill everything with good alignment.

The other consequence of my re-gauging the loco was it being necessary to bend the valve rods, as the eccentrics now sat further outboard against the wheels. Not going to lie, this was a royal pain in the proverbial. I'm not entirely sure it would have been much easier without the extra effort of re-gauging, as no matter what I tried, one rod always seemed like it was too long, and one of the eccentrics had a bit of extra solder on it that had to be filed smooth. I ended up having to take one of the rear wheels off the axle to work on the eccentric before re-loctiting it again. Eventually, and with a bit of help from what I thought was a clever trick to run everything in, I got everything running smoothly.
IMG_20201220_161237-1.jpg
IMG_20201220_161237-1.jpg (36.6 KiB) Viewed 7032 times
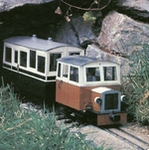
Couldn't resist...
IMG_20201220_202850.jpg
IMG_20201220_202850.jpg (388.84 KiB) Viewed 7032 times
Next I have to take it all apart to paint the frames...

Post Reply

Who is online

Users browsing this forum: No registered users and 13 guests