DIY brass etching

What is your latest project?
Big Jim
Moderator
Moderator
Posts: 2694
Joined: Sat Jul 06, 2013 5:28 pm
Location: Near Llanelli

DIY brass etching

Post by Big Jim » Sat Jan 09, 2016 8:40 pm

As some of you may have read, I have been messing about with brass etching to make some name plates.

There are various ways to etch brass, the most common way is to use a chemical etch to remove the unwanted metal. Ferric Chloride is often used for brass. The down side of using a chemical etch is the hazardous nature of the solution. Ferric Chloride is nasty stuff and not really what you want to be playing around with. I have used it in the past but didn't want to do it again.

The method I use is called Galvanic etching and is much safer.

What you need for it is.
12v DC supply, quite a beefy one is required, I used a car battery charger, but a car battery could be used.

Suitable container to take the plate and solution.

Copper Sulphate (Try your local agricultural supplier)

Brass

Brazing Rods (Local Motor Factors, NOT Halfords)

Inkjet Photo Paper

Laser Printer (borrow the one in work when no one is looking!)

Domestic Iron

ImageDSC_0246 by bigjimiflash, on Flickr[/img]

First draw your design on your computer and print using LASER printer  on INKJET glossy photo paper.

I used Rymans own brand paper and it worked okay.

The more astute of you will notice the deliberate error. The image in the picture is the wrong way round. It should be printed as a mirror image.

ImageDSC_0245 by bigjimiflash, on Flickr[/img]

Next take your piece of brass, I used .030, or .7mm (in the new money). Clean the side you will be etching on really, really well. I rubbed it with fine wire wool and then rubbed with acetone (some nail varnish removers contain it, or try a proper Chemists). When the paper towel remains clean after the acetone wipe, it is clean enough. Keep your grubby mitts off the brass surface afterwards.

ImageDSC_0247 by bigjimiflash, on Flickr[/img]

Set the iron to its hottest setting with any steam off. When hot enough iron the brass and paper, keep the pressure on  for a couple of minutes. Roll with a roller if you have one and iron again. What we are trying to do is melt the toner on the paper and transfer it to the brass. At this point do not be tempted to remove the paper. Place the brass in a tray of water and leave to soak and cool for a bit.

At this point some of us may be tempted to crack open a bottle of something and bask in the warm glow of satisfaction that comes with the successful mastering of a previously unused piece of domestic equipment. If this applies to you, congratulations, but please be aware that the domestic authorities may now refuse to press your shirts as you have now demonstrated that you can do it yourself.

ImageDSC_0258 by bigjimiflash, on Flickr[/img]

After a soak for 10 mins or so start to remove the paper. Peel away what comes away easily and soak again if needed. Remove the last bits of paper with a tooth brush or similar.  Check the transfer carefully. Any small gaps in the toner can be filled with a sharpie type permanent marker. Larger gaps can be filled this way but it may be better to clean the brass and start again. Cover as much of the brass sheet that does not need to be etched with insulating tape.

ImageDSC_0259 by bigjimiflash, on Flickr[/img]

Find a container large enough to take the brass. Ideally it should be square and not to large as you want the two plates close together.
I used brazing rods as the cathode (neg side), They need to be as long as  your brass sheet and ideally you could do with one for each inch of the width of the brass. Place the rods in and secure them with clips or clothes pegs. Place the brass in and set it so it is parallel with the rods. In an old jug mix the copper sulphate crystals with some warm water. I used about 8oz per pint. Watch out this solution will stain and I trust you are all wearing gloves and eye protection aren't you?
Fill the container with the solution until the level of the bits you want etched is covered.
Connect the positive lead to the bit you want etched (anode) and the negative lead to the rods.
Check the anode and cathode are parallel to each other. I found that a distance of about 2 inches apart worked okay with out over loading the power supply.
Cross your fingers, close your eyes and turn the power supply on.
Wait.
After a few minutes some brown gunge starts to form on the plates and rods. I cleaned this off every 15 minutes or so.
After about 45 minutes the plates were etched deep enough for me and the toner was starting to come off.


[/img]ImageDSC_0264 by bigjimiflash, on FlickrImageImage
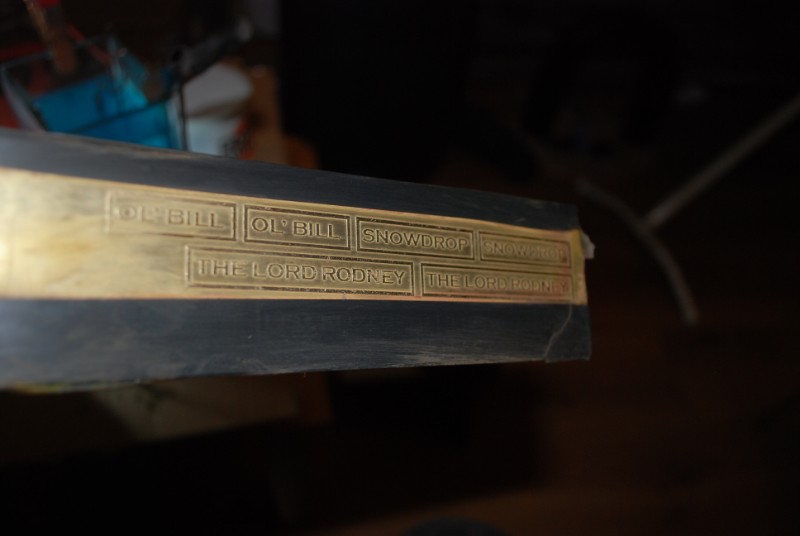
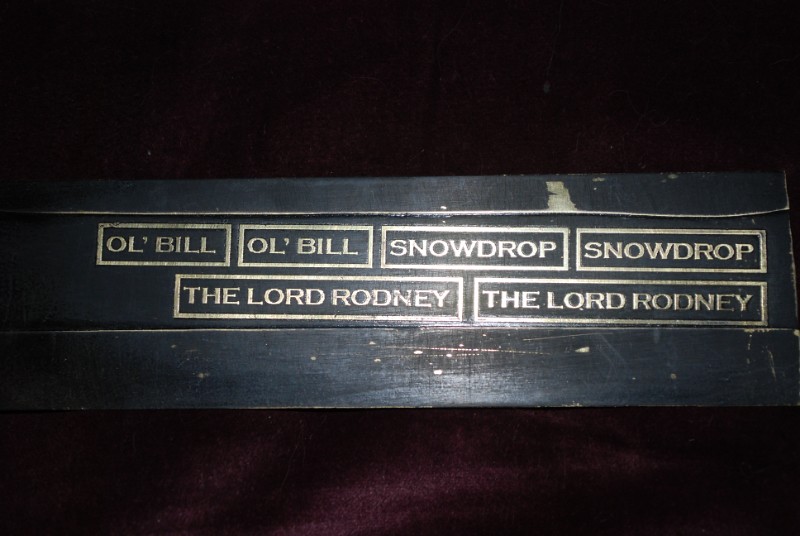
DSC_0266 by bigjimiflash, on Flickr[img]

I sprayed the plates with a couple of light coats of black and then cleaned the tops off with wire wool.

Ta da.

There are a few things to note. The closer the anode and cathode the faster the etch, however the chances of over loading the power supply is higher. The stronger the solution the faster the etch. Keep the anode and cathode parallel otherwise you will end up with an uneven etch.
Used solution can be kept for another go, or disposed of carefully.
I am told that this method works in line of sight so to speak, so there should be no need to mask the rear of the plate.
It is best if the brass is suspended in the solution rather than sitting on the bottom of the tank, You could use more rods as hooks or a couple of bulldog clips.

Have fun
Jim
Last edited by Big Jim on Sun Jan 10, 2016 6:48 am, edited 1 time in total.
If at first you don't succeed, use a bigger hammer!

User avatar
Peter Butler
Driver
Driver
Posts: 5243
Joined: Sun Sep 09, 2012 10:33 pm
Location: West Wales

Post by Peter Butler » Sat Jan 09, 2016 9:54 pm

Nice one Jim. They look just fine.
The best things in life are free.... so why am I doing this?

User avatar
Annie
Fireman
Fireman
Posts: 471
Joined: Tue Aug 28, 2012 4:45 pm
Location: New Zealand

Post by Annie » Sat Jan 09, 2016 10:02 pm

Excellent. They turned out really well :)
What has Reality done for you lately?

Big Jim
Moderator
Moderator
Posts: 2694
Joined: Sat Jul 06, 2013 5:28 pm
Location: Near Llanelli

Post by Big Jim » Sat Jan 09, 2016 10:26 pm

Thanks for the kind words.

I should like to add that this is very much a cheap and cheerful way of doing it.
You can use proper toner transfer sheets. However they cost a lot more than inkjet paper. OHP transparency film is supposed to work as well.
If you could still find it, Letraset rub down transfers would do as a mask.
If you were feeling really clever, just a sharpie pen will work.
But what ever you do the mask has to be dense.
If you read about brass etching the issue of undercut is often mentioned. I don't know if this will be a problem with this method and really for my purposes it doesn't matter anyway.
The biggest problem I had was getting the image right. I found that if I just saved it as a MS Publisher file the quality was not as good as a PDF file.

I think the plates should have been spaced a little further apart as cutting them out will be a nuisance.

The brass needs to be at least .030 thick, trials with thinner stuff did not work so well.
If at first you don't succeed, use a bigger hammer!

User avatar
Dr. Bond of the DVLR
Retired Director
Retired Director
Posts: 4485
Joined: Tue Jun 09, 2009 9:43 pm
Location: Suffolk
Contact:

Post by Dr. Bond of the DVLR » Sat Jan 09, 2016 11:15 pm

Thank you for writing this up - most entertaining and educational!
Image
The railway which people forgot
(to build)

User avatar
tuppenced
Trainee Fireman
Trainee Fireman
Posts: 161
Joined: Wed May 27, 2009 1:50 am

Post by tuppenced » Sun Jan 10, 2016 12:09 am

Great Topic, Jim.

Funnily enough, art etchers are moving towards ferric chloride - some even calling it "non-toxic" - simply because it's so much less nasty than their traditional nitric acid brews: over the centuries, etchers died young. So while ferric chloride is 'relatively safe' some etchers have developed chemical brews that are safer still, nevertheless qualified with:
All safer etching methods involve more or less hazardous chemicals and by-products, they are not ‘nontoxic’.
Safe handling, informed training, and various protective measures are essential requirements in metal etching.
 which is why some have sought even safer and cheaper methods.

I've come across a commercial PCB Galvanic etcher who has used the same barrel of salt-water electrolyte for 25 years - all the waste copper gets plated onto copper Cathodes which he sells for recycling.

Thinking of safety:
What you need for it is.
12v DC supply, quite a beefy one is required, I used a car battery charger, but a car battery could be used.
If using a battery, include a current-limiter such as a 12V lamp. The choice of wattage determines your maximum current.

David
Last edited by tuppenced on Sun Jan 10, 2016 9:51 am, edited 1 time in total.

Big Jim
Moderator
Moderator
Posts: 2694
Joined: Sat Jul 06, 2013 5:28 pm
Location: Near Llanelli

Post by Big Jim » Sun Jan 10, 2016 6:47 am

Thanks for the correction, I will edit the above post accordingly!
If at first you don't succeed, use a bigger hammer!

User avatar
sstjc
Fireman
Fireman
Posts: 442
Joined: Mon Dec 22, 2008 10:47 am
Location: Faversham Kent
Contact:

Post by sstjc » Sun Jan 10, 2016 12:58 pm

tuppenced:115519 wrote:Great Topic, Jim.

I've come across a commercial PCB Galvanic etcher who has used the same barrel of salt-water electrolyte for 25 years - all the waste copper gets plated onto copper Cathodes which he sells for recycling.

David
So do I conclude from this you could use salt water. If so does anyone know the ratio of salt to water and how would this effect the etch time and quality ?

Barry
Regards
Barry

www.5inchrail.com

Big Jim
Moderator
Moderator
Posts: 2694
Joined: Sat Jul 06, 2013 5:28 pm
Location: Near Llanelli

Post by Big Jim » Sun Jan 10, 2016 1:31 pm

I understand that salt water can be used. However I have read that copper sulphate solution is better. I think that you need to use an electrolyte solution that is matched to the metal being etched. Copper Sulphate for copper or brass, Ferric Sulphate for iron or steel.

I understand that it the ions in the plate are transferred to the solution and then from the solution to the cathode. The solution should never be exhausted this way.

Copper sulphate is cheap enough and perhaps it might be a case of 'spoiling the ship for a ha'porth of tar' if salt were to be used.

I am no scientific boffin, and school chemistry and physics lessons were wasted on me.

I have a suspicion that hydrogen may be given off when doing this so if like me you smoke, watch out! The funny thing about eyebrows is you don't notice them until they are gone! :blob6:

Rubber gloves should be worn along with eye protection, old clothes, hard hats, toe cap boots, face mask, overalls, condom etc and any other PPE you think appropriate!

Seriously though, rubber gloves are a good idea and possibly goggles as well.

One thing that has just occurred to me is you could use a steel mesh as the cathode. Its amazing what you think off as you watch the wife washing up a cooling rack. I think I'll wait until she goes out and pinch it!
If at first you don't succeed, use a bigger hammer!

User avatar
tuppenced
Trainee Fireman
Trainee Fireman
Posts: 161
Joined: Wed May 27, 2009 1:50 am

Post by tuppenced » Sun Jan 10, 2016 2:23 pm

Big Jim:115525 wrote:I understand that salt water can be used. However I have read that copper sulphate solution is better. I think that you need to use an electrolyte solution that is matched to the metal being etched. Copper Sulphate for copper or brass, Ferric Sulphate for iron or steel.
Jim,

While I've blithely been using table salt for 50 years, what you say is actually sounder because of unwanted chemical reactions I was unaware of as a kid - though for steel it would be Ferrous Sulphate (from gardening shops) rather than Ferric Sulphate.

Here's some more Chemistry supporting your view - a web excerpt with a link to a more comprehensive pdf.
http://www.greenart.info/galvetch/appndx3draft.htm

Remember that if you plate your cooling rack at Etching current densities, it will come over all artistically knobbly rather than merely copper-coloured.

David
Last edited by tuppenced on Sun Jan 10, 2016 5:47 pm, edited 1 time in total.

User avatar
GTB
Driver
Driver
Posts: 1559
Joined: Sat Mar 05, 2011 2:46 pm
Location: Australia

Post by GTB » Sun Jan 10, 2016 3:15 pm

Big Jim:115525 wrote:I understand that salt water can be used. However I have read that copper sulphate solution is better. I think that you need to use an electrolyte solution that is matched to the metal being etched. Copper Sulphate for copper or brass, Ferric Sulphate for iron or steel.
Salt water won't etch anything on it's own, but you can use it as the electrolyte when electrolytically etching metal. All the sodium chloride solution does in that case is provide a salt bridge between cathode and anode. Be aware though that passing current through a sodium chloride solution can generate chlorine at the anode.

Copper and it's alloys can be etched chemically only with an oxidising acid solution. Nitric Acid (which is evil stuff) was the traditional one used by etchers for copper and steel printing plates.

Printed circuit boards used to be etched with ferric chloride. It isn't particularly dangerous, but it is corrosive and it stains everything in sight with rust stains. It will etch copper, brass and steel.

A cleaner and safer etchant for copper alloys is copper chloride (copper sulphate would also work). Another common etchant for PC board work is now Ammonium Persulphate, which is clean in use and is also reasonably safe. Electronic suppliers like Jaycar sell the stuff for DIY PC boards. Any chemical etchant that works on copper will also work on copper alloys like brass.

Steel, including stainless steel, can be etched by any mineral acid, like dilute hydrochloric acid, or dilute sulphuric acid. Nitric acid works on mild steel, but passivates stainless steel instead of etching it. Ferric chloride also works on steel, but copper salts won't, they just copper plate the steel.

All in all, electrolytic etching is probably the safest method for home etching, but it is a bit touchier than chemical etching and Jim covered the things that can go wrong.

The info on this site seems more sensible on the subject of electrolytic etching than some of what you will read on the net....

http://www.greenart.info/galvetch/contfram.htm

Regards,
Graeme

Big Jim
Moderator
Moderator
Posts: 2694
Joined: Sat Jul 06, 2013 5:28 pm
Location: Near Llanelli

Post by Big Jim » Sun Jan 10, 2016 3:18 pm

This is where my lack of chemical knowledge lets me down. Along with an over zealous spell check.

Ferrous, ferric or extract of ferret?

Ferrous sulphate should be the one.

Thanks for your corrections, it is nice to see that there is someone who can correct my errors. ;)
If at first you don't succeed, use a bigger hammer!

User avatar
GTB
Driver
Driver
Posts: 1559
Joined: Sat Mar 05, 2011 2:46 pm
Location: Australia

Post by GTB » Sun Jan 10, 2016 3:48 pm

tuppenced:115527 wrote:
Big Jim:115525 wrote: - though for steel it would be Ferrous Sulphate (from gardening shops) rather than Ferric Sulphate.
It wouldn't make a lot of difference in the long run, as oxygen in the air converts ferrous to ferric over time, especially in solution. An alternative is Ferrous Ammonium Sulphate (Ferrous Alum), which is a bit slower to go off in the package.

Graeme

User avatar
Lonsdaler
Driver
Driver
Posts: 1229
Joined: Tue May 20, 2014 9:50 am
Location: North Yorkshire

Post by Lonsdaler » Sun Jan 10, 2016 11:49 pm

Big Jim:115529 wrote:This is where my lack of chemical knowledge lets me down. Along with an over zealous spell check.

Ferrous, ferric or extract of ferret?

Ferrous sulphate should be the one.

Thanks for your corrections, it is nice to see that there is someone who can correct my errors.  ;)
I rather like the sound of Ferret Sulphate (or should that now be ferret sulfate?) 8)
Phil

Sporadic Garden Railer who's inconsistencies know no bounds

My Line - https://gardenrails.org/forum/viewtopic ... 41&t=11077

Big Jim
Moderator
Moderator
Posts: 2694
Joined: Sat Jul 06, 2013 5:28 pm
Location: Near Llanelli

Post by Big Jim » Mon Jan 11, 2016 8:32 am

Ah yes, the little known chemical compound ferret sulphate.
Etches metal, catches rabbits, quite reactive and pongs to high heaven. Needs to be kept in ones trousers. Mined near Doncaster in Yorkshire I believe.

User avatar
Lonsdaler
Driver
Driver
Posts: 1229
Joined: Tue May 20, 2014 9:50 am
Location: North Yorkshire

Post by Lonsdaler » Mon Jan 11, 2016 6:25 pm

Big Jim:115539 wrote:Ah yes, the little known chemical compound ferret sulphate.
Etches metal, catches rabbits, quite reactive and pongs to high heaven.  Needs to be kept in ones trousers. Mined near Doncaster in Yorkshire I believe.
:lol:

And so begins another sketch in Goon Manor...
Phil

Sporadic Garden Railer who's inconsistencies know no bounds

My Line - https://gardenrails.org/forum/viewtopic ... 41&t=11077

Big Jim
Moderator
Moderator
Posts: 2694
Joined: Sat Jul 06, 2013 5:28 pm
Location: Near Llanelli

Post by Big Jim » Mon Jan 11, 2016 6:36 pm

Its all in the mind you know.....

Back to the topic slightly. Be careful how you dispose of any solution as it is used as a herbicide. Might be handy for killing off tree roots though.
If at first you don't succeed, use a bigger hammer!

User avatar
Peter Butler
Driver
Driver
Posts: 5243
Joined: Sun Sep 09, 2012 10:33 pm
Location: West Wales

Post by Peter Butler » Mon Jan 11, 2016 8:37 pm

Big Jim:115549 wrote: Might be handy for killing off tree roots though.
Save some for me next time we meet Jim.... I have that cut down stump to dispose of if you recall?
The best things in life are free.... so why am I doing this?

User avatar
MDLR
Driver
Driver
Posts: 4027
Joined: Thu Jan 15, 2009 10:38 pm
Location: Near Ripley, Derbyshire, UK
Contact:

Post by MDLR » Mon Jan 11, 2016 9:08 pm

Peter Butler:115555 wrote: Save some for me next time we meet Jim.... I have that cut down stump to dispose of if you recall?
You are aware that Real Creosote is good for that, too? Remember to cut a criss-cross pattern on the tree stump with a chain saw to help absorption..........
Brian L Dominic
Managing Director
Flagg Fluorspar Co
www.mdlr.co.uk/ff.html

User avatar
Peter Butler
Driver
Driver
Posts: 5243
Joined: Sun Sep 09, 2012 10:33 pm
Location: West Wales

Post by Peter Butler » Mon Jan 11, 2016 10:32 pm

Thank you Brian, I have already drilled loads of large diam. holes in the stump for that purpose but have nothing to fill them with. From other posts on the Forum I believe Jim might have Creosote too, so if you are reading this Jim, I'll be popping over soon!
The best things in life are free.... so why am I doing this?

Post Reply

Who is online

Users browsing this forum: No registered users and 8 guests