Page 1 of 1
The Pear Tree Light Railway (MK3) - (WIP)
Posted: Sun Oct 28, 2012 11:28 am
by Resurgam05
The Pear Tree Light Railway (PTLR Wales) is now in its third encarnation on the same site. Over the last 11 years my father and I have experimented with different styles and construction methods. So far this version of the railway has been a marked improvement; both in terms of ease of operation and its visual impact on the garden. Presently we have 80-90 ft of operational running line which is level and designed for running manual locomotives. However, in the last week work has begun on Phase 2 which should double the length of our running line.
Phase 2 has been designed to incorporate some gradients for added interest when running our R/C locos, but Phase 1 will still be useable as a level circuit. The junctions where Phase 2 diverges from and converges with the existing line will be placed such that the longest continuous run is possible without the need to keep changing points.
Work started on Monday and has centered around the most prominent section of the line (visible at eye level from the kitchen window), which is the rockery section above our pond.

We started from the bridge where Phase 2 passes beneath Phase 1. The clearance height will be about 8 inches, which should be sufficeint for most locos and stock (Although doubtless someone will prove this to be wrong.). This also provided us with our datum point for setting out our levels and gradients. On this short section the line is running on 4x4 treated posts supporting 2 inch planking. The line climbs away from the bridge at 1:72 and the gradient will be set with additonal treated battens.

Out on the rockery we cleared away the most rampant of the plants, drove in stakes at three foot intervals and marked up the gradient. (1:72 = 1/2 inch in 3ft)

For the trackbed we used 4inch Thermolite blocks. This will also serve as a partial retaining wall for the bank behind.

The next job was to build up the rockery in front of the wall and this was as far as we had got by teatime yesterday. The track will probably go down quite soon on this section so mum can plant up wihtout Dad and I trampling everything. This should then allow the plants to time become established before trains start running. we intend to fix the track to wooden battens fixed to the blocks before then adding cosmetic ballast.
You can just see the waterfall at the left hand edge of the shot. Glan yr Afon viaduct will probably provide the source of inspiration for the necessary bridge.
Now if only it would stop raining...
Posted: Sun Oct 28, 2012 2:11 pm
by tom_tom_go
Looks to be a very scenic line David, keep up the good work

Posted: Sun Oct 28, 2012 4:41 pm
by DolwyddelanLightRail
I really do need to pay a visit one day! That looks brilliant!

Posted: Sun Oct 28, 2012 8:46 pm
by laalratty
DolwyddelanLightRail:76160 wrote:I really do need to pay a visit one day! That looks brilliant!
Seconded, will have to make the trip down one day as well. Extension work looks great and well done, and 1 in 72 is a gradient that better running manual locos should still be ok on
Posted: Sun Oct 28, 2012 10:20 pm
by laurence703
Very nice! Do you reckon it'll be usable by time I come up to Rhyl for the annual Santa trains? Would love to give my stock a good run! (My stock list has grown quite considerably since I last saw you!)
Posted: Mon Jul 15, 2013 2:33 pm
by Resurgam05
Following a prolonged hiatus due to a myriad of other loco and rolling stock related projects work finally recommenced on Phase 2 a couple of weeks ago.
At present work is focused on adapting Phase 1 in readiness for the new additions and as a result almost the whole line has or will have been re-laid.

The first job was to replace the original 'Maelgwyn's Bridge' with a new structure of thinner cross section. This was achived using 16SWG galvanized sheet riveted to the underside of substantial angle irons. The new structure means that the new line passing underneath will have less distance to climb/fall. The section of line between Maelgwyn's Bridge and Pooch's Pocket Bridge which had suffered from frost heave was re-laid at the same time.

The junction for the section of new line that will run inside the existing circuit has also been moved further back to add another 12ft to the line, reducing the gradient further (It would have been 1:50 but will now be about 1:70.) As the section of line through Pooch's Pocket was distinctly lumpy it was decided to relay it whilst we put the new right hand point in. In the end all of the concrete base was removed and replaced with Thermolite bricks. At the same time the little used passing loop was also removed and the space turned over to more planting. The new line will run inside of the curve, and more rockery will be built to support it.
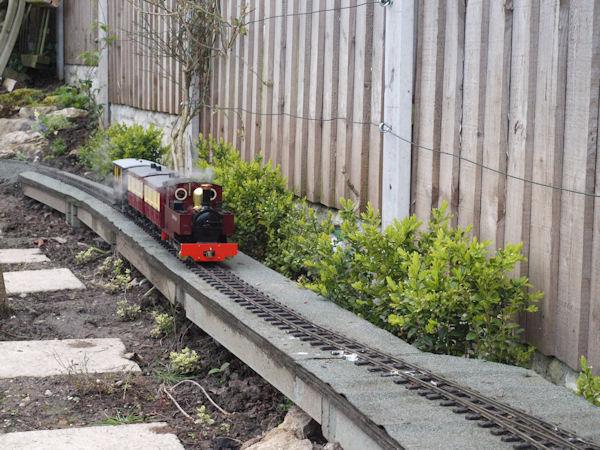
The section along the back fence was originally built in wood as seen here with a visiting Caradoc bustling along.

The new line will run in parallel to this section but on a gradient of 1:70 rising away from the camera. Whilst the wood was sound it would eventually rot, and as the new section will be stone it was decided to replace the wood now rather than having to rip everything out again later. The now standard PTLR technique of Thermolite blocks was employed for the trackbed.

This was then faced with rock and soil, as well as being backfilled to the kickboards. The track awaits final alignment and ballasting, before the whole lot is planted up with suitable ground cover. Where the trackbed stops, marks the start of the improved Rhiwelli station area. The exact design has not been completely finalised yet but will proably feature similar construction techniques as far as the start of the raised boards.

As the new line will feature a change in the current normal direction of traffic various changes have been incorporated into Rhiwelli station area. The steaming bay which previously sat at 90 degrees to the line has been removed, and will be replaced by a new facility elsewhere at a later date. The passing loop previously located aling the left hand side has been changed for the main line and two reasonably long carriage sidings (and a temporary steam up area). A new long passing loop has been installed and should be capable of holding 9 bogies plus an NG/G16 and continues around next to the greenhouse (out of shot). The curves in this area have also been smoothed out to give a continuous minimum radius of 5ft 6in and should hopefully improve running in this area. All that is required is to extend the carriage sidings and complete the main line circuit.
Hopefully the good weather will hold and work can then re-start on the actual extension in the not too distant future.
Posted: Mon Jul 15, 2013 6:09 pm
by laurence703
Looks like you've been very busy! look forward to seeing more progress
Posted: Sat Jul 20, 2013 9:55 pm
by Resurgam05
Well, over the last few days work has continued.

The circuit was reconnected and the back straight ballasted as far as practicable.

Having zeroed in on the exact clearance of the new line under Maelgwyn's Bridge, we knew where to start with the inside part of the line. Once the rampant Lavender was cleared away this was the bare site at 1000 this morning.

The route was marked out with Thermalite bricks and blocks, using two rods and a piece of string as a guide for the 7ft 6in radius.
The 1:72 gradient was determined using our gradient template and with myself mixing the mortar Dad dug out suitable foundations and laid the blocks in position.

By 2000 we had laid around half the trackbed for this section of the new line. However, there is now a significant section of rockery to complete before the level of the current circuit is reached.
Posted: Sun Jul 21, 2013 5:58 pm
by tegfan railway
Looking good! Its inspired me to order some blocks and continue with mine!
What mix/ratio do you use to bed the blocks down, you have told me before but I have forgotten!!!!!
PS Tell the boss the plants have settled in well!!
Posted: Mon Jul 22, 2013 2:41 pm
by Resurgam05
Hi Tegfan,
For the blocks in the ground 4:1 is quite adequate, where they are above ground we have used 3:1.
(The Boss is glad the plants were of use.)
Posted: Thu Jul 25, 2013 7:52 pm
by Resurgam05
With the fair weather still holding on work has continued.

The foundations for the new line were continued on Wednesday morning.

By teatime the formation was complete as far as the foot crossing.
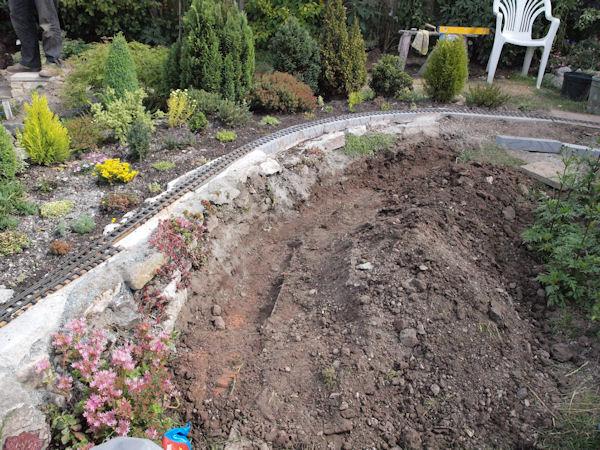
The scene this morning with the foundations dug for the final section of formation before re-joining the existing line.

At the close of play the formation was complete, and the substantial rockery facing was nearing completion. A significant amount of top soil will be need importing to support the planting which will follow.
As yet we aren't sure exactly what we'll do next. If the weather holds we'll carry on building the rest of the trackbed. If not we'll probably lay the track on this section.
Posted: Thu Jul 25, 2013 8:29 pm
by laurence703
Its looking really good now! Would love to be there for the reopening if its possible?
Posted: Sun Jul 28, 2013 8:00 pm
by laalratty
laurence703:86311 wrote:Its looking really good now! Would love to be there for the reopening if its possible?
Can I second that, would love to come down for a visit if at all possible. Excellent work anyway!
Posted: Thu Aug 01, 2013 5:24 pm
by tegfan railway
Progress looking good! I have another question, most of the track I have laid so far have been on standard concrete blocks with the track held in place using yellow plugs and screws. Having made the change for the next section to thermalite, I was wondering how have you fixed the line to the blocks in your layout?
Posted: Thu Aug 01, 2013 11:31 pm
by Resurgam05
Hi Tegfan,
We have used the same method of plugs and screws on the Thermalite.