An international forum for garden railway modellers in all scales and gauges. It is free to join and is funded through voluntary contributions by its members. Many thanks to all those who keep it going. http://gardenrails.org/forum/
I liked the chimney and the cab roof curvature better on version #1, but the deeper roof on the latest incarnation is good. I do think the roof is now too flat.
The first version has a jaunty look that I think is important for this little engine.
Posted: Thu Dec 22, 2016 3:39 pm
by Chris Cairns
I have the factory roof on my Lumber Jack, and a 3rd hand hinged roof on my Vincent. I find the Lumber Jack is very awkward to finely set the regulator under the roof, and on the Vincent I moved the regulator handle on the shaft so it operates over a range that is more readily accessible under the roof.
Putting a driver figure in the Vincent's cab I also found that interfered with the regulator operation.
Chris Cairns
Posted: Mon Jan 23, 2017 10:57 pm
by ferrysteam
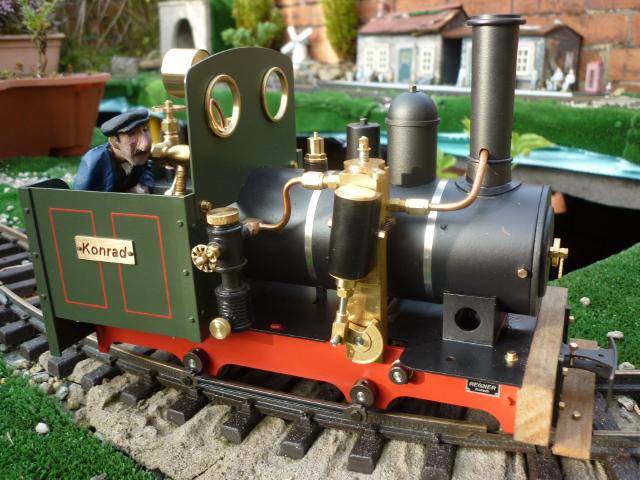
I got this Regner spec' plate for mine, it's easy to get at the controls but looks pretty good I think.....
Posted: Mon Jan 23, 2017 10:59 pm
by SimonWood
Yes - the spec plate already makes a huge difference to the appearance - an excellent enhancement in my view.
Posted: Wed Jan 25, 2017 12:54 pm
by Sir Clothem Cap
I'm not sure your driver is tall enough to see ahead but it looks great.
Posted: Wed Jan 25, 2017 7:36 pm
by ferrysteam
Sir Clothem Cap:122379 wrote:I'm not sure your driver is tall enough to see ahead but it looks great.
Thanks Bryan. I'm not a rivet counter.....
Posted: Wed Jan 25, 2017 7:54 pm
by tom_tom_go
I agree, version three is the best looking.
Re: A Kab for a Konrad
Posted: Sat Aug 18, 2018 4:36 pm
by SimonWood
Ok, I've been making quite slow progress with building my new cab, but I've been even slower in actually writing it up.
In the last 20 months or so (although only really doing anything during the winter months). I began cutting out the cab from brass, and fabricating some angle for the joins. Here's most of the pieces held together with tape:
IMG_1310.JPG (387.72 KiB) Viewed 12572 times
And here is the new footplate in place soldered to the lower half of the cab front:
P1210755.jpg (325.83 KiB) Viewed 12572 times
The footplate is held in place by the screws that go up into the gas tank, now moved to its new position in the bunker.
I decided to use Swift Sixteen's revolving spectacle plates so that determined the size the holes would need to be in the cab front. Here we are drilling out the holes (and by "we" I mean Tony Bird is doing the hard work while I take pictures).
IMG_1468.JPG (323.19 KiB) Viewed 12572 times
The following winter I started (inexpertly) soldering the bits of the cab together:
IMG_1301.JPG (358.51 KiB) Viewed 12572 times
The frames of the spectacle plates are soldered on inside the cab. Once painted (not a job I'm looking forward to) I will fit the spectacles and then glue on the front frames. I've also added Chuffed 2 Bits handrail knobs, and soldered beading down the cab sides. This whole upper part is designed to be removable, so we soldered bolts to the angle and the bottom of the cab sides and drilled holes through the footplate to take these. (I think I should be able to shorten the bolts.)
I glued the bunker pieces to the gas tank with araldite. There are some additional photos showing some of the details in this blog post.
While the cab was in progress, whenever I ran the Konrad I took everything apart and reverted to using the old cab, but last week I tried it out with the new cab and the gas tank in its new position. Here it is running at Cardiff MES:
Besides the spectacles, fitting the handrails, finding a new rear buffer beam and painting, I’ve also got some Swift Sixteen cab steps to fit. Oh and a water filler valve. And I must get a whistle. I’m also thinking of adding a servo in the cab to remote control the reverser (and experimenting with opening the ports on the cylinder to increase the chances of the loco self-starting). Still plenty to do!
Re: A Kab for a Konrad
Posted: Sat Aug 18, 2018 4:42 pm
by tom_tom_go
The new cab is looking great (you are lucky to have Tony Bird as a friend!)
Please don't use glue for any of the brass bits, you will regret it later. Why are you having to glue the front spectacle rims?
Re: A Kab for a Konrad
Posted: Sat Aug 18, 2018 4:48 pm
by SimonWood
tom_tom_go wrote: ↑Sat Aug 18, 2018 4:42 pm
The new cab is looking great (you are lucky to have Tony Bird as a friend!)
Please don't use glue for any of the brass bits, you will regret it later. Why are you having to glue the front spectacle rims?
Thanks, indeed I am!
I will glue the front spectacle rims because I will have painted the cab by the time I come to fix them. The instructions supplied offer gluing as one method of fixing, albeit with soldering preferred.
Re: A Kab for a Konrad
Posted: Sat Nov 10, 2018 5:07 pm
by Michael Saettler
The cab looks really great! In fact, the Konrad is a good base to make different looks. My Konrad got a cab from plywood because I have neither the knowledge nor the machines for doing it in metal.
Have a nice weekend
Michael
Re: A Kab for a Konrad
Posted: Sat Nov 10, 2018 5:41 pm
by tom_tom_go
That's quite the colour scheme, even when sober.
Re: A Kab for a Konrad
Posted: Sat Nov 10, 2018 5:52 pm
by Keith S
SimonWood wrote: ↑Sat Aug 18, 2018 4:48 pm
I will glue the front spectacle rims because I will have painted the cab by the time I come to fix them. The instructions supplied offer gluing as one method of fixing, albeit with soldering preferred.
Normally I would agree with Tom about the glue, however I have installed the Swift Sixteen spectacle kit on my RH "Billy" and I found it nearly impossible to solder correctly. I am of course far from the world's best solder-er, but I found it very frustrating.
The problem I had (I did the front or outside rings first) was that when I tried to solder the inside ones, the heat melted the solder on the outside ones. The brass is so thin that the heat warps them a little- not a problem if you were just soldering the one side, but the heat on the other side caused the front rings to spring free. I ended up just glue-ing the inside ones. Tom is right, it is less desireable, and I've had to re-glue one of them after knocking it free, but I can't work out any other way to do it.
As for painting, which I also loathe, if you're using enamel paint, try popping the just-sprayed cab into the oven on its lowest setting. The paint will harden in half an hour rather than the three days it will take without the oven.
Please say "hello" to Tony for me when you see him next. He was very kind at the 2017 show in Peterborough, what a nice man.
Re: A Kab for a Konrad
Posted: Sun Nov 11, 2018 9:00 am
by FWLR
Hi Keith,
What wattage iron did you use mate. You really need has low a wattage as you can have when soldering thin brass. I did some the other week and I used a high wattage and blew the brass away. so I then got my lowest iron out, about 30 watts and it did a better job. I also only tacked it first, then ran solder in-between them.
I hasten to add, I was only experimenting with soldering brass for the first time, but it did the job very well. so when I do get to start on a brass build, hopefully it will be okay. But only the more experienced brass builders can tell me that when I do a build and post the results.
Try it next time Keith.
Re: A Kab for a Konrad
Posted: Sun Nov 11, 2018 6:17 pm
by Keith S
I will try that. I can't remember what I was using, I think it might have been a butane pencil torch. The brass I used on the new spectacle plate is quite thick, so I thought I would need a lot of heat. I'm OK at soldering the big platework but this fiddly stuff with different thicknesses is more difficult. I burn myself a lot.
As it happens, I have a Swift Sixteen cab roof hatch to solder on, so I will try a low-wattage iron on that. Thanks for the advice!
Re: A Kab for a Konrad
Posted: Mon Nov 12, 2018 10:02 am
by FWLR
Hope it works for you Keith. Hopefully it will. The different thickness’s won’t be helping, but with a bit of patience and luck you should be soldering brass like a professional…….
Re: A Kab for a Konrad
Posted: Mon Nov 12, 2018 10:51 pm
by f.schulz
Hallo guys,
this is my Konrad:
He is fully RC whistle and steam regulator controlled. RC is completely on the loco, nothing is in the tender except dummi coals.
Loc and tender are regaugable 45/32mm.
Wooden cab is a very modified kit from "lasergang"
This for Your information.
Wishes
Frederic
Re: A Kab for a Konrad
Posted: Tue Nov 13, 2018 8:21 am
by FWLR
Unusual Frederic… I like it.
Re: A Kab for a Konrad
Posted: Tue Nov 13, 2018 1:47 pm
by SimonWood
Michael Saettler wrote: ↑Sat Nov 10, 2018 5:07 pm
The cab looks really great! In fact, the Konrad is a good base to make different looks. My Konrad got a cab from plywood because I have neither the knowledge nor the machines for doing it in metal.
Thanks! The wooden look suits the Konrad well. It's amazing how different cabs completely change the character of this splendid slow-runner.
Keith S wrote: ↑Sat Nov 10, 2018 5:52 pm
As for painting, which I also loathe, if you're using enamel paint, try popping the just-sprayed cab into the oven on its lowest setting. The paint will harden in half an hour rather than the three days it will take without the oven.
Please say "hello" to Tony for me when you see him next. He was very kind at the 2017 show in Peterborough, what a nice man.
Thanks, I'll do that. And I'll say "hello" to Tony, he is indeed a very nice man!
FWLR wrote: ↑Sun Nov 11, 2018 9:00 am
You really need has low a wattage as you can have when soldering thin brass. I did some the other week and I used a high wattage and blew the brass away. so I then got my lowest iron out, about 30 watts and it did a better job. I also only tacked it first, then ran solder in-between them.
This is useful to me (a bit of a soldering novice). Thanks Rod. So far I've done all my soldering on the cab using Tony's (rather hefty) blowtorch. I'm trying to remember why we thought it was better to glue it. Tom you're right about glue. One side of my bunker has already dropped off. With the spectacles what I thought I would do is paint the outer rims (which are fixed to the cab) and leave the inner rims (which rotate) in brass. One half of the outer rims are already fixed. So I've still got to sandwich the glass between the inner rims - and if I solder, not crack the glass, and then put them in place and fix the remaining outer rims. Again, if I solder, without cracking the glass. And somewhere along the way paint it - which I could either do first, or afterwards by masking the entire inner rotating spectacle.
I think I've explained that badly, but I'm not sure I'll do better if I try again.
Meanwhile I've not progressed much on these cosmetic details because I've been busy trying to put RC on the reverser - to do which, I've designed a linkage into the cab, and mounted a servo inside the cab (photos to follow).
f.schulz wrote: ↑Mon Nov 12, 2018 10:51 pm
this is my Konrad:
Excellent! Once again the wooden cab gives it a different character. I like all the details - especially the bell.
f.schulz wrote: ↑Mon Nov 12, 2018 10:51 pm
He is fully RC whistle and steam regulator controlled. RC is completely on the loco, nothing is in the tender except dummi coals.
Do you have any pics of where you have mounted the servos? I'd really like to get RC on a whistle if I can fit it in (and regulator would be nice).
Re: A Kab for a Konrad
Posted: Wed Nov 14, 2018 11:45 pm
by f.schulz
Hallo Simon,
where is this problem, there is enough place in and under the bottom of the cab.
Do a look into a 1:32 modell, there You have problems.
I have fotos but due to this SW I can not post them in this forum and I refuse to place it in any foreign cloud. Sorry!