Thanks Tony,
That might be another possibility.[/i]
Ol' Bill
-
Keith S
- Driver

- Posts: 1668
- Joined: Thu Feb 24, 2011 11:44 pm
- Location: Canada
If you feel like doing a bit of soldering, I might be able to send you the original cab front from my "Billy" if I haven't thrown it away. I cleaned my workbench last week and may have disposed of it as I couldn't think of any use for it, but on the other hand it might be in my drawer of bits. I can't check right now as I am in England but I will check when I get home if you like. If you do a full cab back with spectacles it might come in handy, as a pattern if nothing else. It still has the rings.
-
Big Jim
There has been progress of a sort with Ol' Bill.
I have never been happy with the cab steps on the R/H Billy so I decided to do something about it.
A few bits of scrap brass were dug out and cut to size, the angle was given a couple of presses in a rivet press
 20160913_132835 by bigjimiflash, on Flickr[/img]
The result took less than 10 mins and looks okay IMHO
 20160913_140414 by bigjimiflash, on Flickr
Soldered onto the bottom of the foot plate to see how they look before the old steps were cut away.
[/img] 20160913_141045 by bigjimiflash, on Flickr
I have never been happy with the cab steps on the R/H Billy so I decided to do something about it.
A few bits of scrap brass were dug out and cut to size, the angle was given a couple of presses in a rivet press
20160913_132835 by bigjimiflash, on Flickr[/img]The result took less than 10 mins and looks okay IMHO
20160913_140414 by bigjimiflash, on FlickrSoldered onto the bottom of the foot plate to see how they look before the old steps were cut away.
[/img]
20160913_141045 by bigjimiflash, on Flickr-
Big Jim
Steps now fitted and old ones removed.
 20160914_122545 by bigjimiflash, on Flickr
I decided that the front buffer beam needed changing to a small one, I know that you can buy one but after all it is only a small piece of flat sheet. So one was cut to size and rivet detail added. I suppose I will have to make one up for the rear now.
 20160914_133529 by bigjimiflash, on Flickr
The set screws will be replaced with hex headed ones when I can find them.
20160914_122545 by bigjimiflash, on FlickrI decided that the front buffer beam needed changing to a small one, I know that you can buy one but after all it is only a small piece of flat sheet. So one was cut to size and rivet detail added. I suppose I will have to make one up for the rear now.
20160914_133529 by bigjimiflash, on FlickrThe set screws will be replaced with hex headed ones when I can find them.
-
tom_tom_go
- Driver
- Posts: 4824
- Joined: Wed Feb 23, 2011 3:08 am
- Location: Kent, UK
- Contact:
-
Big Jim
More work has been carried out Today. An overlay for the rear buffer beam has been made and fitted and the work to fit a coal bunker on the rear has commenced.
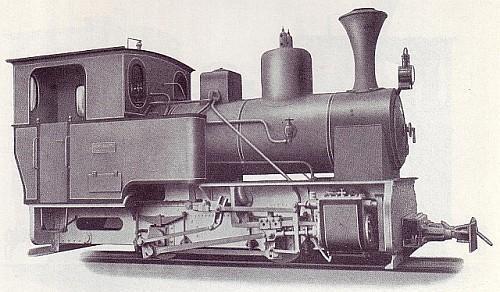
Now I am understand that Billy is vaguely O&K or Barclay in design and the high placed boiler would suggest a well tank. This would mean the side tanks are actually coal bunkers.
As I have now fitted a rear bunker do I fit tank fillers to the side 'tanks' or do I fit an approximation of a well tank between the frames and refit the funny R/H cast plates back again?
Anyone got any suggestions?
 20160916_155934 by bigjimiflash, on Flickr
 20160916_160005 by bigjimiflash, on Flickr
Now I am understand that Billy is vaguely O&K or Barclay in design and the high placed boiler would suggest a well tank. This would mean the side tanks are actually coal bunkers.
As I have now fitted a rear bunker do I fit tank fillers to the side 'tanks' or do I fit an approximation of a well tank between the frames and refit the funny R/H cast plates back again?
Anyone got any suggestions?
20160916_155934 by bigjimiflash, on Flickr20160916_160005 by bigjimiflash, on Flickr
-
Chris Cairns

- Driver
- Posts: 2372
- Joined: Mon Oct 29, 2007 7:25 pm
- Location: Glasgow, Scotland
Hello Jim,
Roundhouse say their Billy is based on a design by Arthur Koppel, but he never built locomotives, so it is likely based on the Orenstein & Koppel 'Contractors Loco' 0-4-0WT (probably the 30 hp version) which allegedly with inadvertent access to intellectual rights during WW1 was copied by Andrew Barclay to become their E Class narrow gauge locomotive.
The only AB E Class loco I can find with the bunkers/side tanks fitted is No.6 Douglas at Talyllyn, which is referred to as a modified E Class with bunkers. Most O & K 30 hp locos I've found that have these extensions are bunkers, yet No.6 'Eighau' at Bredgar has side tanks there. So it can be either. My Billy will be running with a tender so I'm sticking with the side tanks as modelled.
http://www.bwlr.co.uk/locos.php-flag=no6.html
http://www.rmweb.co.uk/community/index. ... sfer-shed/
http://www.chm.bris.ac.uk/org/murray/ok11206.htm
I like your cab steps as the Roundhouse ones are very vunerable to bending (similar problem with the Katie ones), although as you can see Roundhouse have modelled them on the actual O & K/AB basic cab step.
I was originally going to fit full length cab handrails, but again the short cab handrails as modelled by Roundhouse are actually correct for the actual O & K/AB loco.
My Billy has been somewhat sidelined this year, and its previous owner is still patiently waiting for its conversion to a Riverdale Elke. I hope to get the bodywork repaired & painted before it gets too damp this year, then briefly run it under Radio Control, before tackling the Elke conversion.
Look forward to seeing how "Ol' Bill" develops.
Chris Cairns
Roundhouse say their Billy is based on a design by Arthur Koppel, but he never built locomotives, so it is likely based on the Orenstein & Koppel 'Contractors Loco' 0-4-0WT (probably the 30 hp version) which allegedly with inadvertent access to intellectual rights during WW1 was copied by Andrew Barclay to become their E Class narrow gauge locomotive.
The only AB E Class loco I can find with the bunkers/side tanks fitted is No.6 Douglas at Talyllyn, which is referred to as a modified E Class with bunkers. Most O & K 30 hp locos I've found that have these extensions are bunkers, yet No.6 'Eighau' at Bredgar has side tanks there. So it can be either. My Billy will be running with a tender so I'm sticking with the side tanks as modelled.
http://www.bwlr.co.uk/locos.php-flag=no6.html
http://www.rmweb.co.uk/community/index. ... sfer-shed/
http://www.chm.bris.ac.uk/org/murray/ok11206.htm
I like your cab steps as the Roundhouse ones are very vunerable to bending (similar problem with the Katie ones), although as you can see Roundhouse have modelled them on the actual O & K/AB basic cab step.
I was originally going to fit full length cab handrails, but again the short cab handrails as modelled by Roundhouse are actually correct for the actual O & K/AB loco.
My Billy has been somewhat sidelined this year, and its previous owner is still patiently waiting for its conversion to a Riverdale Elke. I hope to get the bodywork repaired & painted before it gets too damp this year, then briefly run it under Radio Control, before tackling the Elke conversion.
Look forward to seeing how "Ol' Bill" develops.
Chris Cairns
-
Big Jim
I had looked at creating a representation of the well tanks between the frames but the construction of the engine seems to preclude it.
I may have another look to see what is possible.
I want to give the impression of an engine at the end of its working life that may have been modified and 'repaired' locally and on the cheap, probably using bits from other locos.
I may have another look to see what is possible.
I want to give the impression of an engine at the end of its working life that may have been modified and 'repaired' locally and on the cheap, probably using bits from other locos.
-
Big Jim

-
Keith S
- Driver
- Posts: 1668
- Joined: Thu Feb 24, 2011 11:44 pm
- Location: Canada
There's an O&K engine that had outside frames and a well-tank. It's quite a bit larger than the "contractor's loco" but looks nearly identical to a "Billy". You could make your "Billy" look quite a bit like this one by putting a plate over the frames so it looked from above like a boxed-in tank. You'd just need little cut-outs for the wheels, or make dyes on the plate so it stands a little proud of the frames.
With the coal boxes,or tanks, or whatever they are, if you want them to look like coal bunkers, add some coal "greedy" things. Someone makes them for "Lady Anne". You know, those little baskets that go on top of the bunkers.
With the coal boxes,or tanks, or whatever they are, if you want them to look like coal bunkers, add some coal "greedy" things. Someone makes them for "Lady Anne". You know, those little baskets that go on top of the bunkers.
-
Chris Cairns
- Driver
- Posts: 2372
- Joined: Mon Oct 29, 2007 7:25 pm
- Location: Glasgow, Scotland
Sadly the damp weather arrived rather early this year so I never got to paint the cabs of my Billy (& Katie). I have however finally managed to get the right size servos for Radio Control, but now need to work out how much of the Riverdale Elke R/C fittings I can use to save time with the R/C conversion before the subsequent Elke conversion.
Look forward to seeing an enhanced Ol' Bill in due course.
Chris Cairns
Look forward to seeing an enhanced Ol' Bill in due course.
Chris Cairns
-
Big Jim
-
Big Jim
Just steamed up to set the rc gear. Ran okay forwards but lumpy backwards. Think the valve timing may be out. Although I have not touched the valve gear and it ran okay last time.
The throw on the servo was nowhere near enough to open and shut the regulator. Whether the timing is out so far it needs more steam I don't know yet. Although it is a rc regulator and I did keep the pressure at around 25 psi.
I did notice that there were no springs on the pivots for what roundhouse charmingly call the penguin bracket. This may account for some of the knocking noises.
The throw on the servo was nowhere near enough to open and shut the regulator. Whether the timing is out so far it needs more steam I don't know yet. Although it is a rc regulator and I did keep the pressure at around 25 psi.
I did notice that there were no springs on the pivots for what roundhouse charmingly call the penguin bracket. This may account for some of the knocking noises.
-
Chris Cairns
- Driver
- Posts: 2372
- Joined: Mon Oct 29, 2007 7:25 pm
- Location: Glasgow, Scotland
Double check you have the reverser servo & linkage set up properly, particularly the neutral & end points. I watched 3 different Roundhouse locos running really jerky & lumpy this year. In each case they were radio controlled and to compensate for a regulator that would not shut off the steam they were being driven by using partial reverser. Similarly a member brought his manual kit built Billy (similar vintage as Ol' Bill) to the winter meeting this month with similar running problems to Ol' Bill. Turned out the push rod had slipped on the reverser lever arm & the crank pin spring had worked loose.
Chris Cairns
My 2nd hand kit built radio controlled Katie runs rather tamely. On investigation I found it has a manual regulator fitted (Roundhouse do state that externally the manual & radio control regulators look the same). As it is now controlled by a DX6i transmitter I've adjusted the throttle channel servo throw to 125% which seems to work OK on most layouts. I'm in the process of preparing to fit R/C to my kit built Billy and on opening the sealed 2004 R/C kit I've found it has also been supplied with a manual regulator - D'oh!Big Jim wrote:Although it is a rc regulator
Chris Cairns
-
Palmerston
- Trainee Fireman

- Posts: 223
- Joined: Mon Feb 02, 2009 5:56 pm
- Location: Southest of The Netherlands
Indeed, ive just set up my Fathers kit build Billy. This must be the 12th loco or so ive RC-ed. Not al mine!
I keep telling every one to use a programmable transmitter (Spektrum DX6i and 7 and LRP for those pistol steering 2 channel) does make setup and closing of the regulator so much easier. Spektrum receivers are very cheap 2H. Do not save 30 pound for a cheaper set. Spektrum also has the benefit to operate with Deltang RC (for a battery loco)
If adjusting the linkage often the bolt resides in the dipple in the rod caused by previous setup so in the end there is no adjusting. Then adjust the endpoint on the Tx with a few %.
On the reverser set up linkage for equal throw back and fort. The Dx6i also has a servo monitor for observing midpoint-center and end points.
The Roundhouse RC-kit manual also states : "Note that the radius rod should not travel the full length of the expansion link, but should stop a small distance from either end" I noticed on a VOR with non programmable servo throw to run jurky due to fully travel in the link.
I keep telling every one to use a programmable transmitter (Spektrum DX6i and 7 and LRP for those pistol steering 2 channel) does make setup and closing of the regulator so much easier. Spektrum receivers are very cheap 2H. Do not save 30 pound for a cheaper set. Spektrum also has the benefit to operate with Deltang RC (for a battery loco)
If adjusting the linkage often the bolt resides in the dipple in the rod caused by previous setup so in the end there is no adjusting. Then adjust the endpoint on the Tx with a few %.
On the reverser set up linkage for equal throw back and fort. The Dx6i also has a servo monitor for observing midpoint-center and end points.
The Roundhouse RC-kit manual also states : "Note that the radius rod should not travel the full length of the expansion link, but should stop a small distance from either end" I noticed on a VOR with non programmable servo throw to run jurky due to fully travel in the link.
Last edited by Palmerston on Sat Dec 31, 2016 3:18 pm, edited 1 time in total.
Live steam on 45 & 184mm, battery 45mm only.
-
Big Jim
Who is online
Users browsing this forum: No registered users and 54 guests