(WH)WHR Rolling Stock
-
Peter Butler

- Driver

- Posts: 5304
- Joined: Sun Sep 09, 2012 10:33 pm
- Location: West Wales
Re: (WH)WHR Rolling Stock
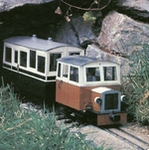
The exterior rusting is so realistic, I am really impressed with the effect you have created there. I'm sure you have explained the process before, but a recap would be most appreciated.
The best things in life are free.... so why am I doing this?


Re: (WH)WHR Rolling Stock
As others have said, really excellent looking rust!
Personally. I'd be reluctant to load it with too much coal. It looks like the base and the sides will very soon part company .....
Rik
Personally. I'd be reluctant to load it with too much coal. It looks like the base and the sides will very soon part company .....
Rik

Re: (WH)WHR Rolling Stock
I can only agree with what's already been said, great job on the weathering. Wondering if a piece of cotton thread pulled between the axle box and wheel would ease out anything stuck there, particularly if it's dry.
Grant.
Grant.
Re: (WH)WHR Rolling Stock
Nice that Andrew 
ROD
Life is so easy when I run my trains.


https://gardenrails.org/forum/viewtopic ... 41&t=11364
https://www.youtube.com/@fairywoodlightrailway
Life is so easy when I run my trains.


https://gardenrails.org/forum/viewtopic ... 41&t=11364
https://www.youtube.com/@fairywoodlightrailway

Re: (WH)WHR Rolling Stock
Thanks for the kind comments, they're very much appreciated.
I think I have waffled on about rusting techniques before, but this thread now runs to over 50 pages and spans a decade, so I wouldn't expect to read back through it!
Essentially, they're a synthesis of techniques borrowed from others (including some on here), that I've evolved to meet my own needs.
The basic ingredient is iron powder, seeming sold mostly for science experiments in schools. Ideally, you want nice fine stuff - I experimented with courser filings and was disappointed with the result.
I paint (and letter) the body, let it dry, then apply more paint just where I want the rust to be - looking at pictures of the real thing is best, but I tend to go for where water would collect or paint would be damaged.
While that paint's still wet, I apply the powder (pretty liberally) from an old Lidl container that originally dispensed peppercorns, using the same technique that Blue Peter presenters use to apply glitter to cardboard boxes, over a sheet of newspaper so that any excess that doesn't stick can be poured back into the pot.
Once that's dry, and where it seems appropriate, I use the body colour to paint over the powder for a couple of millimetres around the edge of each rust patch - the idea is that once the powder turns to rust, it'll look like it's eating away beneath the paint too. It also helps soften the edges of the rust patches - if you look closely, some of mine end a little abruptly, which doesn't look right. It's possible I need to extend those "transition zones", maybe up to say 5mm in places.
After all of that, it's time to "activate" the rust. I've used two techniques, one involving vinegar, the other copper suplhate solution. Again, the latter is sold for schools, but send me a message if you'd like some, a little goes a very long way, and I seem to have a lifetime's worth! Either way, you can spray it on with an old spray bottle or apply with a brush.
I've no idea what the chemistry behind it is, but my experience is that vinegar produces older looking black/brown rust, whereas copper sulphate makes very new looking bright orange rust. I've not tried it (I should), but I'm guessing that different concentrates of the the solution would yield different results. Vinegar takes longer to act, and can be sped up a little by leaving the model in a steamy bathroom or similar, and the dark brown rust can be enlivened a little by rubbing with wire wool.
I think I'm going to stick with copper sulphate in future - it's quick and reliable, and although the rust is rather too startlingly orange for most applications (again, experimentation with concentration is called for...), that can be toned down - that's the next stage...
Next, it's on to general weathering. I usually start with a wash of dilute black or dark grey paint, slightly more concentrated for a coal wagon. I use acrylics for painting wagons, so add a drop of washing up liquid to help it get into the nooks and crannies. Then I wipe it off again with a down (ie rain)-ward motion of a dry cloth - it remains in the aforementioned crannies. Then, I add a gunky brown wash to the lower bits of the wagon, wiping upwards to represent dirt splashed up by rain, or from the wheels. Those washes will permeate the rust (whether you want them to or not, to an extent!), toning down the colour, and this can be adapted to suit your requirements.
I generally replicate less established rust (just a general rusty patina) by dry brushing, again downwards, using a palette of orange and brown acrylics. This looks especially good around rivet detail etc, although it occasionally, and annoyingly, it dislodges them! Where I've got a patch of "real" rust, the same technique can be used to represent rain streaking - I think that went pretty well on the coal wagon. I'm quite careful to mix a good approximation of the colour of the patch, which then gets a little more orangey as it runs down the wagon - that seems to be how the real thing looks.
And that's it. Practice makes perfect - I'm a long way from there, but I'm getting better!
Cheers,
Andrew.
PS I'll try to illustrate the above with pictures some time...
-
Peter Butler
- Driver
- Posts: 5304
- Joined: Sun Sep 09, 2012 10:33 pm
- Location: West Wales
Re: (WH)WHR Rolling Stock
Absolutely wonderful Andrew, excellent description and superb results! I will definitely give your method a try now all is made clear.
I have just ordered iron powder, which I hope is the correct grade (Ultra fine), and will now try to source copper sulphate solution.
Many thanks for your time.
I have just ordered iron powder, which I hope is the correct grade (Ultra fine), and will now try to source copper sulphate solution.
Many thanks for your time.
The best things in life are free.... so why am I doing this?
Re: (WH)WHR Rolling Stock
Thats pretty good Andrew,  ...no it's an excellent post.
Seems I like to say that twice...
...no it's an excellent post. Seems I like to say that twice...
ROD
Life is so easy when I run my trains.
https://gardenrails.org/forum/viewtopic ... 41&t=11364
https://www.youtube.com/@fairywoodlightrailway
Life is so easy when I run my trains.
https://gardenrails.org/forum/viewtopic ... 41&t=11364
https://www.youtube.com/@fairywoodlightrailway


Re: (WH)WHR Rolling Stock
Good grief, that is incredible. Absolutely stunning and highly realistic.
I was going to ask about the rusting technique but scrolling down I've seen it's been asked, and answered. Definitely going to give your whole approach a try!
I was going to ask about the rusting technique but scrolling down I've seen it's been asked, and answered. Definitely going to give your whole approach a try!
Re: (WH)WHR Rolling Stock
Thanks Simon!
To give credit where it's due, much of the rusting technique, particularly the use of Copper Sulphate, is derived from the Pen-y-Bont thread: https://gardenrails.org/forum/viewtopic ... e&start=30
Cheers,
Andrew.
To give credit where it's due, much of the rusting technique, particularly the use of Copper Sulphate, is derived from the Pen-y-Bont thread: https://gardenrails.org/forum/viewtopic ... e&start=30
Cheers,
Andrew.
Re: (WH)WHR Rolling Stock
Back before I was distracted by the coal truck, I was distracted by an "H Jones Engineering" kit for the Ffestiniog van currently numbered 99, which was originally 116.
I've built the kit into what I hope is the van's 20s/30s guise, in the process embellishing it with individual plank overlays and rivets, swapping some of the strapping for chunkier alternatives, and adding some extra brake detail.
Here it is posing for its official photograph, and then going for a quick test run...
I'm thinking a "Christmas Mail" train featuring a variety of vans might be fun - watch this space!
Cheers,
Andrew.
I've built the kit into what I hope is the van's 20s/30s guise, in the process embellishing it with individual plank overlays and rivets, swapping some of the strapping for chunkier alternatives, and adding some extra brake detail.
Here it is posing for its official photograph, and then going for a quick test run...
- Van 116 test A.jpg (297.24 KiB) Viewed 3452 times
- Van 116 test B.jpg (351.18 KiB) Viewed 3452 times
- Van 116 test D.jpg (438.73 KiB) Viewed 3452 times
- Van 116 test E.jpg (383.77 KiB) Viewed 3452 times
I'm thinking a "Christmas Mail" train featuring a variety of vans might be fun - watch this space!
Cheers,
Andrew.
Re: (WH)WHR Rolling Stock
Very very nice that van is Andrew. 
A Christmas Mail train would be an excellent idea, for which I think you are doing secretly
A Christmas Mail train would be an excellent idea, for which I think you are doing secretly
ROD
Life is so easy when I run my trains.
https://gardenrails.org/forum/viewtopic ... 41&t=11364
https://www.youtube.com/@fairywoodlightrailway
Life is so easy when I run my trains.
https://gardenrails.org/forum/viewtopic ... 41&t=11364
https://www.youtube.com/@fairywoodlightrailway
Re: (WH)WHR Rolling Stock
I like the subtle weathering
Rik
Rik
Re: (WH)WHR Rolling Stock
Absolutely agree the weather is brilliant. Stunning job.
Re: (WH)WHR Rolling Stock
Famous last words, of course, but I thought I'd try to squeeze in just a quick little project before Christmas.
Inspired by JMORG of this forum, indeed by his words on this very thread, I'm having a go at using a couple of Lineside Hut slate wagon kits to recreate a pair of the NWNGR's wooden slate wagons, as seen in this builders photo (courtesy of Gloucestershire Record Office, D4791/16/1):
At first glance, it's pretty similar to the Ffestiniog's wooden slate wagons, so my first attempt at a model used the classic Binnie kit. The problem is it's clearly too narrow, so Take Two involves Lineside Hut's wider wagons intended to run on 45mm track, as suggested by JMORG. LH kindly made me a special version of the kit, with an extra chassis piece, so I can use larger wheels of the correct pattern.
So far, I've made up the kits, with various minor modifications along the way, including biro inner tube slices on the uprights to represent the "bobbins", extra planks along the sides, and Binnie axleboxes. I've pinched the distinctive brake handle from the original Binnie version, which will revert almost to its original FR guise as art of the project.
Before I undertake lettering and weathering, I thought I'd temporarily put it together and try a quick recreation of the works photo - and here it is:
You can clearly tell that it's an approximation rather than an accurate model but it (and its unbraked twin) are turning into quite attractive models, I think...
Cheers all,
Andrew
Inspired by JMORG of this forum, indeed by his words on this very thread, I'm having a go at using a couple of Lineside Hut slate wagon kits to recreate a pair of the NWNGR's wooden slate wagons, as seen in this builders photo (courtesy of Gloucestershire Record Office, D4791/16/1):
- Gloucester slate wagon A.png (160.07 KiB) Viewed 4390 times
At first glance, it's pretty similar to the Ffestiniog's wooden slate wagons, so my first attempt at a model used the classic Binnie kit. The problem is it's clearly too narrow, so Take Two involves Lineside Hut's wider wagons intended to run on 45mm track, as suggested by JMORG. LH kindly made me a special version of the kit, with an extra chassis piece, so I can use larger wheels of the correct pattern.
So far, I've made up the kits, with various minor modifications along the way, including biro inner tube slices on the uprights to represent the "bobbins", extra planks along the sides, and Binnie axleboxes. I've pinched the distinctive brake handle from the original Binnie version, which will revert almost to its original FR guise as art of the project.
Before I undertake lettering and weathering, I thought I'd temporarily put it together and try a quick recreation of the works photo - and here it is:
- Gloucester slate wagon B (2).jpg (133.21 KiB) Viewed 4390 times
You can clearly tell that it's an approximation rather than an accurate model but it (and its unbraked twin) are turning into quite attractive models, I think...
Cheers all,
Andrew

Re: (WH)WHR Rolling Stock
Looks very good Andrew. As you say "approximation", but the curved brake plate should have 2 rows of holes and a man of your perspicasity could surely knock one up from styrene?
Philip
Re: (WH)WHR Rolling Stock
Ah, naturally I would have loved to make myself go cross-eyed doing that, but that's an optical illusion - the second row's on the rearmost plate. Phew!
Re: (WH)WHR Rolling Stock
That is very good Andrew. You have shown it to be the real interpretation of the Ffestiniog's wagon.
You are really good at this aren't you.
You are really good at this aren't you.
ROD
Life is so easy when I run my trains.
https://gardenrails.org/forum/viewtopic ... 41&t=11364
https://www.youtube.com/@fairywoodlightrailway
Life is so easy when I run my trains.
https://gardenrails.org/forum/viewtopic ... 41&t=11364
https://www.youtube.com/@fairywoodlightrailway
-
Peter Butler
- Driver
- Posts: 5304
- Joined: Sun Sep 09, 2012 10:33 pm
- Location: West Wales
Re: (WH)WHR Rolling Stock
Very nice work Andrew, a fine representation.
Question..... on the 12" scale wagon, with 'bobbins' on the posts, how would the laths be slotted on and what then keeps them in place?
Question..... on the 12" scale wagon, with 'bobbins' on the posts, how would the laths be slotted on and what then keeps them in place?
The best things in life are free.... so why am I doing this?
Re: (WH)WHR Rolling Stock
I don't actually know, but there are nuts on the top lath, so I think there's probably a threaded rod that runs all the way through, with the bobbins acting as spacers?Peter Butler wrote: ↑Fri Dec 09, 2022 9:09 am Question..... on the 12" scale wagon, with 'bobbins' on the posts, how would the laths be slotted on and what then keeps them in place?
Who is online
Users browsing this forum: No registered users and 0 guests